Fruits with a simple pencil. More useful materials. Strawberries - step-by-step drawing of fruits with children
Not only an adult, but also a child can easily cope with such a task as drawing fruits. After all, fruits, if you compare them, for example, with animals, have an extremely simple structure. The easiest way to draw fruits is from life. But, if there are no pears, apples, or any other fruits at home, then you can use a high-quality and as clear photograph as possible. Beautiful still lifes with all kinds of fruits can be seen on the canvases of many famous painters.
Before drawing fruits, it is recommended to make sure that the following items are nearby:
1. A set of multi-colored pencils;
2. Pencil. Both mechanical and sharply sharpened simple ones will do;
3. Liner. It is better to use a black liner;
4. A piece of paper;
5. Rubber or kneading.
It will be much easier to learn how to draw fruit if you divide this whole process into several steps:
1. Draw a horizontal line, thus marking the edge of the table on which the fruit lies. Then, without pressing too hard on the pencil, draw the outlines of each fruit, making a composition out of them. Thus, outline the contours of a banana, apple, pear, plum, and also cherry;

2. Draw the fruit with a pencil, paying more attention to detail;

3. Now you know how to draw fruits with a pencil step by step. But in order for the picture to turn out colorful and juicy, it must be colored. Using a liner, carefully outline the initial sketch of the fruit;

4. Use an eraser to remove all traces of the sketch;

5. Now that you have learned how to quickly and easily draw fruits with a pencil, you can color them. Thanks to this, the drawing will look more realistic and interesting. First, color the apple, using brown pencils to color the stem, as well as yellow and red-burgundy pencils to shade the fruit itself;

6. Paint the cherry branches in brown tones. Color the cherries themselves with red and burgundy pencils;

7. Color the banana with shades of yellow and brown;

8. To color the pear, choose pencils that have yellow and green colors. And paint its stalk with pencils gently
How to draw fruits?
Drawing not only develops fine motor skills hands, instills a sense of beauty, and also calms the nerves, brings peace and concentration. Below we will give general tips on how to draw fruits and what sites you can find good ones on step by step instructions and videos, by watching which you can easily learn how to draw still lifes. Still life - a drawing (picture) depicting a group inanimate objects or one item. The word came to us from French"nature morte", which translates as dead nature. Can be used as nature various items: household utensils, vegetables, fruits, flowers.
Drawing a still life
- First you need to create a composition. Decide whether it will be one item or several, take care of the background. It is advisable to use plain fabrics or a wall.
- Now we determine the center of the composition on paper and make sketches with a pencil. How to draw fruits with a pencil? We start with the simplest shapes: an apple - a circle or an oval, a pear - two circles, grapes - several balls, etc. It is worth paying close attention to ensure that proportionality is maintained and that everything is in its place.
- Now we fit the fruits into the shapes. These lines should already be clearer.
- We remove the auxiliary lines and clarify the contours of the fruit, draw small details.
- Shadows are applied with a pencil, creating the correct tone layout. Carefully monitor the application of shading; darker areas are darkened first, then those that are lighter. This is done with a well-sharpened pencil, layer by layer.
- On last stage We check and clarify all the details, paying special attention to areas of light and shadow. After this, you can start coloring if you paint a still life with watercolors or other paints.


The following sites show very well how to draw a still life with fruit.
Many people involved in painting are interested in the question of how to draw fruits using a simple pencil. If you are one of such people, then this publication will help you understand this topic. Let's look at all the steps using the example of drawing a still life. To work, you need to prepare a pencil, a sheet of paper, an eraser, an apple and bananas. Don't forget that the lighting should be good, as it plays an important role in conveying the color and light tones of the image.
How to draw fruit. Proportions and location of the drawing
So, we have album sheet in the most convenient way and get to work.
1. Using light strokes, sketch out the boundaries in which the drawing will be located. It must be located in the center of the sheet and not move.
2. Take the average size of the fruits that we want to draw and see how they will be placed horizontally and vertically on the paper. In order to maintain all the proportions, it is necessary to place the objects at arm's length and measure their width and height, for which it is enough to use a pencil and your thumb.
3. Set the boundaries of the apple, which should be located behind the bananas, and not on the same line with them, then the drawing will be more believable.
4. The next step of the algorithm on how to draw fruit is to determine how much the apple should protrude from the bananas. For example, this distance could be a quarter of an apple. In this case, we divide the markings of the fruit into four parts and mark the same distance from its upper border to the beginning of drawing bananas.
5. Determine the height of the banana relative to the apple. In the example under consideration, it is equal to two apples. We mark all the necessary boundaries.
step by step. Drawing an apple

1. This fruit closely resembles a circle. Therefore, we must draw it within the boundaries located.
2. Decide on the location of the lighting. Those areas of the fruit that are closer to the light will be lighter. Next comes an area a little darker (midtone), then its own shadow, reflex (lighting from the surface on which the apple lies) and the falling shadow. Celebrating light movements semicircle these areas.
3. Shade areas of the fruit with a pencil and leave a white highlight.
4. Paint over the reflex. It should be lighter than the shadow, but darker than the midtone. Let's do the shading.
5. We complete the shape of the apple, since it cannot be absolutely round.
6. Now we add a knot to it, a small hole around it and leaves. The apple is ready!
How to draw fruit. We pretend to be bananas

1. Draw an arcuate line bending at the bottom.
2. Draw a second line, located below the first and tapering at the end. The design should resemble a month lying horizontally.
4. Add another line, located between the two drawn ones, closer to the top, since the banana does not have a strict oval shape.
6. Now you should shade the drawing, taking into account the lighting.
If necessary, draw other details: the table surface, a napkin or something else. Now you know how to draw fruits with a pencil. However, you can, following the principle described above, paint them with watercolors, then you will get a more believable drawing.
How to depict fruits in watercolors?
How to paint fruits or vegetables in watercolor so that your mouth waters? So that painted fruits are as fresh and juicy as natural ones?
How to convey the volume and texture of the fruit, and at the same time not “dry out” the watercolor?
These questions will be answered step-by-step master class drawing lemon in watercolor!
Basic principles on how to paint fruits in watercolor:
- The juiciness and freshness of fruits are best conveyed by the a la prima technique, watercolor painting in one layer.
One coat of paint allows maximum penetration of light rays. Light passing through a layer of paint is reflected from the surface of the paper and returns the purest color wave to us.
- In the case of multi-layer painting follows:
- layer from light to dark
- use transparent rather than opaque pigments
- use purer source colors to achieve complex shades
The principle of multilayer writing is based on optical color mixing. That is why you should alternate layers correctly so that they do not cloud the previous ones or reduce the transparency of the final watercolor layer.
More information about correct selection see colorful pigments in watercolor here:
Perhaps it is better to illustrate these principles using the example of a finished sketch. Come on, I'll show you how to paint fruits in watercolor step by step.
We draw a sketch of a lemon step by step.
So, here it is, my vitamin nature. The more I watch, the more my mouth waters. 🙂 I’ll try to preserve this feeling of lemon juiciness in the sketch.

Stage I. Study of a whole lemon fruit.
- I'm starting to draw a lemon from its illuminated part.
Here its color is as bright and clear as possible. I use a mixture of lemon yellow and cadmium yellow.
In the most convex part of the lemon we can see highlights - small light areas on the tubercles of the peel. They must be shown in order to believably convey the texture of the surface of the lemon.
For this I use the dry brush technique. 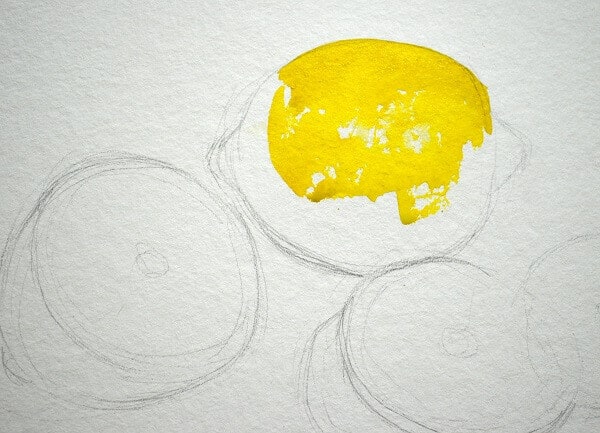
2. At the bottom of the lemon there is an area of light reflected from the table surface, reflex. I paint this place with a pale blue tint.
3. Darkening will complete the creation of the volume of the lemon. own shadow.
To obtain a shade of shadow, I mix cadmium yellow with natural umber.
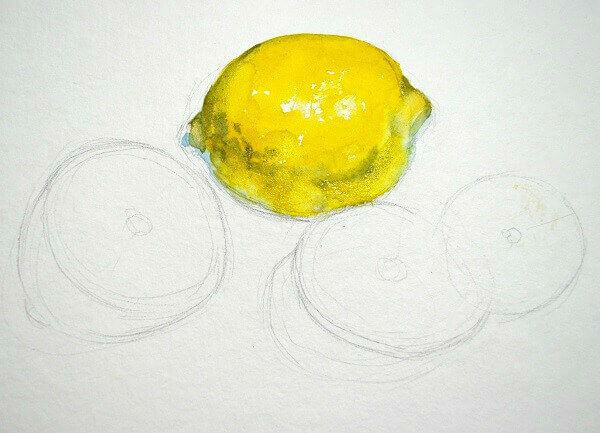
I paint the shadow immediately, before the edges of the illuminated part and the reflex dry out. This ensures the color flows smoothly into the color.
At the border of my own shadow I emphasize the small pimples of the lemon peel.
Thus, to convey texture, I use two tricks:
- gaps on the convex part in the light
- unevenness of the border at the turn of light and shadow
4. Falling shadow from lemon completes its volume.

To paint the shadow I use a mixture of yellow and purple. I fill with a predominance of one or another color. This helps convey the transparency of the falling shadow and connects the lemon to the table surface.
5. Since the falling shadow has the same color everywhere, at the same time I paint the shadow of the lemon slices: 
As you can see, it takes very little effort to draw a whole lemon fruit. The a la prima technique is quite suitable for this. Especially if this fruit is not the main object of the composition, and I do not need its detailed elaboration.
But with lemon slices there will be more work. The juicy pulp, its shine, the fibers - all this requires more careful work, which means multi-layer painting.
Start painting with watercolors today!
Master the basics of watercolor painting with this popular course
“Taming Watercolor”
Stage II. Image of lemon slices
1. I prescribe lateral surface half a lemon in the same way as described above.
2. I begin to depict a slice of the fruit.
I select several shades of yellow, from pure to a mixture with umber, and draw radially arranged pulp fibers. At the same time I leave white paper in places of glare and jumpers: 

3. Here and there I introduce even more shades into the moist environment of the laid spots. 
I leave this layer to dry.
More useful materials:
4. You can write slices and in another way.
For example, on these lemon rings, I first completely painted the cut with a pale yellow tint of the illuminated part of the pulp. Wherein. again, it left gaps of glare. 
5. When this large light spot dries, I give radial strokes with darker shades: 
These strokes are quite large. I leave them to dry so I can share them later.
6. In the meantime, you can touch a little background.
Using a very pale shade of gray, in wide washes, I fill in the background around the lemons.
At the same time, I touch the light areas of the zest on the cuts. 
I have prepared three simple still life, selecting objects so that they complement each other in color and shape.
My goal is to show the taste of these fruits and vegetables. I often remember the words of my high school art teacher: “You will know that you have succeeded in painting food when you want to eat what is depicted in your painting.”
I think it's fast and expressive technique Painting with bright colors is an ideal way to achieve this goal and to convey the freshness and juiciness of the product.
Let's start learning how to draw fruits and vegetables so that you want to eat them!
Here's what to remember during the process:
- It should be fast and fun;
- The brush should be dipped in a solution of paint and water, but not too watery;
- Let the colors flow and mix with each other. Don't fix these priceless accidents.
- Each new paint must be applied after the previous one has dried. This is where a hairdryer comes in handy - but be careful not to blow off any paint!
- The layers must be transparent so that the painting remains light;
- The thinner the layers, the fresher the painting looks;
- Don't try too hard, keep your brush strokes simple and relaxed;
- To make a stroke, rest the brush completely on the paper, this is better than using just the tip.
Materials:
- Two soft round brushes, one slightly larger, one slightly smaller.
Colors:
- Cadmium red
- Cadmium orange
- Cadmium yellow
- Yellow Ochre
- Cobalt blue(Cobalt blue)
- Ultramarine
- Carmine Permanent
- Grass Green (Sap Green)
- Viridian green
Broccoli and tomato
Step 1

I started painting the broccoli with a light shade of Sap Green and a touch of Cadmium yellow. For the tomato, I decided to use a concentrated solution of one color. I apply Cadmium red on top, leaving dry areas for highlights. When finishing painting the tomato, I added a little Cadmium orange.
Notice that the bottom of the tomato is slightly lighter than the center because it reflects the white surface.
While the broccoli and tomato were still wet, I painted the cast shadow with Cobalt blue. A small amount of the vegetable dye fell into the shadow, adding color reflected in it.
Step 2

Once the first coat of paint was completely dry, I outlined the broccoli florets with a mixture of Sap Green and Cobalt blue.
Step 3

I added a little more detail and shading to the broccoli and added splashes of green paint to make it look fresh and unique. This is very easy to do by vigorously shaking the brush over the surface of the painting.
Grapes and pear
Step 1

I started painting the pear in a light area using a very light Cadmium yellow solution, avoiding any highlights. I then updated my brush and finished off the fruit by adding Yellow ochre and a dash of Cadmium red to represent its ripeness. In this step I also applied the first coat of Cobalt blue and Permanent Carmine, marking the grapes as one piece. I painted the cast shadows right after that. Some yellow paint got into the shadows and berries, just like I wanted.
Step 2

I lightly add bright colors to the pear and grapes using a mixture of Cadmium yellow and Yellow ochre for the pear, and Permanent Carmine and Ultramarine for the grapes.
Step 3

I painted the stems with a mixture of Sap Green and Cadmium red using a fine brush. A little more detail and shadows are added to the grapes and pears.
Radish
The method of working with radishes differs little from that described above. I started with a light mix of Sap Green, Permanent Carmine and Cobalt blue, then I added a couple of pops of color using Permanent Carmine, Viridian green, and Grass Green. Sap Green), Cobalt blue and Ultramarine. A few splashes of Permanent Carmine complete the composition nicely.
Step 1

Step 2

Step 3

By the end of the work, I really wanted something green and juicy. These paintings will not only be a wonderful decoration for the kitchen, but will also promote healthy eating!
What are your favorite fruits and vegetables that you would like to draw?


- Mackerel in oil in a slow cooker: a recipe for preparing delicious canned food for the winter
- Red currants, pickled for the winter
- Masago caviar: what it is, where it is used, description and nutritional value
- Bonus – a completely new apple pie recipe – French apple pie “Tarte Tatin”
- Minced meat cakes in the oven
- Step-by-step cooking instructions
- Christmas fortune telling for children
- Sergey Yesenin Yesenin's work more information
- Ancient Slavic calendar Daaryan circle number of the god Kolyada dar Slavic Vedic calendar
- Slavic fabric amulets dolls: their meaning and how to make them with your own hands When you need to say goodbye to a doll
- Festive cutting of dough
- Step-by-step recipe for making pies with potatoes in the oven
- Oven pies with potatoes
- Recipes for simple and tasty salads with croutons
- Recipes for simple and tasty salads with croutons
- Fish soup Sea bass recipes for cooking fish soup
- Chicken hearts in sour cream
- Chicken hearts in sour cream: recipes
- Recipe for lavash envelopes with cheese
- Preparation of canned fish from mackerel