Artistic pencil drawing of a cat. How to draw cats without problems
Cats are incredibly graceful and beautiful animals, so drawing them is a real pleasure. For beginning artists who have recently begun to master graphics, master classes on how to draw a cat with a pencil step by step are suitable.
Creating such cats does not require skill, talent or artistic taste. If a child asks to draw a cat, and time is short, then you can limit yourself to funny images.
Sleeping kitten
Anyone can easily draw such a sleeping miracle. All you need for this is an A4 sheet, soft and hard pencils, an eraser, a little patience and perseverance.
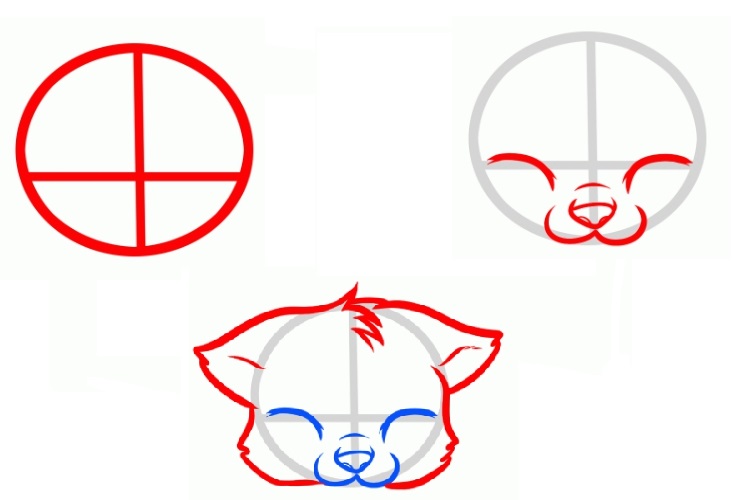
Stage 1: We start drawing a sleeping cat from the head. For this hard pencil draw a circle and mark thin auxiliary lines. The vertical divides the muzzle clearly in half, and the horizontal goes so that the upper part accounts for more than half of the circle.
Stage 2: Focusing on the auxiliary lines marked in the first stage, we outline the kitten’s eyes, nose and mouth.
Stage 3: Mark the outline of the head with a soft pencil. We draw the ears, protruding fur, and a funny “whirlwind”.
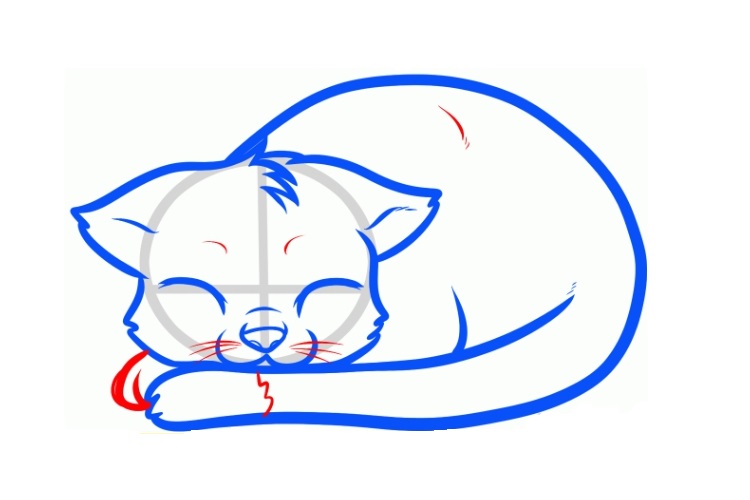
Stage 4: draw the body of the animal and draw the tail. Please note that the kitten is curled up into a ball, so the tail covers part of the muzzle.

Stage 5: On last stage Paws and whiskers are drawn. Use an eraser to carefully erase any excess lines and markings. The kitten is ready. If desired, you can color it with paints or colored pencils, or leave it as is.
Mischievous kitten

Any child will love this naughty baby. You need to start drawing a mischievous kitten from the head. Draw a circle, add triangular ears and draw a muzzle. Then comes the drawing of the torso and paws. Play with your kitten's emotions and show your child that... small parts The mood of the cat shown in the picture depends. Surprise can be conveyed through wide-open eyes; a protruding tongue will add mischief, and by moving the pupils slightly to the side, you can make a thoughtful or sad cat.
Kitten made of circles

Even a child can make this drawing of a cat from circles with a pencil, since it is one of the most simple ways for beginners. The animal is drawn from the back, so there is no need to draw features and maintain proportions.
First, two circles are drawn on the sheet so that they slightly intersect each other. In this case, the diameter of the lower one should be approximately twice as large as the upper one. Then the ears are drawn to the upper part, and the tail to the lower part. Then the mustache is drawn and the fur is randomly marked.
One circle, two circle
Another clear example of how you can quickly and easily draw a cat with a pencil.

The larger circle is drawn first, and then another, smaller circle is drawn inside it. Add ears, facial features and a tail. Children will love a funny sleeping kitten and can quickly distract a child and cheer him up.
Such a sketch is something between simple schematic images and realistic drawings animals.
We mark the outline of the animal with thin auxiliary lines made with a hard stylus. The sketch of the head looks like an octagon, the ears are triangles, and the body is a rectangle or cylinder. After this we make markings for the paws.
We draw a horizontal line in the center of the head, thus indicating the level of the eyes. We draw sketches of the mouth and nose, round eyes. We draw a chin and mustache.
We define the muzzle more clearly. We draw in detail the eyes, nose, mustache and cheeks. Soft pencil draw fibers on the ears, head and muzzle. Then we draw the front paws with claws and pads, and detail the hind paws.

On final stage All auxiliary lines are carefully erased. It's time to draw fur. For these purposes, a 2M (or 2B) lead is best suited, but in principle you can use any soft one.

Realistic
Many people think that realistic portraits pets - not the best simple task for beginners, but in reality not all sketches are difficult. You can verify this using the example of step-by-step instructions for a portrait of a Scottish Fold.
Draw a Scottish fold cat with a pencil
Scottish Folds are loved by many breeders for their disposition and charming appearance. Thanks to distinctive feature breed - with ears curved forward and down, these cats look so cute that it is impossible to resist squeezing such a mustache. We offer simple step by step lesson for beginners how to draw a British cat with a pencil step by step.
At the first stage, auxiliary lines are drawn with a hard pencil: 1 vertical and 2 horizontal. The vertical one shows the center of the muzzle, so it needs to be slightly shifted to the right relative to the center of the page, since the cat is sitting slightly turned.
The horizontal ones should be parallel to each other, as they indicate the size of the animal's eyes. After this, you need to start drawing the contour of the muzzle and eyes.
Important! For a cat to be proportional, the distance between the eyes must correspond to the size of the eye.
When drawing a nose, remember that its size should be less (narrower) than the distance between the eyes.

Then, using an M or TM stylus, we darken the eyes and nose. More experienced artists who are confident in their movements can use a black pen for these purposes.
To make the cat’s look “alive”, do not forget to leave unpainted, white areas, as in the picture.

For the third step, you will need a 2M (or B2) pencil. Carefully, using smooth lines, shading the strokes, darken the areas around the pupils. Notice how the color goes from darkest (around the pupils) to lightest. Then, with a hard stylus, arrows are marked in the direction from the nose. They show directions for drawing fur.

Using the softest stylus (it is better to use B4 or 4M), focusing on the arrows, draw the darkest fur. The crown and fur under the ears should be the darkest.

To complete the picture, draw in the remaining fur. The cat is ready
Attention! The color of the bristles depends on the force of pressure.

In this material I want to tell you, how to draw a kitten. I found 20 step-by-step schemes, which presents cats and kittens of different breeds, ages and in different poses. All diagrams enlarge when you click on them! I have also prepared for you several video lessons on drawing a kitten! Watch and learn!
Cats are incredibly graceful, they are well oriented in space and often surprise us with amazing tricks. Therefore, in order to draw this animal correctly, good clarity of lines is required.
1 scheme:
To draw such a fluffy cat, you should determine the main figure that can be used to describe its body and begin to move from less accurate outlines to more accurate ones.
2 scheme:

The cat's skull has an incredibly complex anatomy. Large eyes and a small muzzle are difficult to depict. Therefore, it is important to convey the relief of the head so that further steps are clear.
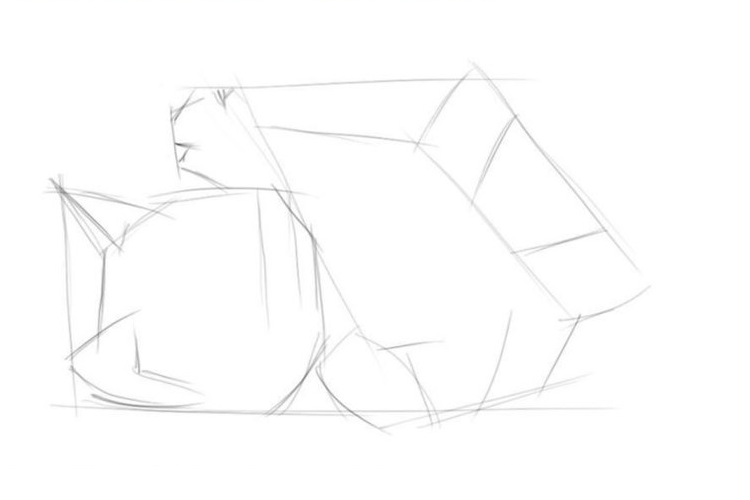
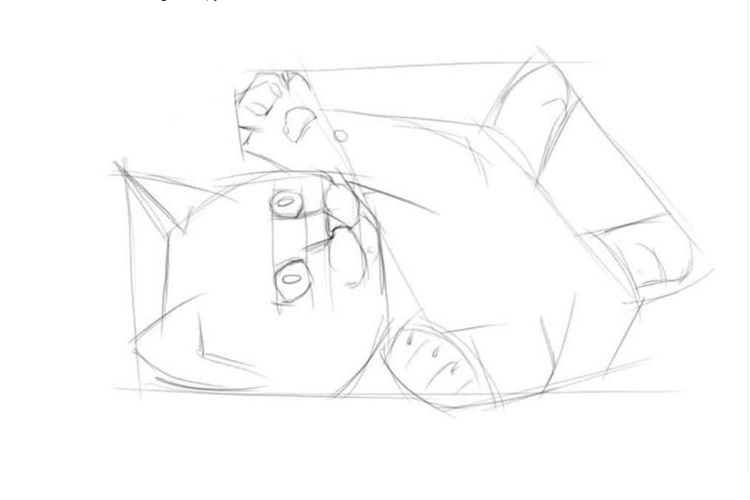
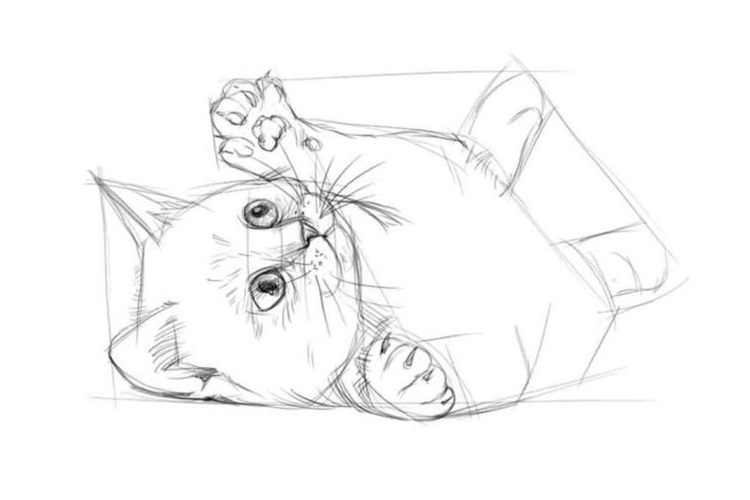
3 scheme:
A cat lying on its back is a rather non-standard design. That is why you need to master it. Pay attention to the overlap of details. Try drawing this funny kitten.
4 scheme: 
Little kitty- an incredibly gentle creature. Therefore, it is necessary to correctly convey his emotions: fear, interest, desire to learn. The kitten's paws should be massive.
5 scheme:
The schematic and semi-childish manner of drawing also requires effort and step-by-step work. So try to see final result- a cheerful and mischievous kitten.
6 diagram:
The graceful Siamese cat is an example of what all cats should be. With the help of this breed, you should study the anatomy of the animal. Emphasize the sharpness of the lines.
7 scheme:
To correctly convey the purposefulness of the cat’s gaze, you need to depict the eyes as voluminous. Therefore, add more highlights to your eyes and depict the pupil correctly. It's best to follow suit so you don't get disappointed if you don't get a different angle from the cat.
8 diagram:
When a cat washes itself, it treats itself very carefully. All muscles are relaxed, and the animal feels completely calm.
9 diagram:
If the drawing has few distinct lines, take advantage of this. Carefully draw the structure of the cat's fur and whiskers. Add some formlessness.
10 scheme: 
A humorous depiction of a cat requires drawing certain elements. Funny paws, long whiskers and striped colors make our cat a typical yard resident.
11 scheme:
Learn to draw not only correctly, but also quickly. Having selected several figures in the drawing, practice drawing a finished high-quality image at speed.
12 scheme:
An anime style kitten has a typical big eyes and very nice looking. To evoke tenderness and joy, you should add contrast to the picture. The big head and small muzzle convey this mood just right.
13 diagram:
This drawing is not standard, because its drawing begins not with ovals, but with rectangular shapes. By the way, this approach does not spoil the kitten at all. He's quite nice and not rude at all. Try drawing this fluffy kitten.
14 scheme:
The number of cat-themed cartoons is reaching record levels. Moreover, all these drawings are very easy to execute. As you can see, there is not such a big difference between the schematic image and the finished look.
15 diagram:
Not all cats are graceful and cute; moreover, there are quite large breeds of animals. Therefore, you should be able to portray such cats. The chest is coarser and the neck is shorter.
16 diagram:
By dividing the entire drawing into circles, you can train your hand and achieve softer lines in the drawing. By adding slight asymmetry to the paws, you can make the kitten more funny and naive. Try to draw such a kitten with a ball.
17 diagram:
A sedentary cat is a very curious phenomenon. Here is another comical image of a sitting cat. Several figures can perfectly depict a pet.
18 diagram:
A lying cat is not a simple drawing, because you need to correctly depict the posture of the animal and its body parts.
19 diagram:

The fluffy cat is looking straight at us. The drawing is quite easy. Just 8 steps.
20 scheme:
A cat's curiosity can be conveyed with a long tail, mischievous ears and huge eyes. By correctly depicting these parts of a cat’s body, any drawing can be made attractive.
Along with dogs, cats are one of the most popular pets. Even a two-year-old child knows what a cat looks like and will probably want to draw it.
Using simple step by step instructions this will be very easy to do. Any beginning artist can handle some of them.
You can draw a picture with your child in a realistic or cartoon style.
It all depends on your imagination and your baby’s ability to draw. Start with simple lessons, and then proceed to more complex ones.
It is better to use for drawing with a simple pencil, so that you can later erase unnecessary auxiliary lines. This way your drawing will turn out neat.


If you want to create a girl cat, draw her long eyelashes. They will make your look more open.
- The kitten's head is ready, all that remains is to modify the body a little. On each of the paws we draw fingers, erasing all the extra lines. Notice how the toes on the left paw overlap each other slightly. You can draw claws on each of your fingers.
- We complete the picture by erasing unnecessary lines and drawing out the details more carefully. We color the kitten with colored pencils, felt-tip pens or paints.

Sitting cat in profile
- Draw the line of the ear and the front of the head as shown in the figure.
- Draw a smooth curved line at the back of the head.
- Sketch the cat's back using two curved lines different lengths. The small one will be the cat’s neck, and the large one will be the cat’s back. The line ends where the tail begins.

- We draw the lower part of the animal’s muzzle, using a curved line to indicate the chest. Draw an arc - it will become the cat’s back paw.
- We complete the outline of the front and rear legs.
- Add a tail, draw a triangular eye and a second ear peeking out from behind the first.
- Apply shadows with a simple pencil as shown in the picture. Adding shadows will give the painting a more realistic look.

Realistic cat
- We mark the outline of the animal's body. Draw a circle for the head and divide it in half with a line. A little lower and a little to the left we draw a circle of larger diameter. Draw a curved line to it as shown in the figure.
- We draw the outline of the cat’s face and add triangular ears to the head. Add two small ovals at the bottom of the head, connecting them below with a curved line. This way we will designate the cat's nose and mouth.
- In the lower part of the body, draw two small ovals (front legs) and a long rectangle (tail).
- We draw the details of the face: we make almond-shaped eyes, draw a nose and muzzle. Using small strokes we make the cat fluffy. Add eyebrows and mustache using longer strokes.
- We draw the cat's front legs, her tail and claws. Don't forget to add small touches that will make the cat look fluffy.
- Using strokes of various lengths we complete the picture. Erase the extra details and color the cat.

- We sketch the figure of a cat: draw a small circle and a large oval intersecting it. They will become the head and body of the animal.
- We outline the main details of the face: the circle of the muzzle and the triangles of the ears. To make it easier to maintain proportions, we divide the circles in half with several lines.
- Using several circles and ovals we outline the hips, tail and paws of the cat.
- On the muzzle we draw two circles for the eyes and a triangle for the face.
- The sketch is almost ready, let's start detailing it. Using strokes we create fluffy cat fur, erase extra lines and add color. Color the cat the way you like.

Standing cat in profile
- Draw a circle for the animal’s head, a rectangle for the body. Inside the rectangle we place an oval extending beyond its borders. It will help us define the cat's hips. Draw an arc to the part of the rectangle that is located closer to the head.
- To the animal’s head we add the main facial features: ears and muzzle. Draw a triangular eye and nose.
- Using ovals different sizes create a sketch of the cat's front, hind legs and hips. At the back we draw a curved line indicating the tail.
- We connect all these lines and apply strokes to create an imitation of the fluffy fur of a cat.
- Erase the extra lines and add additional details. Our cat can be tabby or spotted. Using colored pencils, markers or wax crayons add brightness and color to the picture.

We have a graceful and beautiful cat!
Now we will learn to draw a kitten from the very beginning, and with our own hands. If you learn to draw it with a pencil, you can draw it with anything.
Like this one.
Step 1
In order to draw it correctly, you need to figure out what it is made of. What, what, what are our kittens made of?.. Naturally, from the head, carcass, paws (4 pcs.) and tail.

All shapes are very simple: the body and front legs resemble sausages, the hind legs resemble sausages with lentils attached to the top, the head is a flattened ball, the ears are rounded triangles.
Step 2
Now let's connect the parts together. Naturally, we don’t stupidly apply one to the other - this is not Soviet that making a toy bear! And the kitten’s paws are not nailed down. They need to be grown. Imagine that you are sculpting it from plasticine - you make a body, a paw, and then press it into the body with the upper part and lubricate the joint with your finger. So it is here. The transition from the body to the paws should be smooth, do not forget that the kitten still has time to walk and jump on them! If the muzzle is half turned, then the far ear needs to be turned: it will become narrower, and the inside of the ear will almost not be visible.
To make the picture look more alive: do not draw with straight lines! Also, don't draw the entire object with one simple arc. Look at the near front leg: it is not straight, not concave or curved, it bends in both directions! 
Step 3
Now we draw the eyes and nose. We draw them at the bottom of the head, leaving the kitten more space for the brains (his brains will be useful to him in life). We draw the eyes almost at the same level as the nose; in fact, the inner corners of the eyes and the lower corner of the nose form an obtuse triangle. Don't forget that the head is not round, but spherical. That is, it is volumetric, so even with the slightest rotation there will be slight distortion.

Step 4
Draw the pupils following the Caracal tutorial. Carefully draw the nose, eyes, outline the eyebrows and mouth (this way you can make the face more expressive). 
Now the outline and features of the faces... muzzles! ready. But he shouldn't be bald! This is not a sphinx, this is an ordinary kitten. We need to make it wool. Therefore, before drawing the fur, I erase the clear dark outline of the kitten. Well, I paint the eyes, I like to do it. Dark on top, light arc below, white highlight on top. 
Step 6
Now you can make the outline woolen. We draw in place of the old outline of the hair.
Carefully draw the tail. Many people like to immediately draw a panicle, so that it is more magnificent and beautiful. In fact, a thin ponytail that tapers towards the end looks much more touching! 
Step 7
The most tedious part is shading the kitten with hairs. At the same time, we make sure that the hairs grow in the right direction, do not continue each other and do not merge. You can make a few stripes on the tail and leave a white breast. 
Step 8
Woolen, but flat. It's like it's covered in texture. Ugly. Need to add volume! Add it along the edges of the legs, body, head, using neat semicircular strokes. We shade from the edge to the middle in an arc! Select arcuate stripes. The far paw should be made darker than the near one. You can also put triangular shadows on the paws above the toes and above the nose. We paint over the ears in depth. 
Step 9
Now, it’s already beautiful! Now we strengthen all the shadows, because there are few of them yet. If somewhere it turns out to be a very dark place, lighten it with a nag. And along the edges we add random thin hairs to enliven the picture. Don't forget about the mustache: it grows on the muzzle near the nose, on the eyebrows and in the ears. Well, we need to put it on the surface, then a shadow will come to our aid if there is no time or desire to come up with something else 
Step 10
From these same simple forms, combining them and bending them, you can create various poses. It’s okay if the sketches are sloppy, you can always draw 5 pieces, select the most successful one and redraw it on a clean copy. 
The cat is one of the most favorite animals among children. Cats attract them with their fluffy fur and affectionate playful disposition. In ancient times, cats were considered sacred animals. And still some people are convinced that these animals can heal people.
It doesn't take much skill to draw a cat. With the help of video and photos, we will see step by step how you can easily and beautifully depict the figure of a cat.
1. Draw a circle, from which we lower an oval, widened at the base. We get the head and torso of the cat.
2. Draw triangular ears on the head.
Stage 1-2: draw the head, ears and body
3. From the middle of the body, draw the paws with four lines.
 Stage 3: adding paws to the body
 4. On the muzzle we add eyes, a nose and a mustache.
Stage 4: draw the face5. All that remains is to draw the raised tail.
Stage 5: draw the tailWe color and tint our cat. The result is a drawing like this.
Stage 6: color the cat
Graceful kitty
In the following steps you can draw an elegant cat. There is a photo and video detailed instructions how to draw a cat with a pencil.
1.Draw an oval and divide it into two perpendicular lines into four parts.
Stage 1: draw an oval with lines
2.Slightly sharpen the corners on the sides, add a nose, mouth and ears.
Stage 2: sharpen the corners, draw ears and nose
Stage 3: finishing the eyes
4. We lower another circle down - the body - and two paws.
Stage 4: draw the torso and front legs
5.On top we draw the base of the ovoid body with the pointed end up.
Stage 5: finishing the torso from behind
6. Draw paws and a tail at the base.
Stage 6: Add a tail and hind legs
7. Tint the top of the muzzle and tail.
Stage 7: color the cat
We get a beautiful charming cat.
Little kitty
Now let's draw a little kitten. To draw the figure of a cat correctly and beautifully, consider the instructions, photos and videos. Here's how to draw a kitten with a pencil step by step.
1.Draw two circles one above the other: one bigger size, and the other smaller.
Stage 1: draw two circles: head and torso
2. On the muzzle we depict eyes, a nose and a tongue, and on top – two ears.
Stage 2: draw the face and ears
3. The next step is the front and hind legs, tail.
Stage 3: draw the front legs Stage 4: draw the hind legs Stage 5: complete the tail
In the picture there is such a baby kitten.
Ready kitten
How to draw a cartoon kitten:
cartoon pussy
You can draw a cartoon cat for children in an easy and original way in four steps. The video and photo provide detailed instructions on how to do this step by step.
- We draw a circle beveled at the top - the head - and an ovoid body.
- Add a raised tail.
- We draw the eyes and nose, and use a curved line to divide the body in half.
- We depict the cat's pupils and whiskers.
- Color the picture in purple shades.
This is how you can quickly and beautifully depict a cartoon cat.
Muzzle
If you do not want to depict a cat in full height, you can draw only the animal's face. Let's see how to draw a cat's face step by step. Easy drawing and is accessible even for children.
- We draw a circle and divide it into four unequal parts with two smooth lines.
- We place the nose and mouth in the center, and to the right and left of the center are the cat’s eyes.
- On the head in the form of two triangles we depict the ears, below - the contours of the neck.
So, it won’t be difficult to draw the animal’s face beautifully and correctly.
To profile
To depict the cat's face in profile, we start with the same circle. Divide the circle in half horizontally. We draw in the ears and lengthen the circumference with the contours of the nose. On the line we draw the eyes and nose, a little lower - the mouth. We clarify the contours of the ears and remove the circle. We get an easily and beautifully drawn face. Stages of drawing a cat's face in profile
With kittens (1st option)
It will be interesting for children to draw a cat with kittens. However, the drawing is complicated by the fact that in this case you no longer need a separate figure, but a whole composition. You can easily and correctly depict a cat with kittens in stages as follows.
1. Draw an oval (the body and the center of the composition), and a circle on the bottom right.
Stage 1: draw an oval and a circle
2. At the next stage, draw the head and contour of the body.
Stage 2: draw the head and outline of the torso
Stage 3: outline the kittens with a trapezoid
4. Draw a kitten in the middle and the cat’s front paw.
Stage 4: draw the front paw and the kitten in the middle
5. We finish drawing the rest of the kittens, hind legs and tail.


 Elder Macarius of Egypt")

- Church of the Assumption of the Blessed Virgin Mary
- Boris Khramtsov. Eyes looking to the sky. "he knew something that I had long forgotten"
- The tomb of Blessed Alexandra and the August icon in the darna
- Temple of the Placing of the Robe on Donskoy
- Temple of the Tikhvin Icon of the Mother of God on Ave.
- Step-by-step recipe for making pies with potatoes in the oven
- Oven pies with potatoes
- Recipes for simple and tasty salads with croutons
- Recipes for simple and tasty salads with croutons
- Fish soup Sea bass recipes for cooking fish soup
- Chicken hearts in sour cream
- Rosneft - politics of the Urals Federal Republic Who will head the security service of Rosneft
- Colonel Romanov and General Khorev were overtaken by a large customs redistribution
- Serious accusations: women complained to Matvienko and Bastrykin about the chief military prosecutor Fridinsky Sergey Nikolaevich daughter
- Write Alexander Evgenievich Lebedev
- Castling Shah Galina Dolova read in full
- Book Review: Tony Buzan's "Speed Reading Workbook Training Angle of View for Speed Reading"
- Reverend David of Serpukhov
- Venerable Macarius the Great, Egyptian (†391) Elder Macarius of Egypt
- What does the “Desperate One Hope” icon help with?