Making finger puppets. DIY finger theater. DIY glove puppet
It doesn’t take much effort to create a fascinating and mysterious fairy tale world for a child. It’s worth spending a little time and creating a finger theater for games and performances at home. The uniqueness of such a theater lies in the fact that it was created with the love of a mother or grandmother. Each toy is filled with the energy of positivity and love; each element contains a piece of the soul of a loved one.
From a very early age, every child learns various songs, poems and fairy tales. A fairy tale can teach a child to recognize good and bad, understand what time and space are, and also learn about the connection between nature and man.
Functions of the finger theater
 The finger theater allows you to create a fairy tale in miniature. It can be located in the palm of your hand. The child can play a role any character using small figures. Each character can be put on fingers or on special stands that allow you to organize a performance on the table surface. If the child is still too small, then his relatives can perform the performance. The baby will be delighted with the finger theater.
A theater like this can be wonderful. simulator for speech and sensory-motor systems. It is suitable for babies over 1 year of age. Dolls help develop the mobility of children's fingers, communication using the replicas of fairy tale characters, and also help to reveal the child's creative potential.
 The game can be a mechanism by which the baby quickly masters counting. An example of such an educational fairy tale can be safely called “Teremok”. In a fairy tale there is a constant n counting the heroes(“...and the three of them began to live”). The child will not only learn to count, but will also be able to master concepts such as “left and right” with the help of fairy-tale characters and their actions.
You can play such a puppet theater not only at home, but also on the street, in a clinic or in transport. A fairy-tale plot will help you in more ways than just entertaining spend time, but also not to notice the long and tiring road to the dacha or to the village to see your beloved grandmother.
Instructions for creating a mini-theater
In order to make a finger theater at home you must have:
- Fabrics of different colors and textures (you can use felt).
- Non-woven fabric. It will help glue small parts.
- Embroidery thread (preferably floss).
- Wood slats for creating a frame theater for finger characters (horizontal slats should be 45 cm long, and vertical ones - 30 cm. There should be 4 sticks in total).
- Scotch.
- Gouache.
- Cardboard (preferably thick).
- Fabric for sewing curtains for a small theater (you can take silk).
- To design the rear view, you will need bright color pictures.
Making a stage for performances

- The first step is to fasten the wooden slats together with glue.
- The finished beauty frame can be painted (preferably white).
- In order to make a sign for an improvised theater, you can use thick cardboard. You need to draw a template on cardboard, cut it out and color it with prepared gouache or ordinary felt-tip pens. In this case, the cardboard can be purchased, or you can use an unnecessary box from a game or equipment that everyone has in the house.
- The sign should be cut along the contour in such a way that you can later make two longitudinal puzzles. Then the sign needs to be secured to a base of wooden slats.
- The next point of work will be creating the background of the theater. To do this you need to cut out a piece of cardboard. The cardboard will have a length of 45 cm and a height of 30 cm. It is necessary to make 4 notches in the cardboard so that pictures of the size of a landscape sheet can then be inserted into them. In order for the cardboard to attach to the wood base, you need to make special small slots. The details are ready. Now you need to secure them to the base and hang curtains made of silk or other material. The material can be tied with a beautiful ribbon or lace, or simply fall in an even line. Curtains can be attached to a slatted base using thread, wire or tape.
Sewing fairy tale characters
 Before sewing fabric dolls, you need to make your own finger theater templates from paper and make a pattern. The baby can help in this matter. This very exciting activity - creating drawings of heroes - develops imagination. To save time, you can print paper finger puppet templates. Then follow these instructions:Staging the play
- Finished patterns must be cut with scissors. Transfer them to a fabric base. Do not forget that the torso of each hero will consist of two identical parts.
- Ears, nose and eyes can be made of fabric of different colors or embroidered with thread. Fabric parts are carefully cut out.
- If the fabric used for dolls is too thin, you can glue it with non-woven fabric for additional compaction.
- On the front of the characters' bodies you need to place small details, such as eyes or a nose.
- When creating a grandmother or granddaughter, you must not forget about the hair. They can be made from wool threads. A scarf and a bow will help complete the look.
- When creating a grandparent, don't forget about wrinkles. For greater realism, they can be embroidered with thread.
- The finished front and back pieces must be hand stitched. Each fairy tale hero is put on a finger or a special stand.
- If the play is planned to be staged on a table, then a special stand needs to be made for each character. It can be made of a plastic cap into which a screw is screwed. The base of the cork can be made from a five-kopeck coin. To do this, using ordinary glue, the coin is glued to a plastic base.
- If you couldn’t make the figures for the theater yourself, you can buy ordinary small fabric keychains. Rip the bottom with it and, taking out the padding polyester, replace it with a frame made of durable fabric.
Production of the fairy tale “Turnip”
For the turnip, you need to prepare the main character of the fairy tale - the turnip. It can be made of fabric. Then the back of the scene needs to be decorated with a printed or hand-drawn picture. It can depict a garden, a house and nature. After this, each character appears on stage and is voiced. The characters can be voiced by mom or dad, or by the baby himself.
Believe me, such a pastime will definitely captivate the baby, and will help not only develop speech and motor skills, but also simply have fun with the whole family.
Attention, TODAY only!
Today we will show you how to make cool paper finger toys for little ones. With the help of these animals, your children will be able to play a fun farm, or even show a small puppet theater. Making them is very simple, since we have already prepared animal templates for you. All you have to do is print them and assemble them. You can make a pig, a cat, a horse, a mouse and a rabbit for your children.

Everything, that you will need:
- thick paper
- scissors
- toy templates (download)
Let's do
First, print out the templates for future toys and carefully cut them out. Look carefully, there are also parts for rings that will be glued to the heads of animals, and then put on the child’s finger so that he can control the character’s head. These rings also need to be cut out.


Now roll the animals' bodies to form a main ring where the child will insert his finger.

Now it’s time for the little rings that need to be glued into the animals’ heads.

That's all, the toys are ready! You can start playing with the children.

Learn how to create a puppet theater with your own hands. At the same time, characters can not only be sewn and molded, but also made from plastic spoons and wooden sticks.
DIY finger puppet theater
If you want to develop your baby’s fine motor skills, speech, thinking and simply be able to lift the mood of the whole family, then turn the room into a temple of art. To do this, you need to know how to make a finger puppet theater with your own hands.

For this you will need:
- felt;
- threads;
- scissors.
Fold 2 character blanks with the wrong sides together, sew along the edge using a machine or with a thread and a needle on your hands.
To make a beard for your grandfather, wrap several rows of thread around your fingers and cut them on one side. Fold these identical threads in half and sew the beard in place.
And here’s what the heroes of the fairy tale “The Ryaba Hen” might be like.

Cut out your grandfather's beard and bangs and grandmother's hair from gray felt. It will also help you create a mouse with a long tail. These are the kind of dolls you can sew for a puppet theater. If a baby will wear them, cut them so that they are the size of his fingers. If the performance will be performed for children by adults, then the fabric dolls should be slightly larger.
Check out another interesting idea. This could be a home puppet theater for staging the fairy tale “Turnip”. In kindergarten, it is better to have larger characters so that the whole group can see them from afar. But you can do something like this by taking:
- modeling paste (preferably Jovi, which does not need to be burned, it hardens in air);
- yellow and green paste Jovi Patcolor;
- acrylic paints;
- tassels;
- markers;
- stacks.

- Let's sculpt the grandfather first. Take a piece of pasta measuring 2x3 cm, roll it into a sausage, and form a cylinder. You should end up with something like a nesting doll with a body and head, and at the bottom there will be a notch for your finger.
- Separately sculpt the arms and attach them to the body. But outline the facial features, beard, and mustache using a stack.
- Using the same principle, sculpt the grandmother, granddaughter and animals. Once these characters are dry, paint them with acrylic paints.
- For the turnip, roll a ball of yellow paste, pull it out a little from the top, insert green plastic tops here, and secure.

When sculpting with paste, you will find that it dries quickly in the air, so periodically wet your fingers with water.
This is how you will get a finger puppet theater; with your own hands, a child will be able to act out the fairy tale “Turnip” or come up with his own plot with some of these characters.

DIY table theater
If you want to have a tabletop theater with paper dolls, then enlarge the following image. Print it on a color printer on thick paper. If this is not possible, attach a sheet of thin paper to the screen and transfer the outlines onto it. Then place it on cardboard, draw outlines, and let the child decorate the characters with colored pencils or paints. All that remains is to cut out the images, glue each one on the side and glue the top of the head to the head.

And here are some more templates that can be used to easily make theater dolls. With your own hands or by giving the blanks to your child, cut them out along the contours and glue them in pairs.

If a small rectangular sheet of colored paper is glued on the side, you get a small tube. It should be such that it fits well on your finger. Glue the ears, nose, eyes, front paws to the blank, and you will get a finger puppet theater hero.

These characters can be made from the most unexpected materials. See how to turn plastic spoons into stage plays.

To make these toys for the puppet theater, take:
- plastic spoons;
- colored paper;
- scissors;
- ready-made plastic eyes;
- glue gun;
- textile;
- narrow tape, scissors.
- Using a glue gun, glue the finished eyes to the convex side of the spoon.
- Turn a piece of fabric tied with a ribbon into a dress. For a male character, just glue a bow tie to his neck.
- Cut strips of colored fringe paper on one side and glue this hair. They will also be replaced by pieces of colored cotton wool.
Other characters are controlled in the same way, to create which you will need:
- ice cream sticks;
- children's magazines;
- glue;
- scissors.

If you want to make another tabletop theater, then milk bottle caps will come into play. Plastic yogurt cups.

Glue paper fairy tale characters to the back of these items, and you can play out old stories with them or invent new ones. The background is created from a large sheet of cardboard, which is painted to match the theme.
How to make a screen for a puppet theater?
This is an essential attribute of puppet theater. Check out the simplest options:
- Cover the hole under the table with a cloth, tying its two corners to the top of one and the other leg. The child sits on the floor behind him and leads the characters at the level of the table top - just above it.
- Take an old curtain or sheet. Gather any of these fabrics onto a rope, tie the ends of the thread on one and the other side of the doorway. Make a rectangular cutout in the center of the top of any of these pieces. It should be at such a height that it is not visible to a child or adult sitting behind the curtain who are playing the role of puppeteers.
- A tabletop screen is made for the finger theater. The easiest way is to make it from cardboard. Take the box. It needs to be disassembled, covered with wallpaper or colored paper, and 2 sides bent so that a sufficiently sized canvas remains in the center. There is a cutout in it through which the puppeteer shows finger toys.

Here's how to make a plywood screen. For it you will need:
- plywood;
- jigsaw;
- fabric or piece of wallpaper;
- glue;
- small door hinges.
- Based on the presented dimensions, cut out 3 blanks from plywood: a central one and 2 side panels. Cover them with fabric.
- When the canvas is dry, attach the loops to the designated areas so that you can close the puppet theater screen and fold it.

See how to make a screen out of cardboard so you can show performances with mitten, glove, and cane puppets. It should be such that the puppeteer can fit there freely, standing up to his full height. If the performance is performed by children of different ages, then the tall ones will kneel, placing a pillow under them.
In order to make a screen, you will need:
- PVA glue;
- rope or lace;
- carton boxes;
- wallpaper;
- stationery knife;
- awl;
- roulette;
- wide brush;
- long ruler;
- rag.

You can make a screen for a puppet theater with your own hands as follows:
- The drawing is given for teenagers or adults whose height is 1 m 65 cm. If you are making a screen for children, reduce this figure.
- To make it durable, make it three-layer. To do this, stick a second one on one large sheet of cardboard, then a third one on the other side. Apply PVA glue with a wide brush. This way you will make the front part - the apron.
- The side elements are also made in three layers, but the folds, which you then glue to the apron, should consist of one layer.
- Connect the parts by gluing them. When the glue has dried, sew in these places with a lace, having previously made holes in the fastening points. Attach the top arch in the same way.

All that remains is to cover the screen with wallpaper of a dim color so that it does not distract from the theatrical performance.

We make do-it-yourself glove dolls
These can be seen in a real puppet theater. Dolls put gloves on their hands. By bending your fingers, you can make the fabric character tilt its head and move its arms.

Children's puppet theater will have many characters if you use the proposed template.

But it is not necessary to create all the heroes at once. Let's start with two - bunnies and piglets. Having understood how to make such doll gloves, you will be able to sew others, thereby gradually replenishing your theater.
If you then make human dolls, you can make the hairstyle from fabric or thread.
The thickness of the character's neck should be such that the puppeteer inserts his middle and index fingers here to control the hero of the play.
Before sewing puppets for the theater, place a puppeteer's glove on the re-cut pattern to decide whether the base is suitable. If not, then increase or decrease it. You can do without a glove by placing the puppeteer’s hand on the base pattern. Please note that the character will not be static, so you need to add a little on all sides for a loose fit so that the fabric of the action hero does not stretch while controlling him.
So, here's what you need to sew a glove doll:
- faux fur and/or plain fabric;
- tracing paper or transparent paper or cellophane;
- pen;
- scissors;
- threads;
- buttons for eyes.

Place the pattern on the fabric folded in half, cut with a 7 mm seam allowance. For a bunny it is better to take gray fabric or white fur, for a pig - pink.

If you want to draw facial features, tails, hands, hooves, then do it now, before sewing both halves of each character. Take special fabric paints that do not fade when washed. If there are none, then use watercolor, gouache, but first apply a PVA solution to the fabric, after it dries, paint this place, but use a minimum of water. When the paint is dry, add another layer of PVA on top to secure it.
But it is best to embroider the nose and mouth by stretching these areas onto a hoop or sewing blanks of appropriate colors and eye buttons.
Cut out a shirtfront from white fur for the bunny glove doll, sew its triangular part to the front half, and the semicircular part, in the form of a collar, to the back half. The tail is attached to the same reverse side, and white paws with or without pink claws are attached to both parts.

When small parts are sewn on, you can sew both halves of the doll on the inside out using a machine or on the face using your hands. In the latter case, use an over-the-edge seam or take a tape of a matching color and edge the side seam with it.
Other glove dolls, for example, a pig, are also created using this technique.

When the sides are stitched on all sides, hem the bottom. The characters' ears can be stuffed with cotton wool or padding polyester. Fill the pig’s nose with any of these materials, only after that sew this “patch” to the head. Applique it on his cheeks, giving them a blooming look. It remains to sew a few yellow threads between the ears, and another glove doll is ready.

Now you know how to sew characters for a puppet theater, if you want to see this too, then watch the following stories.
Marina Topychkanova
The purpose of my work:
Create conditions for the development of children's creative activity in theatrical activities.
Tasks:
1. Improve children’s ability to convey the images of fairy tale characters.
2. Develop fine motor skills of hands and fingers in children, develop memory.
3. Form friendly relationships.
4. Enrichment of vocabulary.
5. Increasing the level of speech development.
6. Develop the ability to behave freely and relaxed when performing.
Methods:
Playful, creative, verbal.
Preliminary work:
Reading a fairy tale, looking at illustrations.
What is finger theater?
Finger theater is a set of character figures that are put on a separate finger. These could just be individual dolls, animals, some objects for dramatizing a fairy tale, or well-known characters from our favorite Russian folk tales. When playing, it is important to work with different fingers, pairs of fingers, one and two hands, several fingers at the same time. All this helps with the development of coordination of movements and the brain.
1. Finger theater is a unique opportunity to place a fairy tale on the palm of a child, in which he can play the role of any hero.
2. Theater is also an excellent speech and sensory-motor simulator. Dolls develop the mobility of the fingers of both hands, help master the speech of characters, help develop vocabulary and activate speech functions.
3. The game can be used to get acquainted and learn counting
(for example, in the fairy tale “Teremok” a mouse, a frog, and a hare began to live together, then a fox came - there were four of them);
to get to know the characters and plot of the fairy tale,
to get acquainted with the concepts of “to the right is glory”, “nearby”, “one after another”.
4. And small finger theater figures will keep you company during your walk. With their help you can revive any poems, fairy tales, nursery rhymes. Simple toys develop intonation, artistic skills, creativity, imagination, memory, thinking, attention, and fantasy.
Advantages of finger theater
Finger theater is one of the types of puppet theater and has the following advantages over its other types:
Finger theater promotes the development of fine motor skills. Thanks to actions with dolls, subtle differentiated movements of the fingers are formed;
Using a finger theater does not require the child to have special technical skills, which may be needed when using glove puppets, puppets, etc.
Finger theater is familiar to children from early preschool age, as educators widely use it in various classes during the learning process;
In dramatizations, finger theater allows the child to show several characters at once;
Finger theater puppets take up little space and do not require large material costs. There are various types of finger theater, made using various technologies that take into account the physiological capabilities of children.
In the finger theater, director's play is used as a type of theatrical games. In it, the child does not play the role of any character himself, but controls the artists - the dolls. In this type of theatrical play, the child “voices” his characters and comments on the plot like the author, thereby developing his monologue speech.
Types of finger puppets
1. Finger theater made of paper. Perhaps the easiest type of finger tetra that you can make with your child. The disadvantage of this type of doll is its fragility. Due to its lightweight nature, this type of finger theater is recommended for use at the initial stage of working with children of all age groups.
2. Finger theater made of fabric. Such a theater can be purchased in stores. You can also make it yourself, but first prepare a pattern. Due to the material it is very functional. Can be used in all age groups.
3. Finger theater made from waste and natural materials. Another type of easy-to-make finger theater. The material can be various cups, pieces of fabric, threads, buttons, plastic spoons and forks, etc. You can make such a theater together with your children, having previously prepared the material. Necessary condition: safety of the material used. This finger theater can be used in all age groups, while taking into account the physiology of the children.
4. Wooden finger theater. It has become widespread in various online stores. Manufacturers package such theater in various “boxes” that correspond to the theme of a particular work. The figures can also be used as a tabletop theater. Often used in younger groups due to the small indentation for the finger. The main disadvantage is the difficulty of selecting the size of dolls for each child.
5. Knitted finger theater. One of the most durable and easy-to-use types of finger theater. The main condition: knowledge of knitting skills, as well as the presence of certain patterns for knitting a particular character. The puppets of this finger theater turn out to be very “alive”, soft and pleasant to use. Can be used in all age groups.
6. Finger theater made of felted wool and fabric. Felting or dry felting is a process of making products using special needles that mix and tangle wool fibers. Dry felting is suitable for creating three-dimensional products: toys, decorative figurines, designer dolls, applying drawings to felt.
7. Finger theater “Puppet heads”. As a rule, factory-made. Can be made of rubber or plastic. It requires the child to master a certain technique, as it is the most difficult to use.


This is the kind of theater we have.
Now I want to introduce you to making a finger puppet using the origami technique.
First we make the body of our doll


Now we fold the head.


This is the little fox we got. You can also make other fairy tale characters, only by changing the ears and the sharpness of the muzzle.
Maybe someone will be interested in my work and want to make the same theater with the guys.
Good afternoon guests and blog readers! Today I again want to touch on the topic of how and how to engage a child at home. This topic is very close to me, because I have two children at home. Which require attention and care.
In the previous article, I told you about educational games with your favorite characters from PAW Patrol. For those who missed this issue, read here.
Today I want to offer another option for playing at home, this is a puppet theater. Of course, you can take your child to a real puppet theater, or you can create one at home.
Therefore, I will share with you some thoughts and developments to make such a miracle.
We will need: your desire and a little free time :)
To be honest, we have different theater options at home, such as this one wood.

My kids love it very much, because it is so funny and exciting when I show them a fairy tale and they sit and listen. Now I have an older son, he can show and tell fairy tales himself. Just think, this is very cool, because while playing, a child learns to retell his favorite fairy tale, build a dialogue, etc.

I think that all preschool children, as well as most children of primary school age, will not remain indifferent to such theaters. And if you come up with your own fairy tales with a funny plot and an intriguing ending, then it can actually turn out to be a real holiday for a child.

The simplest version of a do-it-yourself puppet theater is a paper one. It's easy to make it yourself. Well, or together with the child.
DIY paper finger puppet theater, patterns
Children really like this paper finger puppet theater, it attracts them and also develops fine motor skills. Look here.

The first option is a flat round finger theater. You need to make the head and upper part of the doll, put it on your finger using a paper ring or you can make cones.

Create these dolls with your child together, starting with character templates. Download them from my website by writing me a comment below, I will be happy to send you the templates, print them and have fun playing.
After all, finger puppet theater is a whole magical art in which children learn about the world around them. Any child will enjoy being in the role of an artist, and this helps to believe in themselves and achieve success in the future. This is also good material for developing in children processes such as imagination, thinking, as well as the development of fine motor skills and much more.
The finger theater can be made from any available materials, such as paper, fabric, cardboard, corks, threads, cups, etc.
DIY tabletop paper theater, templates
I show my children this tabletop paper theater, which I made very quickly.

We will need:
- cups from Rastishka, illustrations, ice cream sticks
Stages of work:
1. Take any illustrations and cut out all the characters in the fairy tale along the outline.
3. Glue popsicle sticks onto each fairy tale character.

4. Now take the cups and make a horizontal hole at the top of each cup with a stationery knife.

5. Well, now insert the stick with the hero into the glass. Look how lovely it turned out. Very easy and simple, no worse than buying it in a store.

Ice cream sticks can be replaced with plastic forks or spoons.
If you don’t want to take illustrations from books, then you can find characters from any fairy tales on the Internet, save them, and then print them out, and then cut them out and glue them onto sticks. You can download from my website the following ready-made templates of heroes based on the following fairy tales: Kolobok, Teremok, Turnip, Hare's Hut, just write a comment or review below and I will send it to you by email.
Paper puppet theater “Walkers”
This kind of theater is very popular with young children; for such a theater you need your favorite characters and a couple of holes.

Believe me, children will happily play such games.

And if you invite friends over, it will be even more fun to play.

You will also receive samples of walkers of your favorite characters to your e-mail address.
Tabletop paper theater on plastic cups, corks, cubes
This option is also very easy to make; you can even draw the characters yourself or find and cut them out, and then glue them onto corks or cubes. Everything is brilliantly simple.

What do you think of this idea? All children love Kinder Surprise, and all of them have little donations left over from them, which you can pay for in such a theater.

DIY glove puppet
In reality, there are a lot of puppet theaters that can be built. Even at almost no cost. You just need to use your wits and do it! You can sew it, for example.

Or you can learn to knit and knit these cute little characters:

Honestly, I used to knit well, but now I don’t have enough time for it all. But I never liked sewing. But, as an option, you can also create a theater for those who love this business.

Although here is the simplest master for you - a class on sewing a puppet theater from fabric using gloves. Anyone can do it, even those who do not know the art of sewing.

We will need:
- household gloves, knitted - 2 pcs., buttons for the eyes - 2 pcs., thread, scissors, braid, stationery knife
Stages of work:
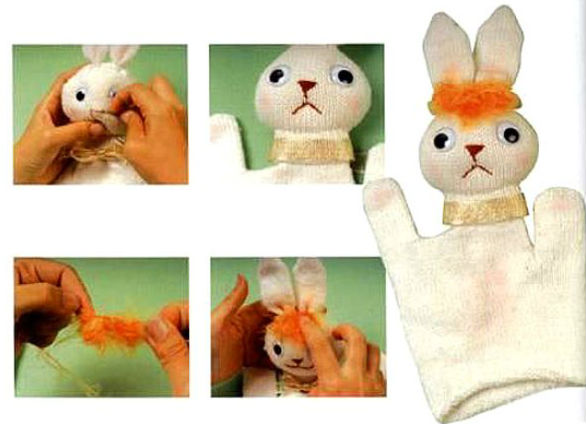
1. Take the first glove and steam the seam thread on the cuff, it is usually red or yellow. Tuck the little finger, thumb and index finger in so that they do not come out, sew them up. You should end up with a head with ears and a hare neck. Sew the bases of the ears to prevent your fingers from getting in there.

2. Now take the next glove and hide your ring finger in it, sew up the hole. Place your middle and index fingers together and now place the hare's head on them.

3. Sew the head to the neck. To hide the seam on your neck, tie it with a bow or tie in the shape of a butterfly. Sew button eyes and embroider a muzzle, or you can draw it with a marker. You can decorate a bunny using fluff or knitted threads by gluing a cute little chupik on his head. 😯
In this way, you can make other toys, such as a dog, parsley, etc.

My son generally loves such a simple glove, he puts it on and goes around making up all sorts of stories with the characters :)

Here is a short article for today. I think any of you have small children, you will be happy to diversify their leisure time. Choose any type of theater and do it with your child. And then enjoy a good mood and positivity. After all, all joint work strengthens your relationship! And the child will only be happy and delighted about this, and will definitely tell you: “Mommy, how I love you!” The most magical words in this world.
Well, I say goodbye to you for today. Until next time.
P.S. Do you know what is very important?! It is in the home puppet theater that you can observe your child and his behavior. Because the baby can come up with something, speak out, and we adults still need to listen to what the child is talking about, what topics he is talking about.


 - Wanderer - LiveJournal The authorities are not from God interpretation")


- Means of transportation For the population of Rus', scattered across the vast expanses of the East European plain, the development of means of communication was a condition for economic and cultural unity
- Surname of Tsar Feodor Ivanovich
- The main Russian signs and superstitions Ancient folk beliefs
- Message “Great Geographical Discoveries”
- Alexander Rybalka. Secrets of Goliath. Biblical heroes David and Goliath. Battle of David and Goliath - Bible
- Prayer to Saints Sophrony and Innocent of Irkutsk Sophrony and Innocent of Irkutsk
- Literary and historical notes of a young technician
- Sample application for clarification of tax payment (error in KBK) Deadline for consideration of clarification of payment at the tax office
- How to pay personal income tax for an individual under a lease agreement?
- OKVED codes for construction: select and register correctly OKVED major repairs of the roof of a building
- X-ray: methods and types of research Features of radiography compared to other methods of studying material
- Hermitages of Theodosius of the Caucasus
- Is all power from God?
- Is all power from God? God's and spiritual authority. Is all power from God? Saint Philaret of Moscow (Drozdov) - Wanderer - LiveJournal The authorities are not from God interpretation
- Recipes for making homemade mayonnaise with photos Recipe for making homemade mayonnaise from chicken protein
- What is the difference between black olives and olives? What is the difference between black olives and green olives?
- Familiar dialogue? Do you know the difference between olives and black olives? Check your...
- Olea europaea L. Greetings, dear blog readers! In this article we will examine the topic: Olives: benefits and harms for the body, what...
- Making protein bars: a recipe for the most delicious protein treats
- Easter cake in a bread machine with lemon zest