How best to draw a pyramid. Mysterious portraits on the Cheops pyramid
Let's learn how to draw a pyramid in different positions.
Draw in angular perspective. Build vertical and horizontal pyramids on each square of the cube's base.
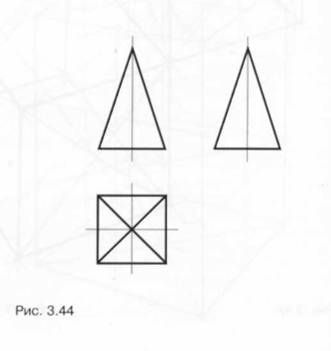
Consider the pyramid in Fig. 3.43 and it in Fig. 3.44. The base of a tetrahedral pyramid is , its side faces are identical triangles. The height of the pyramid in relation to the side of the square of the base determines its proportions (tall or squat).
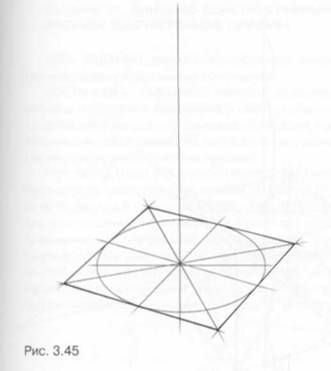
You need to start building a standing pyramid with an image of a square base. Through the intersection point of its diagonals, draw a vertical line, on which set aside a segment equal to the height of the pyramid (Fig. 3.45). By connecting the top of the pyramid obtained in this way with the vertices of the base square, we obtain a promising tetrahedral pyramid (Fig. 3.46). The construction of a pyramid with a vertical square base is carried out in the same sequence.
Sections of the pyramid with planes parallel to the base are squares, the dimensions of which depend on the position of the cutting plane - closer to the top of the pyramid, the size of the sections is smaller than at the base (Fig. 3.47). A section perpendicular to the base of the pyramid, passing through its apex and midline square base, is a triangle. All other sections of the pyramid parallel to this one are trapezoids, the larger base of which is equal to the side of the square of the base, the smaller one varies depending on the position of the section plane (Fig. 3.48). When constructing such sections, remember that the sides of the trapezoids are parallel to the heights in the triangles of the side faces.


Now that you have thoroughly studied the sequence of constructing a pyramid and cutting it with planes of different directions, proceed to the main task. Draw a cube (Fig. 3.49). Cross the diagonals of all six faces of the cube and draw straight lines connecting the centers of the opposite squares. Plot the heights of the pyramids on these straight lines (Fig. 3.50). All six pyramids are the same in height (1.5a, where a is the edge of the cube), but in the figure their heights are different sizes. To determine the heights of the pyramids different positions Various segments are used as a unit of measurement. So, for example, when determining the heights of vertical pyramids, such a unit of measurement is a segment of a vertical straight line, limited by the points of the centers of the horizontal faces of the cube. For the heights of horizontal pyramids, such units are straight segments passing through the center of the cube and having the same direction as the height being determined. Thus, in any drawing based on geometric bodies, the cube acts as a three-dimensional ruler, with the help of which you can determine or measure the lengths of segments lying in three mutually perpendicular directions. When determining the vertex points of the pyramids, also take into account the perspective contractions of the segments. Connect the vertices of all six pyramids with the vertices of the base squares (Fig. 3.57).
Hopscotch option No. 2 and 3 Options for playing “Hopscotch” on the street:
1. Draw a long line with chalk. Even the little ones can play.
Walk the line. Don't stumble.
Jump on one leg.
Measure the number of feet.
Jump either to the right or to the left of the line. You can do it on one or two legs.
2. Draw a long line and triangles adjacent to it. Jump as in option No. 1.
3. Classics option No. 3. Jump on two or one leg. Count jumps out loud. Do not step on the line.
| 0 | 0 | 0 |
The emergence of perspective as a science dates back to the Renaissance, which was associated with the flourishing realistic direction in fine arts.
Created transmission system visual perception spatial forms and space itself on a plane practically resolved the problem facing artists and architects. We still use the fruits of this science to this day.
The architect Philippa Brunelleschi was the first to find a method for optical-geometric constructions, cutting through Euclid's visual pyramid with a picture plane and thereby obtaining a perspective image of objects. Renaissance artists made enormous contributions to the field of perspective.
For example, Albrecht Durer used geometry volumetric bodies and theory linear perspective to construct a human figure in space, taking into account complex angles and movements. Leonardo da Vinci was a brilliant theorist in the field of perspective and participated in the development of the doctrine of proportions and perspective space.
Great educator, educator and teacher academic drawing P. Chistyakov wrote that the ability to draw and write, a subtle knowledge of perspective is necessary for any talent: “Everything that exists in nature and has any form is subject to the laws of perspective. Knowing how to apply the laws of perspective, you can draw everything motionless in nature correctly.” Serious attention devoted to targeted searches in the field of patterns of vision of nature based on perspective A.G. Venetsianov and many other Russian artists, architects and art historians.
Cartoon Bonjour bag. It looks like it was drawn on paper, but is actually a real canvas bag.
The cartoon Hola bag looks like it was drawn on paper, but is actually a real canvas bag.
Cartoon bags were invented by two female designers from Taiwan. In 2012, they exhibited at fashion weeks in London, Paris and Milan.
The bag has a zipper at the bottom, so its volume can be increased. It won't fit much, but the essentials will fit. An ideal solution for a tablet computer.
(http://multyashniesumki.ru/)
Let's draw - we'll live
An idiot's dream come true! Now do = draw. And all because of a magical fountain pen with a polymer that hardens in air. It is claimed that you can simply draw in the air.
| 0 | 0 | 0 |
Pastel drawing - Egyptian Mau cat
1) In this lesson I will tell you how to draw a cat of the Egyptian Mau breed. This is very beautiful cats with large eyes the color of currant green or yellow-amber. The Egyptian Mau has a wonderful and unique color. This is their distinctive feature. For this painting we will need a pastel sheet of dark blue A4 size. Let's make a sketch with a white, well-sharpened pastel pencil.
2) Let's move on to drawing the eyes and nose. For the eyes, use green, yellow, dark orange, and black pastel pencils. Carefully shade the eye, make the pupil black, and finally add highlights with a white pastel pencil. For the nose, use white, pink, black, red pastel pencils. Around the eyes and nose, shade lightly with a white pencil and rub with your finger. When drawing such small parts your pencils must be well sharpened!
3) Shade the ear first with a pink pastel pencil, and over it with a white pastel pencil. Rub everything with your finger. Add black shades and rub. Now sharpen a white pastel pencil well and draw white hairs with quick and light movements.
4) Shade the cat's head with a white and gray pastel pencil. You can add a few touches of blue somewhere. After this, rub everything with your finger.
5) We begin to clarify the details. Using a white pencil, using small strokes, we imitate the growth of fur. Draw the stripes with small strokes of black.
| 0 | 0 | 0 |
how to overcome cellulite-3 simple ways get rid of cellulite without much effort
Move more. A sedentary, sedentary lifestyle is one of the main causes of cellulite. If you don’t have time for fitness, try to walk more - park your car away from the office, go to the toilet on the next floor at work, and use the elevator only in extreme cases.
Drink more. Drinking water is the easiest way to cleanse the body; drink at least two liters of it per day (not counting soups, coffee, juices). Green tea also helps remove toxins from the body, drink at least two cups per day.
Self-massage. Every evening, while taking a shower, give yourself a light massage. Professionals recommend doing it from the bottom up. Start with the shin of one leg, squeeze the skin with your palms to form a triangle, thumbs With both hands, massage the area between your palms, moving up to the problem areas. After a shower, be sure to apply anti-cellulite cream - the components of the product penetrate faster and deeper into the skin heated by massage. Rub the cream with your knuckles (folding your hand into a fist), carefully work through the problem areas. You can solve the problem of cellulite by normalizing your diet and thereby establishing proper metabolism. Yours daily norm What you eat should not exceed your energy expenditure in terms of calories - otherwise excess deposits cannot be avoided. Counting calories is easy. Look at the calorie tables and remember the number of calories in the foods you eat most often. For clarity, draw yourself a pyramid proper nutrition, on top of which there will be a cake, and at the foot - greens, vegetables and grains. Remove all fatty foods, smoked meats and sausage from your diet. Try to replace harmful carbohydrates with healthy ones, for example, include porridge from a variety of cereals in your diet, give up regular bread, replacing it with wholemeal bread. All kinds of gels, creams, lotions and serums will help in the fight against cellulite. But remember - such remedies without proper nutrition and exercise have a weak and short-lived effect. But if you combine them with diet and exercise, they can bring tangible benefits. The most common component of anti-cellulite products is caffeine, which promotes the breakdown of fat. This component may be listed in the product as coffee extract. As a home option, you can use scrubs based on ground coffee.
The second most popular ingredient is algae extract. Seaweed helps improve fat breakdown and restore skin elasticity
| 0 | 0 | 0 |
Please draw me the sea,
So that quiet waves flash,
To the smells of happiness and will
My chest was filled to the brim.
Draw the sand under my feet
Yellow-yellow, like a ray of sunshine.
And decorate the sky with clouds,
Just don't draw clouds, please.
Draw me a kite
So that the wind plays with him rebelliously.
So that I, having nothing,
She continued to be kind and gentle.
Will you draw me the sea and the sky?
And will you strew it with clouds?
Can you draw me an eternal summer?
And sand under your bare feet?
Draw, but don’t put a dot yet,
I didn't tell you the main thing,
Please draw me a daughter,
And draw yourself at the pier.
| 0 | 0 | 0 |
How to draw a picture with paints
Choose watercolor paints. It's easiest to start painting a picture with them. They can convey all shades and add brightness when shined through. Choose what surface you will paint on - wet or dry. When drawing on a wet surface, the outlines of objects are blurred, which is useful in landscape compositions or when filling vegetables and fruits in the background.
Take drawing paper - it does not swell from excess water, and the places that need to be corrected can be easily washed off with foam rubber. Place the paper at an angle of 30-40 degrees to ensure the paint spreads evenly.
Make pencil sketches of the main objects. If this is a still life, then determine the location of the table or other surface and the fruit and vegetable composition. If this is a portrait, then take into account the proportions of the person, and if it is a landscape, then light sketches will be enough - main role colors will play. When painting with paints, especially watercolors, take into account the fact that you need to think through the shade of each stroke in advance. The error can be corrected only with the help of damp foam rubber. Then apply the necessary strokes on the already well-dried surface.
Paint the general background with foam rubber or a wide squirrel brush. When painting large areas, make sure there is enough paint on the brush. Apply the background from light to dark. Please note that the effect of white when drawing watercolor paints is achieved only through unpainted or well-washed areas with water. Be careful not to tear or roll the paper.
Determine the sunny side and shaded areas in the picture. Based on this, sketch all the objects. Mix paints on the palette - in a drawing, overlapping color layers can lead to simple color distortion dark shades. Apply each subsequent stroke next to the previous one with a slightly moistened brush for a smooth transition.
Paintings have the gift of attracting attention over and over again. The unique play of shades allows you to convey everything down to the smallest detail. But how exactly to draw a picture with paints? - drawing paper,
- pencil,
- eraser,
- paints.
| 0 | 0 | 0 |
How to draw a daffodil
Make pencil sketches in the middle of the sheet and arrange the individual details. In the upper part, draw a hexagon - the basis of the flower itself. To do this, draw two equal trapezoids that have a common base, with their convex parts facing opposite sides. Draw the middle in the form of an oval and depict the stem and leaf with simple strokes.
Draw the details of the daffodil more accurately. From each vertex of the hexagon, draw straight lines converging towards the middle. These lines will be the vertical axes for the flower petals. Mark the midpoints of the lines. Now draw strokes from each vertex, expanding to the designated points. Next, add strokes to the middle of the flower in the form of straight parallel lines.
To draw a daffodil, draw the flower petals with smooth lines - smooth out the main contours. Draw a slight curling of the petals with wavy lines located at their walls. Draw the middle of the daffodil. First, make the borders of the oval jagged with small steps. WITH right side oval, add a small dome, making the middle more voluminous.
Draw part of the narcissus stem in the form of a tubular arc connecting the flower itself and the straight thin stem wide side, directed towards the petals. Draw the leaf of the plant as elongated and narrow with a pointed apex.
Sketch a flower with a simple pencil. Densely shade the middle of the daffodil with straight, thin lines diverging from the middle to the borders of the oval. On the petals, draw rays running along the vertical midline. Shade both the left side of the stem and the top of the daffodil leaf.

How to draw an anchor
How to draw an anchor
Draw modern design anchors with two sharp edges at the bottom. Draw a vertical line in the middle of the sheet, slightly narrowed at the top and widened at the bottom. This will be the anchor spindle. Draw a circle around the upper border of the spindle, the so-called. eye - a place where a cable or rope is attached to raise or lower an anchor. At the top of the vertical, draw a horizontal line - the rod. Secure the lower part of the spindle with a large tick.
Draw the individual parts of the anchor in more detail. Draw the spindle in the form of two straight lines, draw each of which at the bottom pointing in different directions, forming an anchor, its main part. This way you will get two anchor horns. The junctions of the lines should be smooth. Make each horn three-dimensional by adding another line that follows the outline of the anchor. At the tips of the horns, draw lobes - wide plates with sharp outer peaks. Please note that the heel of the anchor must be quite sharp.
Draw the stem in detail. From the inclined straight line, at a short distance, draw another one with the same slope, but slightly convex, thus delimiting the side and lower parts of the rod. Connect both lines with several vertical strokes. Now draw another inclined line repeating the outline and continue the vertical strokes at an angle slightly greater than 90 degrees. Draw a neck above the upper border of the stem - draw a small rectangle and divide it in half with a vertical line. Make the eye ring double.
Darken certain areas of the anchor: the lower part of the blade and the right horn. Shade the stem and the neck and its right side with short lines. Also darken the section of the spindle that runs along the right border of the vertical - the drawn anchor is ready.
An anchor is a special metal structure that is designed to secure a ship in one place. It has many various types, but the base is always the same - a heavy bottom, which is fixed to a straight metal vertical. A drawn anchor is most often used as a maritime symbol. - landscape sheet;
- pencil;
- eraser.
| 0 | 0 | 0 |
Maintaining your privacy is important to us. For this reason, we have developed a Privacy Policy that describes how we use and store your information. Please review our privacy practices and let us know if you have any questions.
Collection and use of personal information
Personal information refers to data that can be used to identify or contact a specific person.
You may be asked to provide your personal information at any time when you contact us.
Below are some examples of the types of personal information we may collect and how we may use such information.
What personal information do we collect:
- When you submit an application on the site, we may collect various information, including your name, telephone number, address Email etc.
How we use your personal information:
- Collected by us personal information allows us to contact you and inform you about unique offers, promotions and other events and upcoming events.
- From time to time, we may use your personal information to send important notices and communications.
- We may also use personal information for internal purposes such as auditing, data analysis and various studies in order to improve the services we provide and provide you with recommendations regarding our services.
- If you participate in a prize draw, contest or similar promotion, we may use the information you provide to administer such programs.
Disclosure of information to third parties
We do not disclose the information received from you to third parties.
Exceptions:
- If necessary - in accordance with the law, judicial procedure, in trial, and/or based on public requests or requests from government agencies on the territory of the Russian Federation - disclose your personal information. We may also disclose information about you if we determine that such disclosure is necessary or appropriate for security, law enforcement, or other public importance purposes.
- In the event of a reorganization, merger, or sale, we may transfer the personal information we collect to the applicable successor third party.
Protection of personal information
We take precautions - including administrative, technical and physical - to protect your personal information from loss, theft, and misuse, as well as unauthorized access, disclosure, alteration and destruction.
Respecting your privacy at the company level
To ensure that your personal information is secure, we communicate privacy and security standards to our employees and strictly enforce privacy practices.
In ancient times, people were not particularly far-sighted and optimistic, and generally believed that people would at most live until 2012, and then they would burn in fiery hell. Therefore, they did not have the ability to explain things, or at least hint at their essence, in general, as well as the ability to do simple things. The Mayans made a post-apocalyptic calendar, which caused a lot of molehills and thoughts about life in the average person, and the ancient Egyptians built pyramids, the purpose of which worries even artists. And if so, we will learn how to draw pyramids with a pencil. The Pyramids of Cheops are one of the wonders of the world, a bunch of cobblestones that bring big income from the influx of tourists, as well as an architectural masterpiece built before our era. In ancient times, during the reign of the sun god Ra, they were used for the burial of pharaohs, sacrifices, platonic contacts with the other world and other mass entertainment. The pyramid-shaped structure turned out to be a very reliable structure, so similar buildings were built in Mesopotamia, China, Mars and Las Vegas. If you believe accurate sources from Wikipedia, then the pyramids in Egypt are called Egyptian, in China Chinese, and so on. Well, you understand.
How did mere mortals manage to build a building 146 meters high from blocks weighing 15 tons? Nobody knows this. Perhaps this could not have happened without the help of alien friends.
One thing I know for sure is to draw mystical structures much easier than building, especially if you do it according to these steps:
How to draw a pyramid with a pencil step by step
Step one. Draw several triangles, preferably even ones, and below there will be a sand background with camels. For now, let's denote them by circles.  Step two. Carefully select the shapes of the pyramids and outline the contours.
  Step three. Now let's add some Bedouins with camels.
  Step four. Let's add a few touches for believability. You can even color it with colored pencils. But I’ll leave this to you:
  Try drawing others too mysterious places of our planet.
Rectangle, square, triangle, trapezoid and others are geometric figures from the section of exact science. A pyramid is a polyhedron. The base of this figure is a polygon, and the side faces are triangles with a common vertex, or trapezoids. To fully represent and study any geometric object, mock-ups are made. They use a wide variety of materials from which the pyramid is made. The surface of a polyhedral figure, unfolded on a plane, is called its development. The transformation method will help you create a layout flat objects into volumetric polyhedra and certain knowledge of geometry. It is not easy to make developments from paper or cardboard. You will need the ability to make drawings to specified dimensions.
Materials and accessories
Modeling and execution of polyhedral volumes geometric shapes- an interesting and exciting process. From paper you can make a large number of all kinds of layouts. To work you will need:
- paper or cardboard;
- scissors;
- pencil;
- ruler;
- compass;
- eraser;
- glue.
Defining parameters
First of all, let's determine what the pyramid will be like. The development of this figure is the basis for the manufacture volumetric figure. Completing the work will require extreme precision. If the drawing is incorrect, it will be impossible to assemble a geometric figure. Let's say you need to make a layout of the correct
Any geometric body has certain properties. This figure has a base and its vertex is projected into its center. The base is selected. This condition determines the name. Side ribs for a pyramid, these are triangles, the number of which depends on the polyhedron chosen for the base. IN in this case there will be three of them. It is also important to know the sizes of all components, from which the pyramid will be composed. Paper developments are made in accordance with all the data of the geometric figure. The parameters of the future model are agreed upon in advance. The choice of material used depends on these data.
How is a regular pyramid unfolded?
The basis of the model is a sheet of paper or cardboard. Work begins with a drawing of the pyramid. The figure is presented in expanded form. A flat image on paper corresponds to pre-selected dimensions and parameters. has a regular polygon as its base and its altitude passes through its center. Let's start by making a simple model. In this case, it is a triangular pyramid. Determine the dimensions of the selected figure.

To construct a net of a pyramid whose base is regular triangle, in the center of the sheet, using a ruler and pencil, draw a base of the given dimensions. Next, to each side we draw the side faces of the pyramid - triangles. Now let's move on to their construction. We measure the dimensions of the sides of the triangles on the lateral surface with a compass. We place the leg of the compass at the top of the drawn base and make a notch. We repeat the action, moving to the next point of the triangle. The intersection obtained as a result of such actions will determine the vertices of the side faces of the pyramid. We connect them to the base. We get a drawing of a pyramid. To glue a three-dimensional figure, valves are provided on the sides of the side faces. We finish drawing small trapezoids.
Layout assembly
Using scissors, cut out the completed design along the contour. Carefully bend the development along all the lines. We tuck the trapezoid valves inside the figure so that its edges close together. We lubricate them with glue. After thirty minutes the glue will dry. The volumetric figure is ready.
First, let's imagine what the geometric figure looks like, the model of which we will make. The base of the selected pyramid is a quadrangle. The side ribs are triangles. For work we use the same materials and devices as in the previous version. We draw the drawing on paper with a pencil. In the center of the sheet we draw a quadrilateral with the selected parameters.

We divide each side of the base in half. We draw a perpendicular, which will be the height of the triangular face. Using a compass solution equal to the length of the side face of the pyramid, we make notches on the perpendiculars, placing its leg at the top of the base. We connect both corners of one side of the base to the resulting point on the perpendicular. As a result, we get a square in the center of the drawing, on the edges of which triangles are drawn. To fix the model on the side faces, add auxiliary valves. For reliable fastening, a strip of centimeter width is enough. The pyramid is ready for assembly.
The final stage of the layout
We cut out the resulting pattern of the figure along the contour. We bend the paper along the drawn lines. The three-dimensional figure is assembled by gluing. Lubricate the provided valves with glue and fix the resulting model.

Volumetric layouts of complex figures
After completing a simple polyhedron model, you can move on to more complex geometric shapes. Unfolding a truncated pyramid is much more difficult to perform. Its bases are similar polyhedra. The side faces are trapezoids. The sequence of work will be the same as that in which a simple pyramid was made. The sweep will be more cumbersome. To complete the drawing, use a pencil, compass and ruler.
Construction of a drawing
The development of a truncated pyramid is performed in several stages. The side face of a truncated pyramid is a trapezoid, and the bases are similar polyhedra. Let's say these are squares. On a sheet of paper we draw a trapezoid with the given dimensions. We extend the sides of the resulting figure until they intersect. The result is an isosceles triangle. We measure its side with a compass. On a separate sheet of paper we build which will be the measured distance.

The next stage is the construction of the side ribs that the truncated pyramid has. The sweep is performed inside the drawn circle. Using a compass, measure the lower base of the trapezoid. On the circle we mark five points that connect the lines to its center. We get four isosceles triangles. Using a compass, measure the side of the trapezoid drawn on a separate sheet. We put this distance on each side of the drawn triangles. We connect the resulting points. The side faces of the trapezoid are ready. All that remains is to draw the upper and lower bases of the pyramid. In this case, these are similar polyhedra - squares. We add squares to the upper and lower bases of the first trapezoid. The drawing shows all the parts that the pyramid has. The scan is almost ready. All that remains is to finish drawing the connecting valves on the sides of the smaller square and one of the faces of the trapezoids.
Completing the Simulation
Before gluing the three-dimensional figure, the drawing along the contour is cut out with scissors. Next, the development is carefully bent along the drawn lines. We tuck the mounting valves inside the model. We lubricate them with glue and press them to the edges of the pyramid. Let the models dry.

Making different models of polyhedra
Making three-dimensional models of geometric shapes is a fascinating activity. To master it thoroughly, you should start by performing the simplest sweeps. Gradually moving from simple crafts to more complex models, you can begin to create the most intricate designs.


- Pearl barley porridge with beef
- Recipes for baked apples with cottage cheese, raisins, honey, nuts and cinnamon
- You can get better from potatoes
- Puff pastries stuffed with stewed cabbage
- Recipe: Sponge cake "Apple" - "in the oven"
- Chicken hearts in sour cream sauce
- How to cook bacon and eggs
- How to cook minced meat with vegetables in a hurry
- Gemini - their compatibility with other signs in love
- Submitting an application for the Unified State Exam: deadlines and features of the procedure
- Meaning of the female name hope
- How to reduce VAT and maintain profits
- International accounting and reporting standards
- How to fill out a tax return correctly
- Crab salad with cheese - five best recipes
- Cutlets in foil in the oven
- Salad of crab sticks with corn, cheese and egg Crab salad with hard cheese
- Potatoes with minced meat in the oven in foil
- Cutlets in foil in the oven
- Minced meat in foil in the oven with filling