How to draw a moment from a fairy tale. How to draw a fairy tale with a pencil step by step. How to draw an illustration for the fairy tale “The Silver Hoof”
The airbrush technique is quite complex and requires the use of additional materials. In this section we will talk about those that are necessary for making illustrations using an airbrush.
Just like any other painting technique, airbrushing allows you to create images on the surface of the base. However, its peculiarity is that
Eight secrets in drawing
Eight secrets that will allow you
learn to draw masterfully
 1. Correct construction of objects in space
This skill is the foundation for any professional artist. It will create a sense of volumetric space in your painting, which is very important. This alone will greatly improve your paintings.
2. Proper application of strokes
With the help of strokes, a background is created for the future volume of forms and objects - this is the main basis. When you learn how to apply them correctly, everything you draw will become more saturated and clear.
3. Tone stretching with a pencil
Another secret of the masters. When you learn how to do tonal stretching with a pencil from simple to complex, and dial in tone with pencils of varying softness, you will be surprised at how much more realistic your drawings will become.
4. The art of drawing three-dimensional figures
Another skill that separates people who are great at drawing from those who are new to drawing. This is the ability to give volume to objects that differ in shape, working with light and reflex, one’s own shadow and penumbra. These skills will make your work much better.
5. The ability to work with your own shadow on figures to add volume
This is also important to be able to do if you want to masterfully depict three-dimensional objects and create realistic paintings.
6. Effective construction of falling shadows
The type and shape of falling shadows depends not only on the figure cast by it, but also on the location of the light source. Once you master this skill, you will be able to draw the falling shadows of various geometric shapes, but also apply this knowledge to objects of various shapes.
7. The ability to distinguish objects by tone
Thanks to this, you will not only be able to show the difference between objects and forms, but also indicate the compositional center, which is very important for constructing a composition.
8. Composition skill
But this is the most important knowledge that will “revive” your picture and fill it with meaning, will make the viewer think about what mood you were in at the time of creating the picture, what exactly you wanted to tell the viewer. Knowing composition will allow you to “say” with your painting what you cannot say in words...
... and many other skills and secrets that the world's best artists possess.
How to quickly master the main skills of professional artists?
Of course you can enroll in an art school. However, this is possible if you have a lot of free time. Unfortunately, not everyone can spend several hours a day getting to and from school.
In addition, you can start learning on your own - from books. But this is a very slow and difficult path, and without a professional mentor you will study for a very long time, making many mistakes.
The easiest way is to study using a video course at home. In just 46 days, you can learn to draw great drawings right at home!
HOW TO LEARN TO DRAW
A detailed guide to help you become an artist

Switch to full recording and to order
Learning to paint portraits in oil
Paint a Portrait with Your Own Hands
while receiving a powerful energy boost,
feeling the joy of the process and pride in the result!
And I will help you with this - portrait artist Tatyana Artykova
- Where to start working in oil painting?
- What kind of paints, brushes, etc. use?
- How to build a composition?
- How to transfer an image correctly?
- How to mix colors?
- Stages of creating and completing a portrait;
Get answers in the video course: “Painting a Portrait in Oil” Stages of creating a “living” portrait
What (or who) will facilitate the learning process?
Without knowledge of visual literacy, it will be difficult to cope with the assigned tasks. You will need a “translator” who will help facilitate the process, make it as interesting, efficient and fast as possible.
I act as a “translator” - Tatyana Artykova, portrait artist, teacher.

I have been doing portrait work for 20 years. And, at the same time, at live Master Classes I share my knowledge with those who intend to master the art of portraiture as efficiently and quickly as possible. And now my experience is in video format.
Painting a Portrait in Oil
Stages of Creating a “Living” Portrait
A manual for “beginners” and “advanced”
Who is this course for?
- for those who intend to create their own portraits in the near future;
- in whom the creative fire burns and there is a desire to kindle it “more coolly”;
- who needs clear recommendations to make the learning process as fast, effective, and interesting as possible!

Paint your portrait too, using simple recommendations!
- The “textbook” is a wonderful picture. We study the secrets of portrait painting using the example of a painting by a famous portrait master;
- The “object” of the study is a beautiful girl - the goddess Hebe, a symbol of eternal youth; which inspires you to create a beautiful image;
- The step-by-step implementation makes the course as understandable as possible, accessible even to absolute beginners;
- Step by step, the portrait gains strength, bringing joy to the creative process;
- The problem of creating the most accurate drawing of the person depicted is easily solved;
- A simple technique for selecting the desired colors and shades is shown;
- The main secrets that allow you to create a “living” portrait are revealed;
- In the additional section of the course you will see how students complete the task. This is important for comparative analysis.
It is impossible to imagine a children's book without colorful illustrations that develop the imagination of children and help them imagine the actions described by the author. The illustrator is, in fact, a co-author of the book. If a writer creates imaginary images, then an artist makes them visual. Art centers for children's development widely use illustration techniques in their work, which is a mandatory stage in the development of children's creative abilities.

It is recommended to start creating your first illustrations with Pushkin’s favorite fairy tales. It is very difficult to overestimate their educational significance, because Pushkin’s fairy tales introduce children to the enormous wealth of literary heritage, enrich speech, develop memory and imagination, and instill moral and ethical values. Pushkin's unique poetry captivates children with its emotionality, simplicity of language and colorful literary images. 
- Formation of skills to convey the expressiveness of an artistic image through color and shape.
- Development of independence in the selection of plot composition and performance technique.
- Practicing the skills of placing a plot drawing on an entire sheet of paper, isolating the main elements and emphasizing them with colors, play of light and shadow.

- Development of children's imagination and emotional attitude to the work and characters of the fairy tale.
- Consolidating the skills to use various visual materials: paints, pencils, wax crayons, etc.
- Moral education of children .
Preparatory work
 Before starting to illustrate Pushkin’s fairy tales, children should delve as deeply as possible into the unique fairy-tale world. Preliminary work includes the following steps:
- Reading a fairy tale.
- Listening to a fairy tale on audio recording.
- Familiarization with illustrations made by famous artists (Mavrin, Konashevich).

- Listening to excerpts from the operas of the same name (“The Golden Cockerel”, “Ruslan and Lyudmila”, “The Tale of Tsar Saltan”, “The Tale of the Priest and his worker Balda” and others).
 Illustration is a rather complex process that requires special attention to little things that at first glance may seem insignificant.
- We choose a plot. For children's drawings, it is better to choose key moments from fairy tales (the transformation of the Swan Princess, the Old Man by the Sea calling the Golden Fish).
- Do not immediately transfer the image to a large sheet of paper. Try placing character figures and objects surrounding them on small leaves.
- Before coloring the drawing, choose a basic color scheme, remembering that the colors most accurately convey the general mood of the drawing.

 Kids who don’t yet know how to draw, but love Pushkin’s fairy tales, can also be involved in creating illustrations, allowing them to color ready-made drawings. Children's coloring books based on Pushkin's fairy tales can be bought at a bookstore or downloaded from the Internet and printed on a printer. For the youngest children, choose large images. Be sure to explain to your child what is shown in the picture; you can even read an excerpt from a fairy tale corresponding to this illustration.
See how to draw an illustration for the fairy tale “The Silver Hoof”, “Kolobok”, “The Goat-Dereza”, “The Golden Key” and others. Learn how to draw Father Frost, Snow Maiden, Baba Yaga.
Thanks to parents and educators, fairy tales become children's first books. It will be interesting for children to learn how to portray the characters of their favorite fairy tale or scene from a magical story.
How to draw an illustration for the fairy tale “The Silver Hoof”?

If you're looking for a winter tale, The Silver Hoof is perfect. See how to draw a scene from this interesting story by Bazhov.
First draw a house. Draw two parallel vertical lines that will soon become the corners of the house. Draw two lines on top that will turn into the roof.

Since the fairy tale “The Silver Hoof” is winter, draw a roof and snow on it. Then draw walls and windows. One will have shutters. Explain to the children why these elements are needed.
To show the presence of snow, draw a wavy line near the bottom of the house.

There will be a silver hoof goat on the roof of the house. First it needs to be depicted schematically. To do this, draw three slightly uneven circles. The top one will soon become the head, the second will turn into the front, and the third will become the back of the animal. Connect the pieces and then draw around this diagram to define the character more clearly.

Draw in the missing details. Erase the auxiliary lines. Don't forget to draw one of the front hooves so that it is raised. Draw horns, eyes, ears, nose, legs with hooves. Mark several points on the roof of the house. Soon they will turn into precious stones.

Now you need to draw the Christmas trees. After all, the house is located in the forest. Draw a few lines to show how fluffy the snow is. Draw stars and a month in the sky.

Here's how to draw the fairy tale "The Silver Hoof" with a pencil. If you wish, then color your masterpiece. Draw snowdrifts and snow on the fir trees using white, blue, and gray paint. Then you will see where the shadow is. Behind one of the snowdrifts you can draw a girl who is watching such a miracle. Make the house and characters more colorful and add color to the surroundings. The painting is complete.
- see also
Illustrations for the fairy tale “Kolobok” step by step
Show your child how to draw the characters in the story.

- First you need to draw a circle in the lower left corner. Inside it draw eyebrows, eyes, mouth and nose. This is the main character of the fairy tale “Kolobok”.
- On the right, draw a hare, but first, a schematic representation of it. To do this, draw a large oval, which will become the body.
- The head is pear-shaped as it is positioned in profile. Ears, hind legs, tail are oval. And the front paw consists of two small ovals, so you can see that it is bent.
- At the next stage, unnecessary lines are removed. Then add strokes to the hare to show what kind of coat it has. In some places, leave lighter spots so that it can be seen that there is less shadow here.
- The bun is yellow. Color it this way, make the mouth red and the blush orange. You can draw grass and a forest landscape.
- For the next illustration for the fairy tale “Kolobok”, you will first need to depict two details. The upper one is pear-shaped with a snub nose, and the lower one is oval.
- Now draw two round ears at the top, and four paws below. At the third stage, outline the features of the muzzle, claws, and erase the excess. At the end, draw the Bear with a brown pencil, and his tummy and the inside of his ear with yellow.

The next illustration for the fairy tale “Kolobok” is visible in the picture.

The image begins with drawing geometric shapes. This is an oval that will soon become a body. Place it horizontally. A little higher and to the left, draw a slightly elongated circle, which you will turn into a muzzle. To do this, draw a sharp nose and two triangular ears.
Then draw the tail and paws. In the third stage, outline the chest, tummy, eyes and tip of the tail. Don't forget to erase the extra lines. Then all that remains is to paint the fox red, leaving a little white around the chest, belly and tip of the tail. And make the bottom of some paws darker.
- See also how to organize
“The Gray Neck” - illustrations for the fairy tale
Introduce children to this fairy tale. After all, this story awakens the best feelings and instills kindness in children. Drawing a duck is not difficult, especially since this skill will certainly be useful to kids in the future. After all, sometimes they will need to portray this bird.

Drawing step by step is not difficult. First you need to draw a small circle and a figure that looks like a horizontal drop. Now add a beak to the head, which is shown to the left. The wing almost follows the shape of the body. Draw an openwork edge on it, just like on the tail, to show that these are feathers. Then draw the nostrils, eyes, make the feathers on the chest more ribbed.
At the next stage, this will allow you to color this part so that you can see that this is a Gray Neck duck. The breast and wing are the same color. Draw the beak and paws in orange, and the head and body of the bird in light brown.
- see also
Illustration for the fairy tale “Dereza Goat”
This skill will also come in handy when you need to draw a mother from a fairy tale.« Seven kids." As you can see, this character's head is oval and slightly turned down. An elongated triangle with a beveled top emerges from it.
Since the arms lie on the chest, at this stage you need to make them oval. Next you will add the tassels and outline the sleeves. Draw the lower and upper skirt, apron. Then draw the horns, ears and the base of the headdress. Don't forget to draw the hooves.

- How to do
How to draw the Little Mermaid - step-by-step illustrations for the fairy tale
This skill will definitely come in handy when you start reading the fairy tale of the same name to your child. To draw the Little Mermaid, use the step-by-step photos provided.

First draw a rounded head. To then maintain symmetry when drawing facial features, draw a vertical stripe, but not all the way. At this stage draw the neck and body up to the waist. On the next one, using the previously drawn line, draw symmetrical eyes, and below - the nose and mouth. Draw the tail. Then remove the extra features and make your face more expressive. Draw the hair and scales on the tail. Show your child how to color the mermaid so that she turns out so bright.
How to draw the fairy tale “The Golden Key”?
This is also easy to do. Draw a round head, in the place where the shoulder will be located - a small circle. Mark the line of the body. This curve will help create the back and the leg that is slightly behind. Draw the second one at a short distance.
Draw this character's cap. To draw Pinocchio further, draw his eye and ear. Draw hair that looks like shavings. Dress this character in shorts and a jacket. Give him the golden key. All that remains is to add colors, after which the picture is completed.

The second character in the fairy tale The Golden Key is Karabas Barabas. To draw it, first draw a round head, with a powerful body located just below. We don’t draw a neck, then the figure of Karabas Barabas will appear even more massive.
Draw a semicircular line in the belly area so that you can see where the shirt ends and the trousers begin.
Draw the arms, legs, then the beard and face of this negative character. All that remains is to decorate it.

Here's how to draw a fairy tale« Golden Key".
How to draw Father Frost and Snow Maiden step by step?
On the eve of the New Year holidays, this skill will be very relevant. After all, children at school will probably be given such a task. They can portray Father Frost and Snow Maiden to make a card and give to parents or friends.

- Let's start with Santa Claus. Draw a narrow triangle, which will soon turn into his fur coat.
- At the top, instead of a point, draw a semicircle, which will soon become a face. Draw a vertical line in the middle so that the facial features are symmetrical. From above, draw the edge of the cap and itself. Draw the collar, sleeves, staff and beard.
- To draw Santa Claus further, in the second stage add his facial features, mittens, and make his beard more fluffy. Mark the places where the felt boots and belt will be.
- In the third picture this character becomes more and more realistic. Show that the edge of the fur coat is fluffy. To do this, you need to make the lines more intermittent in these places. Modify your beard in the same way. All that remains is to paint Santa Claus's robe and paint his pink cheeks. Now we move on to the image of his granddaughter.
- To draw the Snow Maiden, first also draw a triangle, but at the top, instead of an acute angle, draw a neck, head and schematically depict a hat. Since the face of Santa Claus's granddaughter is turned to the left, move the vertical line here, which will help make it more symmetrical.
- Then draw a horizontal line to get an idea of where the eyes will be located. Below draw the nose and mouth. Draw the girl's hands and muff. Make this accessory more fluffy, as well as the edges on your fur coat and hat.
- Draw a hairstyle and facial features. To draw the Snow Maiden further, all that remains is to decorate her. Usually this girl sports a fur coat and a blue hat.

How to draw Baba Yaga?
When a child draws an illustration for a fairy tale, he may need to depict this character as well.
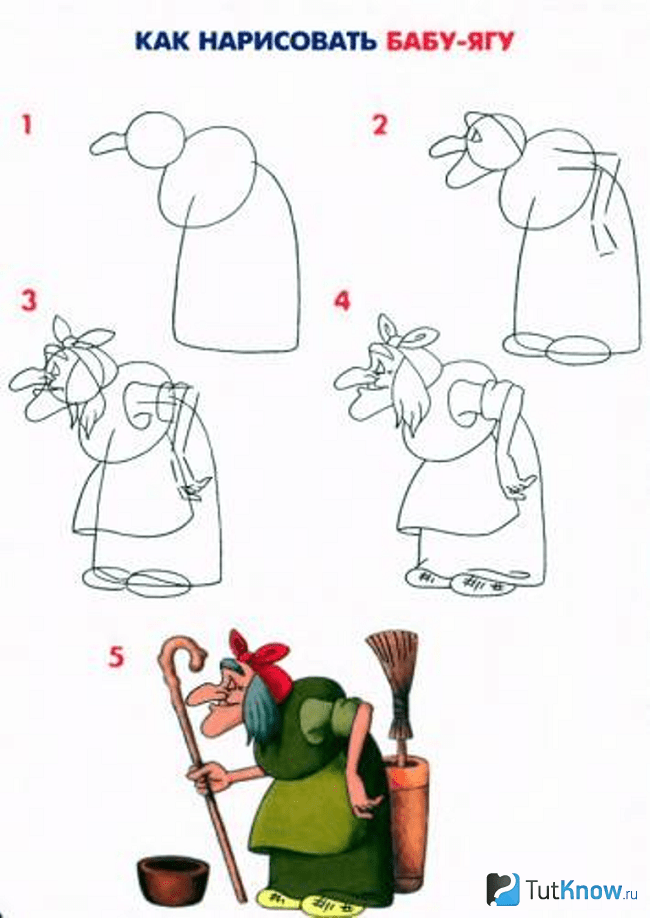
- First, sketch this granny. The circle will become the head, the oval will become the hunched back. Just below it, draw a long skirt, and at the top draw a hooked nose.
- Grandma's chin is elongated. This will be visible in the second picture. Draw her hand, slippers, eyes, this will need to be done in the second stage.
- On the third draw the hair, a scarf with ties at the top. Mark where the apron and sleeves are. At the next stage, draw Baba Yaga’s lower tooth, apply the design to the slippers, and outline the fingers.
- All that remains is to decorate this character. You can draw a mortar with a broom, as well as a stick and a wooden plate.
How to draw a knight, a princess - step-by-step illustrations for a fairy tale
- There are magical stories where these characters appear. To draw a fairy tale with their participation, let's start with an image of a girl.
- Draw her round head, thin neck, body and bell-like skirt. To depict facial features, first draw auxiliary lines.
- Draw hands and hair. In the next step, add a dress pattern. You can steal it with bows. Make your hair voluminous and your eyes more expressive.
If a child draws, then he can “dress” the princess at his own discretion. After all, girls love to come up with outfits.

All that remains is to draw the crown and fan and you can start drawing the knight.
Draw two figures that will become his ammunition. The top rectangle is the helmet. In the next picture you can see that you need to finish drawing the arm and legs. Gradually add new touches. Draw protection for the knees and elbows. All that remains is to decorate this hero and rejoice at how quickly you were able to draw a knight.

Often animated films are made based on fairy tales. This also applies to the next hero.
How to draw Winnie the Pooh step by step?

Draw an oval. He will repeat the figure of this character. Divide it in half with a horizontal line. Draw a semicircle at the top, and right below it draw two eyes and a nose. Also draw a characteristic pattern here, which you will then use to mark the areas around the eyes. Draw ears and paws.
This is how to draw an illustration for this fairy tale with a pencil step by step. You can see what needs to be highlighted with a simple pencil and what areas should be left white.
It is very interesting to do such creative work. You can add other features to your drawings, draw heroes of magical stories against the backdrop of a forest or palace.
See how to draw an illustration for the fairy tale “The Frog Princess.”
And if you need to draw the heroes of the fairy tale “Turnip”, then watch the second master class.
- Article
In this lesson I will tell and show how to draw a fairy tale with a pencil step by step, how to draw an illustration for a fairy tale. A fairy tale is a fictional story, mostly a fairy tale, so often in the illustration of fairy tales there are fairy-tale characters, either non-existent, or animals that can talk, or all together and many other options.
So, there is a text in the fairy tale, we need to find any episode from this text at your discretion and draw it. You can see examples of illustrations for various Soviet fairy tales from cartoons and simply, I will give links below.
We will have a fairy tale about a bear cub, there are many fairy tales about bears, but this illustration will be for a non-existent fairy tale, for example, there will be such a thing that the bear cub ran far away to catch her, she was very beautiful, but did not notice how she ran far away from the house and ran to the river. The little bear had never seen the river, he was delighted with its beauty and there were beautiful flowers growing next to it, which he really liked, he picked one and ran home across the field to tell mom and dad about what he had lost. We will illustrate this moment, when he runs across the field with a flower in his hand.
You can start drawing from nature, or from the character itself, whatever suits you. First you need to make several sketches of the character, in our case it is a bear girl and select one of them. Now you need to depict the selected character in motion. So let's start drawing. Draw a teddy bear in the middle just above the bottom of the edge of the sheet.
Let's draw a circle and auxiliary lines for the middle of the head and the location of the eyes. Our head is turned 3/4, draw the shape of the head and ears.


Draw the pupils, arms and legs, in the hand.


Draw more vegetation in front of the mountains and part of the path.

We draw a whole range of mountains in the distance, and since this is a fairy tale, the clouds will be in the shape of animals, we draw only their silhouettes so that they are recognizable, these are a turtle, a fish and an elephant.

That's it, the illustration for the fairy tale is ready, all that remains is to color it.
Good day everyone! Today we will draw fairy tale character.
This will be a sleepy inhabitant of a cozy house, or an underground dwelling, who has just been awakened by some trifle. Obviously, our hero doesn’t want to go out anywhere, so he reluctantly holds a candle to illuminate the darkness of the night, and his pose and facial expression convey his only desire - to go to bed as soon as possible.
Step 1
Let's sketch out the character's figure, marking the longitudinal line of facial symmetry and the transverse line of the eyes on the face. Note the clearly disproportionate head and neck, which leans forward slightly.

Step 2
This stage will be the most voluminous of the entire lesson. Here we will draw with several smooth lines the outline of the fairy-tale creature’s robe, his shoes, and also draw the eyes, ears and cap. Look at your eyes - they should be half covered with your eyelids. We finish off the face in this step by sketching out the cheekbones and chin.

Step 3
Draw a face creating a fairy-tale character is a rather interesting task, and at this stage we will tackle it. Pay attention to the features - a long, hooked nose, slightly sagging cheeks and a phlegmatically compressed mouth. Here we draw the inside of the ear, and sketch out a line along which the dressing gown is wrapped. By the way, about the robe - don’t forget about the collar and belt. We complete the stage by working on the folds in the fabric of the nightcap.

Step 4
This stage will be the easiest, here we will draw a candle and a saucer in the hand of our fairy-tale character (by the way, we need to give the hand a finished look). We will also draw the knot of the belt on which the robe is tied.

Step 5
That's all, all that remains is to apply the shadows. Shade the dark areas with a simple pencil, paying attention to the candle, which is the source of light. It will be great if the end result looks like the illustration from


- What does individuality mean?
- What does a person’s individuality depend on?
- Issues of formation of a cluster education system in the Russian Federation
- Unified State Exam tests in literature What is included in the Unified State Examination in literature
- How to pay transport tax for legal entities
- Card for individual accounting of the amounts of accrued payments and other remunerations and the amounts of accrued insurance premiums Card for insurance premiums per year
- Error when filling in Contour
- Desk audit: developments
- Conditions for performing the stern experiment
- System status and processes
- Alexey Sergeevich Obukhov development of student research activities
- Oriental and African studies
- Yelets State University named after
- What does it show and how to calculate the internal rate of return?
- Yaroslav Samoilov is a relationship specialist with no professional education. Do you want to save your relationship?
- Perm Pharmaceutical Academy: reviews, faculties
- Trader Dmitry Cheremushkin
- Main economic issues
- Creative competition: we enter the Faculty of Journalism of St. Petersburg State University Bachelor's training programs
- Management of a modern school using the example of creating an educational cluster