How to draw grass using different materials. How to draw grass with a pencil step by step? Draw a herbaceous plant with a pencil
Welcome to another lesson! This time we will look at how to draw grass using copics markers, as well as a method using digital programs (Photoshop, Paint tool SAI). But, first, I would like to tell you some rules for drawing grass.
Remember that grass does not grow evenly! It is growing in many different directions.
Therefore, remember that if you draw it all straight up, as in example A, it will look rough and unnatural. Even after using a lawnmower, the grass may not have this effect. The only time grass can be drawn in one direction is when you are drawing a very strong wind (and then the grass should be quite long!)
See on topic: How to draw trees
Rule 2.
Grass has many colors and shades!

I took each of these colors on the right directly from this photo of grass in my yard to show you that grass contains more than just color!
The grass contains a variety of colors that range from yellow-green to dark green. Please don't make your grass one color, or even just two! The colorful grass looks like believable grass!
Digital painting of grass (Photoshop, Paint tool SAI)
Start by painting the area light green where you want your grass to be.

Now select a regular brush with a hard edge and a yellow or lime color, and then start adding lines of different sizes and directions (the blades of grass will look longer in the foreground)

After you have painted the entire surface with light blades of grass, take a dark green one and repeat the previous step.

Do the same steps again with a less saturated green color. Then add some smaller blades of grass in dark green and light green for a more complex look.

Coloring grass with Copics markers
Materials:
- Copic paper (cardboard can replace this paper)
- Copic markers in the following tones: YG03 (yellow green), YG66 (pea green), YG17 (grass green), YG67 (moss)
Chaotically and carelessly paint the surface with YG03 where you want the grass to be.
See on topic: How to draw clouds

Take the color YG66 and add thick and large strokes on top, directed from the bottom up, but in different directions (right and left). Remember that grass grows in different directions!

We continue to add thick strokes using the color YG17. If you are painting grass over a large area, then the further it is from you, the fewer strokes you should have.

Now select the darkest green YG67 and draw thin strokes. There is no need to fill the entire area of the grass, try adding these strokes between the other blades of grass you painted.

You can stop at the last step if you want to draw grass that stands out and has a more contrasting appearance.
But since the grass is usually not the main element of the painting, I like to soften all the lines and blend the grass with YG03, which will help make it less detailed.

This concludes our lesson! I hope it helps you)
Translation: Prescilla
This material was prepared for you by the site team
Here's a quick tutorial on how to paint grass with light and shadow using Photoshop. The key step is to separate the shadow onto a separate layer, this way we make changes easier
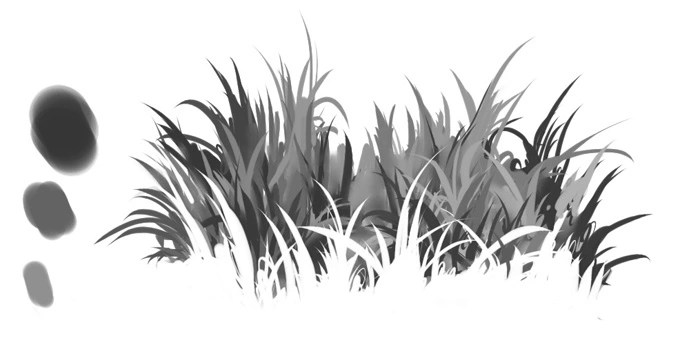
Grass
Start painting the grass in one layer. The default grass brushes are pretty good, but there are a few settings you can tweak:
Shape Dynamics - Flip X Jitter (But not Flip Y Jitter, since we don't want to turn the grass upside down) Size Jitter, Angle Jitter, Roundness Jitter.
Scattering
Color Dynamics - Hue, Saturation, Brightness. I disable the Background/Foreground Jitter, but this can be useful if you select two shades of green and control with pen pressure.
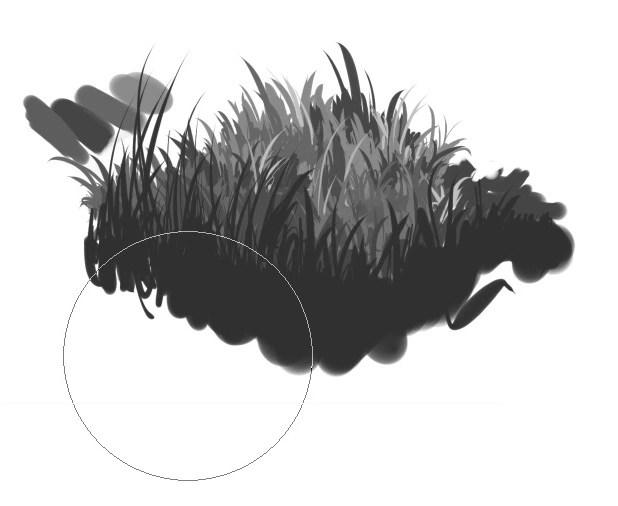
Shadow
Add another layer and paint the shadow of the leaves that the tree casts. Use a blue or light blue tint for this. For the leaves I use a brush from Xong Bros, you can download it , on my dedicated brushes page.
Warp the shadow layer (CTRL-T) to give it some sense of perspective and change the layer blending mode to Multiply. You can go back to change the color of the shadow if you think it's too light or too dark.
At this point, the shadow looks like it's falling on a flat, flat surface, ignoring the texture of the grass. To see what exactly I mean, look at the photos below:
Use the grass brush again: paint and use the eraser on the shadow layer. Remember to use the same blue/cyan color!
Glow/Light flare
Add a new layer and change the blending mode to Screen. Use a soft round brush to paint the area around the shadow.
As an additional step, you can again add a new layer and change the blending mode to Screen. The bright area can be made with the same brush that you used for the grass before.
Video
Below is a very simple animation and an accelerated drawing process on video
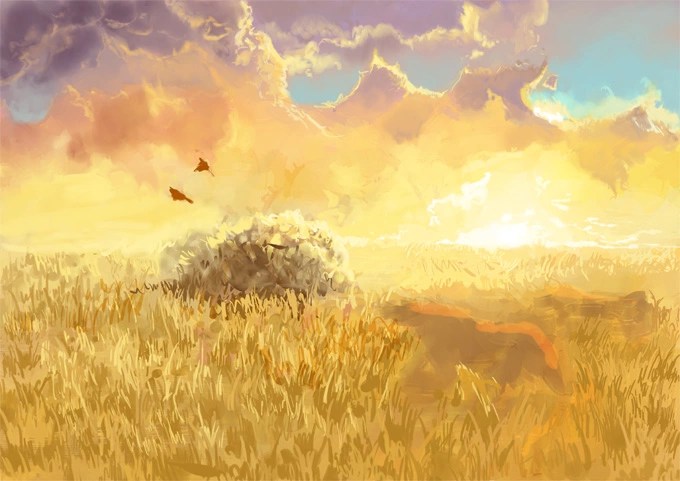
Result
This is what the final version of the work looks like, which I posted online on my own behalf.
Introduction
I haven't written any lessons for a long time. I promise this one will be short and simple. I don't really like drawing grass, just because it's boring and takes a lot of time (I'd rather draw clouds or something...) ...:) But I hope you find this tutorial useful. So, let's start...
STEP 1: Foundation
The very first stage is creating the basis for our so-called grass. Use a medium green color (I daresay you're going for standard GREEN grass) and use a 14px hard brush to paint some straight lines.
As you can see, the lines at the bottom are more saturated than at the top. That's how it should be, okay?
STEP 2: Blur
Now we need to make the tips of the grass sharp. This effect cannot be achieved at the very beginning, I don’t even know why. In any case, take a 19 px brush, the Smudge tool, set its intensity to 70-80%, and start smudging the ends :)

STEP 3: Shadows
Now let's add some shadows. To do this, use at least two darker tones. The lighter one first. Draw in the same way as in the first stage, but just remember - “the deeper, the darker.” No need to shade the ends. They are located close to the light source, moreover, they are thin and quite transparent. Use some small hard brush with Opacity up to 30%.

STEP 4: More lines
Repeat step 2. Take a dark color, set the Opacity to 60% and draw some thin lines (with a 3 px brush).

STEP 5: Highlights and Contrast
Take a light color. Use it on the tips of the grass. The brush is 3 pixels, hard, with a very high Opacity level. Even up to 80%. Add some dark color at the bottom of the roots (with a soft brush, size 60 px, Opacity 20%). You'll get a nice contrast.
How to draw grass with a pencil? and got the best answer
Answer from Dum spiro,spero[guru]
Instructions
1
Observe the original before recreating it on paper. Look what the grass looks like, what shades it comes in, how the wind moves it, how it glistens in the sun. Study what shape the blades of grass have and how they look at different distances. Compare the frequency with which grass grows on different surfaces. In some places it is very thick, in other places you can only see individual blades of grass.
2
Take a simple pencil and outline the contours of your future grass. Draw with soft, thin, barely noticeable lines so that they can be erased later with an eraser. Draw every blade of grass. Follow their direction. Basically, the grass grows in one direction, but individual blades of grass may be slightly deviated in the other. This technique will help you create the most realistic sketch, because in nature there are no perfectly straight lines, there is no ideal symmetry.
3
Color the blades of grass with pencils. Practice using different shades of green first to achieve the color you want. With colored pencils you need to draw in the direction of growth of the blade of grass, along its length. The outline can be made a darker color. Also, consider which side the sunlight hits the grass from. Here the colors will be lighter, and on the reverse side use pencils of a dark, rich green color.
4
Draw the grass in a slightly different way if it is not so close to visible in the landscape. In this case, you can make a background of one of the shades of green, on which you will then draw individual blades of grass. In this case, you also need to take into account whether the sun's rays are falling from the right, left, or directly from above. In this drawing you can depict glare of light. To do this, apply a little yellow or yellow-green color to the grass.
Answer from Marat Melkumyan[guru]
You just try sketching out several views on small notebook leaves and then choose the option you like - that’s all!
Answer from 3 answers[guru]
Hello! Here is a selection of topics with answers to your question: How to draw grass with a pencil?
- This is a good step towards landing the objects in the scene. With the help of painted grass, you can show perspective, and also, with a skillful approach, give the picture natural beauty, as, for example, he does in some of his works.


In general, Anry’s compositions are all very thoughtful and drawn, which adds more realism and interest to his illustrations.
Now I’m drawing a landscape, so I decided to practice drawing grass and imitate Anry a little, since it’s clear that I don’t have enough technique in drawing grass.
The process of drawing grass in
I drew with Ink Pen. I only draw for them.
At this stage, my technique for painting grass involves only strokes from a given color surface upward, creating sharp blades of grass.
It is best to make such strokes by tilting the pen towards you, making strokes away from you. The blades of grass turn out to be quite thin and sharp.
It’s also worth playing with the pen pressure setting.


The drawing process in Photoshop
It’s sad to admit that the king of Photoshop does not live up to my expectations and wishes when working with a brush, but that’s how it is. The strokes in Photoshop come out ropey, and not thin at the tip, as in SAI.

Oh, those “Onions” in Photoshop)


- Meaning of the female name hope
- Russian schoolchildren were reminded of what they can and cannot bring with them to the OGE
- Leo in the year of the Rooster: characteristics of men and women in love and business relationships
- Why do you dream of a blooming apple tree: interpretation options according to dream books Seeing a blooming apple tree in a dream
- Where does Nikita Mikhalkov live?
- Why do you dream about a ghost?
- Nikita Mikhalkov built an estate for $15 million
- Why do you dream about a witch, dream book, interpretation of dreams online
- Planting something in a dream - what could it mean?
- Why do you dream that a man is cooking, what does the dream symbolize?
- Why do you dream of an abyss according to the dream book?
- Recipes for baked apples with cottage cheese, raisins, honey, nuts and cinnamon
- You can get better from potatoes
- Puff pastries stuffed with stewed cabbage
- Recipe: Sponge cake "Apple" - "in the oven"
- Chicken hearts in sour cream sauce
- How to cook bacon and eggs
- How to cook minced meat with vegetables in a hurry
- Gemini - their compatibility with other signs in love
- Submitting an application for the Unified State Exam: deadlines and features of the procedure