How to draw angels with a pencil for beginners. How to draw an angel with a pencil step by step. Necessary materials for drawing an angel
Angels are creatures invisible to humans, whose main function is to convey God’s will to people. After all, we ourselves are not able to feel and see what God wants; for this we need some intermediaries, in the role of which the angels act. These creatures protect and protect us and our children from evil forces and from everything bad. This is why drawings of angels are so popular; many use them as avatars, send them to their friends as gifts, and decorate school diaries.
On the Internet you can find a huge number of different pictures with angels depicted. These are carefree innocent little children, and evil angels in the form of demons, and bright guardian angels, and warrior-defenders, and many others. For animation fans, there is a wide variety of animated angels. By drawing such wonderful pictures, you can immerse yourself in the wonderful magical world of a fairy tale, where miracles happen.
The drawing of an angel with wings can be different - it can depict a cute child with wings, a woman of unearthly beauty who looks like an angel, or a man who personifies masculinity and heroism.
There is no person who would be uncomfortable admiring such cute creatures, because somehow, when looking at them, we are filled with positive emotions, our mood rises, we feel a surge of strength and energy, and a desire to create appears. So let's create a real little masterpiece on paper.
So, how to draw an angel?
It’s very simple, let’s figure it out. The main distinguishing features of any angels are a rather large head and eyes, the obligatory presence of wings, hair, clothes, and it is also desirable to have a halo above their head. In order to learn how to create drawings of an angel on your own, let’s first try to draw a beautiful angel girl. For this we only need a pencil and a piece of paper.
We proceed according to simple steps:
· First of all, we draw a large circle, which acts as a head, and draw a line on the face.
· Below the resulting circle, draw the silhouette of the body.
· We will give the head the shape of the face, and also try to depict the contours of the future hairstyle.
· On the face we draw round eyes, quite large in size.
· Next in line are the eyebrows, as well as the small mouth.
· Next we move on to the body. We draw the elements starting from the top and gradually moving down.
· The neck should be in the form of a small line.
· Our angel’s legs will converge in one place and are shaped like a spear.
· Don't forget to add an angel with wings to your drawing.
· Then we dress our beauty - a few touches similar to the frame of the dress.
· For every angel, an indispensable element are wings, the shape of which can be chosen to suit your taste. There can be as many feathers at the end of the wings as you like - it all depends on your imagination.
· All that remains is to finish drawing our girl’s hair beautifully and using an eraser to erase the unnecessary auxiliary lines that we drew at the very beginning.
 Having drawn the angels with a pencil, you can decorate the drawings in any way convenient for you. Feel free to involve your kids in creativity; they will certainly get maximum pleasure from this activity. IN You can also add hand-drawn angels.
SELECTION OF IDEAS


Everyone represents an angel in their own way. Some people see him as a child with small wings, others imagine him as a girl with wings. For a lesson in drawing an angel step by step, I suggest drawing a girl with wings in a white dress. First you need to take into account several features of drawing an angel. Its contours should be smooth and light, airy. Do not darken your drawing too much with a simple pencil and especially with dark colored pencils. Light emanates from the angel and therefore he is usually depicted in white clothing. An angel's wings should be long and thin, graceful like a swan's.
1. Draw the initial outline of the angel figure

To get it right draw an angel, first let's make a rough outline of the angel's figure. Try, as accurately as possible, to copy the initial contours in your drawing from my drawing. We will draw an angel in a slightly inclined pose, floating in the air, so we need to give the figure a certain pose. Draw a line for the back, lines for the legs and arms, and a couple of lines for the wings. The right leg will be slightly bent.
2. Draw the general shape of the angel’s body

Now draw the still approximate shape of the angel’s body. To do this, circle our previous contours on both sides, with small gaps. You also need to slightly “curve” some of the lines outward, in places where the muscles will show. This needs to be done on the arms and legs. You also need to use an arbitrary line to highlight the lower part of the angel’s dress.
3. Let's add more detail to the angel drawing

Now we will refine the drawn contours of the angel. First, let's clarify the shape of the legs and arms, giving them a complete, realistic look. Then we will draw the initial outline of the hair with a slightly wavy line. Let’s also “pull” the hem of the dress to the left, which will create the effect of a slight wind or movement in the drawing. And finally, let's draw the features of the female angel's face.
4. How to draw angel hair and wings

At this stage we will draw the hair in detail and start drawing the wings of the angel. To the outlines of the hair drawn earlier, add a few more of the same wavy lines. Mark the width of the wings and their span. From below, along the contour of the wings, you need to draw a wavy line, it will indicate feathers.
5. Draw the details of the angel's wings

The feathers of the wings in the angel drawing need to be placed on top of each other, in two rows. For a large angel wing this will be enough. Draw the ends of the feathers with rounded edges or oval shapes. To correctly reflect the proportions, draw the bottom row of feathers more than the top ones, and with less alternation.
6. How to draw an angel. Applying shadows

To draw an angel correctly, you need to add volume to the figure, so let's darken our angel drawing in some places. First we will darken the back of the wings. After this, with a simple pencil we will draw shadows on the angel’s dress, and thereby create volume to the figure. Add more small strokes throughout the angel drawing, where you see fit, based on my picture.
7. Drawing of an angel on a tablet
 You can then give a light bluish background with a colored pencil and angel drawing it will turn out more impressive and airy.
Perhaps the ballerina is most like an angel. The dancer's light airy movements and white fluffy skirts create the impression of flight and weightlessness. In fact, behind this impression lies the artist’s many years of work and talent.
When making a large drawing of an angel, you must accurately draw the person’s face and its most expressive part - the eyes. This is especially important for drawing an angel, since the eyes of an angel should radiate goodness and light.
Let's try to draw a hockey player in motion, with a stick and a puck, step by step. You might even be able to draw your favorite hockey player or goalie.
When drawing a person, including an angel, learn to draw lines in one motion, do not be afraid to make mistakes. While drawing, you should see the entire future image in the intended lines and all you have to do is draw them.
The drawing of the Snow Maiden was made on a graphics tablet in stages. You can use this lesson to draw the Snow Maiden with a regular pencil. The site also has other New Year-themed lessons, for example, how to draw Santa Claus.
Learning to draw the face of an angel correctly, even with a simple pencil, requires not only time to learn, but also talent. The difficulty of drawing a portrait of a person lies in the ability to convey the emotional state of a person, his facial expressions, the depth of his gaze, etc.
The movement of the hand can emphasize the elegance and weightlessness of the angel. A detailed and accurate image of the hand in the angel drawing will give greater realism to the entire drawing.
Angels are unique creatures. Ancient artists painted them and composed music about them. Few people have seen them, but almost everyone is convinced that they exist. And almost everyone agrees that they look like people, only ethereal, resembling a radiance of light and with huge wings. Their goal is to protect, protect every person from troubles and dangers, and console him in sorrow. Let's try to portray an angel the way many people imagine him, let's try to draw an angel with a pencil.
Take a white sheet of A4 paper or a sheet from a sketchbook, two simple graphite pencils - hardness HB and 6-8B, a soft eraser. First we need to mentally imagine what kind of angel we want to draw? After all, everyone sees it differently. For some it is a small charming child, for others it is a beautiful woman or a brave warrior with a sword. In this lesson we will draw an angel - a sweet, fragile and even a little shy girl.
- We outline approximately the figure of the angel, his pose. Since we will draw him to look like a person, we will try to maintain all the proportions as when constructing a human body. If you don’t know how to do this yet, then first remember one simple rule - the height of an adult is calculated in this way: the length of a person’s face from the chin to the top of the head should “fit” into the length of the figure approximately eight times. We schematically draw the spine, shoulders, hips, and use dots to mark the places of the bends. Notice how the entire figure is tilted. The angel takes a step forward and one leg will seem visually shorter to us, so the left thigh will be slightly raised. N.B. If you seriously decide to take up drawing, then it is worth purchasing a small wooden model of a human figure to draw its movements - when walking, running, when a person sits or stands on one leg. You will immediately see how all parts of the body move - arms, legs, shoulders, hips, feet, how your head will be tilted. Even if you draw a person in loose clothing that hides his body, be sure to draw his “skeleton” first. Otherwise, by drawing only clothes at once, you can miss the proportions and make a lot of mistakes.

- Now we outline the angel's robe. It will be spacious, light, and made of flowing fabric. Notice how wide and smooth the folds of his dress are, this means that the fabric is dense and flexible like silk. If the folds were small, this would indicate that the fabric is very thin and light. Take a closer look at how the fabric bends around the hand, at what angle it lies and bends with movement.

- We draw the hair, neck, hands and outline the wings. The neck does not start from the chin, it continues higher to the back of the head. Go to the mirror, turn your head and observe what dimples and bulges appear. The hands can be depicted more generally, without detail if they are difficult to draw. The angel's hair is soft, wavy, and long. They curl and blow in the wind. We will emphasize wavy hair with the direction of shading and shadows.

- We draw large angel wings, draw the feathers in more detail and do not forget that each feather slightly “overlaps” the neighboring one, slightly superimposed on it. Look at the wing of any bird, and you will notice that at the very top, where the bone is, there are very small feathers, like scales. In the middle of the wing they become larger and at the edges the feathers are the longest, widest and stiffest, allowing the birds to soar easily in the air.

- Draw the face. The angel's eyes will be downcast, his head slightly tilted to the side. I’m making allowances for the fact that you haven’t studied anatomy, so just remember a few basic rules for building a face:
- a vertical line along the face is drawn to show the tilt of the head and where the nose will be located;
- the line that bisects the face horizontally will determine where the tip of a person's nose is. Since the angel's face is tilted forward, according to the laws of perspective, the upper part of the face will be larger than the lower. Therefore, we draw a horizontal line a little lower;
- We also divide the area from the tip of the nose to the chin in half horizontally, and this line will indicate where the lower lip ends;
- Divide the distance from the edge of the hair on the forehead to the tip of the nose in half and the angel’s eyes will be located on this horizontal line;
- to indicate the ears, we mentally draw a horizontal line from the tip of the nose to the back of the head. The earlobe will be located on this line. To determine the upper point of the ear, you need to mentally draw the same horizontal line from the upper edge of the eye towards the back of the head;
- the head is not drawn round, the face will rather resemble an oval, an “egg” with a sharp end down.

- a vertical line along the face is drawn to show the tilt of the head and where the nose will be located;
- Let's designate the darkest places, shadows. Since in black and white graphics “color” can only be shown in tone (lighter-darker), to highlight the angel’s robe, we’ll darken its wings a little. Thus, the figure of the angel will come to the fore and become larger and brighter. Mark the places of shadows on the fabric and pay attention to how the shading is laid - in the direction of the fabric. Add volume to the angel's hair, draw his delicate curls. They will glare a little in the light, so we can leave the unpainted areas, just a blank sheet of paper. We designate the falling shadows from the fabric on the feet.

- Let's get down to the details. Using an eraser, carefully erase all the auxiliary lines on the face and figure of the angel. Try not to smear the drawing. A black graphite pencil stains paper very easily and then it is difficult to remove unsightly stains. We sharpen the softest pencil sharper and draw small details - eyes, nose, mouth, fine hair. Draw the feathers on the wings more clearly. There is no need to try to draw each feather separately. It is necessary for the wing to be recognizable and for this it is enough to depict the feathers with such openwork loops.

This “loop” is drawn with one movement of a pencil; practice on a separate piece of paper. First we draw a thin line - increase the pressure - the strongest pressure and again in decreasing order. We draw all this without lifting the pencil from the sheet of paper. The main thing is to show the texture of the wing, how the feathers lie. In our drawing, the angel's wings are not the most important, so it makes no sense to carefully draw out every small feather. To show volume, we intensify the shadow under each row of feathers; the wings will become even more voluminous. At the bottom, the edges of the wings will be clearly defined. If the angel's figure were against a dark background, then it would be better to leave the edges of the wings perfectly white for greater contrast.
Look how feathers are drawn without detailed drawing - only in tone, with a smooth transition. In some places the pencil pressure is strong, dark, in others it is lighter or completely absent. In this way we create the effect of volume and density of the material – in our case, feathers. - Don't forget about the shining halo above the angel's head. We draw him last and, practically, as a hint. After all, this is light, it is very light, weightless, let’s show it only with rays, that will be enough. In our simple drawing, this will be graphic and the lightest, almost white spot above the figure’s head. In order to highlight the halo, there is a little secret: take a small piece of paper and carefully sketch a small part (as if sharpening a pencil on paper). Then carefully use this sketched piece to go over the drawing near the figure of the angel. Tint the background around a little. Go over the halo with an eraser to make it as white as possible. We squint and see how the angel’s figure stands out wonderfully against the background of textured, powerful wings, how light, graceful, almost airy it is. Since this is a girl, we can draw a modest decoration for her neck, literally outline it lightly, with dots.

God's messenger to earth is an angel. This is a creature incomprehensible to us that has no flesh. He has incredible powers with which he can do good. How to draw an angel correctly?
The creature is usually dressed in long, loosely flowing clothing. They are often depicted in white linen robes with gold belts. In Christianity, these are young guys, but cherubs can be both female and male children. An angel always has snow-white wings behind his back - a symbol of meekness, and on his head - a halo.
First way
So, how to easily draw an angel? Let's start working from the head. Draw a wide, slightly plump face. The cherub's hair will not be long, but short, divided into 2 parts. Now we add a small neck.
Since this is a meek and kind creature, it froze in the pose of a slightly bent over child, whose hands are hidden in the sleeves of his clothes. We draw small shoulders and wide sleeves.
Now you need to finish drawing the bottom of the cassock.
An angel always has 2 wings behind his shoulders. The lower part of the plumage should reach the waist, and the upper part will be above the head. We draw the wings in a mirror image, they are symmetrical.

Add a halo above the head. We depict humbly closed eyes with long eyelashes, a nose, arched eyebrows, and a mouth that is frozen in a half-smile.
We paint the face and neck in a flesh-colored, slightly pinkish color, the hair in yellow, the halo in fiery red, and everything else in a bluish tint.
cartoon hero
Kids love to watch animated films, which often depict cherubs. Therefore, it is worth learning how to draw such a hero. The next master class will tell you how to draw an anime angel.
This will be a pretty teenage girl. Draw an oval face and a small half-open mouth.
The eye will take up most of the face. We depict a large eye socket, limit it to a narrow empty area below, and leave a white highlight on top.

Now we make the second eye, but a little smaller. We complete the curved eyebrows.

The girl’s hair flows freely in strands over her forehead and shoulders. We draw a small halo above the back of the head.
The shoulders of a cherub are smaller than the diameter of the head. We make a line for the body, draw a narrow top with a heart.

We continue the body with a smooth downward bend, round it at the hips and draw a long leg.
The girl is wearing platform shoes.
Now you need to finish drawing the second leg, which will be bent at the knee. The angel is dressed in skinny jeans. We detail the pants by adding pockets, a front closure and pleats.

The girl has small graceful wings behind her back that hang in the air.
Second version of the girl's angel
Let's draw a little golden-haired princess with big eyes. She also has a wide, round face and long hair that is parted into two sections with a side parting.
Draw huge round eye sockets. We separate the lower part with a curve and shade it with 4 vertical lines. Leave 2 highlights in the pupil, paint the rest black.
Draw a second eye, a curved eyebrow and a small mouth in the form of a smiley face. Under the head we make a small neck area.
The girl is dressed in a simple dress with long sleeves. Her hands are folded as if she is praying.
On the skirt you need to make 4 vertical lines of folds. Draw the legs.

The hair flows freely in the form of zigzags.

At eye and shoulder level, draw a wing, which consists of 2 rows of feathers.
All that remains is to symmetrically complete the second wing and decorate the girl.
Third girl
Another version of a pretty cherub with a different appearance. We draw a rounded face, 2 long strands on the sides and bangs, which consists of 3 parts.

We finish drawing the upper area of the angel’s head and eyes. We draw using the same algorithm as the previous version. Add a few strands to the sides.
Add an eyebrow, mouth and 2 eyelashes. The girl will be without the usual halo hanging in the air, but with a ring on her head.
She is also wearing a loose dress. We don’t draw the neck, we start the body right away from the head.

The dress needs to be divided into the line of the collar and belt. Draw a heart in the center and make folds on the skirt.
We finish drawing the arms on the sides. Now the legs. The angel has small wings that are located in the shoulder area. We make 3 rows of feathers there.

Let's finish drawing the second wing.
Angel doll
This is another girl with shoulder length hair. We start the drawing from the face area. The hair is evenly parted into 2 parts, which slightly cover the forehead. The eyes are round, but not so big. Leave each one with a highlight and paint it black.

We finish drawing the top of the head, mouth, and hair on the sides.
Again we draw the line of the dress immediately from the head.

The angel has a collar, 2 short sleeves. Hands in an open position.

Draw the legs. The wing reaches the eye line in the upper part, and the waist in the lower part. We make the wing curved at the top.

Draw the second wing in a mirror image and hang a halo above your head.
Important detail: wings
All options are depicted with different elements, so now let's figure out how to draw angel wings. Draw a circle of the head, add a pointed triangle in the chin area. From the head we draw a curve down, and to the right of it we draw another curved line.

We detail the head: nose, lips, chin, curl and pointed ear.
Draw the closed eye and eyebrow.
Now you need to draw long hair that flows behind the head.

Add a few lines of strands.
Now we design the torso: a long arched neck, an arm up to the elbow and the chest and back area.

Add a hand that looks out from under the elbow, and finish drawing the stomach.
It's the wing's turn. Go along the curved one and add feathers underneath it.
Draw the second line, but make the feathers longer.
Add a third row, the feathers of which will be the longest.
Such cute, mischievous and innocent creatures came out. They all bring goodness, love and peace.


On the eve of the most important holiday - Christmas, a pressing topic is how to draw an angel.
By learning to depict mythical creatures, you can get as close as possible to the amazing and mysterious world.
How to draw an angel. Step by step lesson: No. 1
In this article we will look at 2 lessons on drawing gentle and at the same time sublime angels.
1. According to tradition, the general outline of the figure should be drawn in the center of the sheet
2. At the top of the triangle in the form of an oval, outline the head
3. Let's start with the upper part of the figure: showing the shoulders and chest
4. Then we draw a skirt, because the angel will be in a female form. How to draw a mermaid
5. Having decided to draw a mysterious entity, we decide the question: “How to draw an angel more believably?” Everyone has their own ideas and the drawing will be purely individual. The next step is to draw the hands of an angel
6. Having finished with the main points of articulation of the arms, do not forget about the legs
7. The time has come for the most interesting part - we draw wings for the angel. They are huge, full height
8. If we see an angel, then he appears in the flesh. We draw his hands and thin figure
9. Let's move on to the angel's face. Let it be a pretty young girl with long hair
10. We draw in more detail the details of a kind face, big eyes, a soft half-smile, strands of hair
11. Using bold lines, we indicate folds in clothing, adding volume to the skirt
12. Painstakingly and carefully draw the feathers on the angel’s wings. They are small at the top, long and thin at the bottom.
13. Draw a halo over the angel’s head
14. Using shading we achieve the effect of volume and life
15. To complete the image, all that remains is to use an eraser to show the highlights on the angel’s hair, clothes and wings
Having been patient and having figured out the problem of how to draw an angel, every artist seems to touch the world of magic and the unknown.
How to draw an angel. Step-by-step lesson: No. 2
According to the Christian religion, angels have an external resemblance to people. This will help when mastering the step-by-step lesson “How to draw an angel”.
1. Using horizontal and vertical lines, we indicate the outline of the drawing

2. Using an oval we outline the place of the head, the contour of the figure

3. In mirror image, draw two large angel wings

4. We outline the hands with dots and lines

5. Let's start with the details of the costume in the upper part

6. Carefully draw the face: eyes, nose, mouth, and hair

7. Finish drawing the robe

8. The main feature of an angel is its wings: all feathers should be drawn very carefully

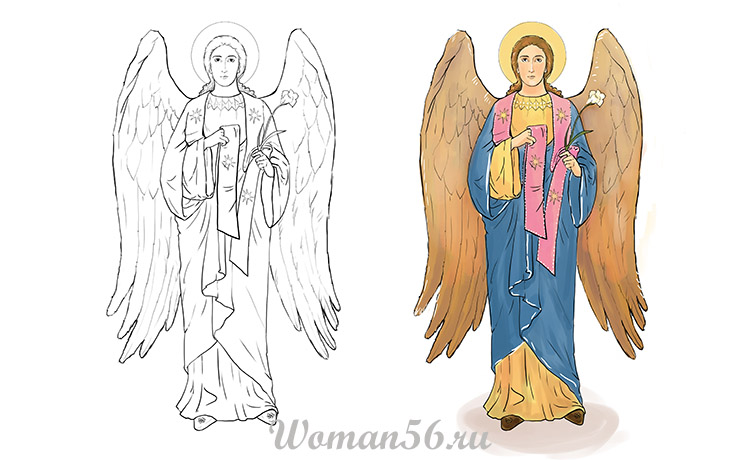
9. Let’s draw a symbol of his holiness above the angel’s head - a halo

10. Let’s start decorating clothes with patterns and ornaments. Let's draw a flower in our hands

11. When thinking about how to draw an angel in color, we start with the hair

12. Paint clothes with delicate shades of blue and light brown

13. Dye the long scarf in pale pink.

14. Paint the angel’s wings brown

15. Using highlights on clothes, wings and hair, we add volume and airiness to the picture
Attention to detail and patience will help you quickly understand all the features of this lesson.


")


- Abstract: Elementary particles
- Presentation on the topic "management"
- History of the development of computer technology presentation for a lesson on the topic Historical development of computer technology presentation
- Astronomy Presentations Interesting Topics for Astronomy Presentations
- Presentation on history "counting years in history"
- Astronomy Presentations Astronomy Presentation Template
- The anniversary of the expulsion of the Karachais recalled the problem of rehabilitation of repressed peoples
- Udmurt people What peoples live on the territory of Udmurtia
- Russia is a multinational state We live in a multinational country
- The smallest peoples of the world Which group of peoples is the smallest
- How to change a cash receipt order in 1c
- Day of Remembrance of Fallen Russian Internal Affairs Officers Heroism of Police Officers
- Northern coast of Neva Bay
- Enviable beauties in politics (17 photos)
- The best ballet performances
- Biography, political activity
- The magical world of crystals
- How to salt milk mushrooms: a quick recipe
- Ten Surprisingly Profitable Illegal Trades
- Management project based on the example of an enterprise presentation