How to make a presentation on a microsoft powerpoint computer. How to make a presentation on a computer
Are you wondering which program is better to use to make a presentation so that it’s simple, convenient, and results in a high-quality result? In fact, there are quite a lot of programs with which you can successfully create presentations: these are online and offline services, paid and free utilities. Each of them has its advantages, but also its disadvantages, and your head is spinning, which one to choose?
Conventionally, programs in which presentations are made can be divided into professional and amateur. We will not consider professional ones, such as AdobeFlash, in detail, because mastering them requires special skills and quite a lot of time.
Which program should I choose?
“Amateur” programs, in which you can make presentations, are sometimes in no way inferior to professional ones in terms of the quality of the projects made in them. They are much simpler in functionality, and thanks to the user-friendly interface and built-in functions, they are suitable for both beginners and more experienced users.
We tried to understand the abundance of presentation software, and present you with a description of the most popular programs. So, let's figure out which program can easily and simply create professional effects?
ProShow Producer in Russian– an easy-to-learn program with an interface in Russian. Allows you to add an unlimited number of photos to presentations, insert signatures, comments and titles, use effects, animation and much more. Finished projects can be saved as an EXE file, screensaver or video, including full HD.
Microsoft Power Point is the most popular program for making presentations. Powerpoint allows you to collaborate on presentations. After creating a project, it can be published on the Internet. The program is available for free use for one month.
Libre Office Impress is a free presentation program that is included in the freely available Libre Office suite. A program with fairly simple functionality, clipart in 2D and 3D format, effects, styles and animation.
Photo to Movie is a program for creating videos from photos, where the photos are changed in a manner that is used in the production of clips. The utility supports a dozen languages, but, unfortunately, Russian is not among them.
Flash Slideshow Maker is a simple program for quickly creating slideshows based on Flash technology. The program contains image editing tools, visual effects, built-in templates and the ability to add music. The program is paid and has an interface in English.
Prezi is a web service that allows you to create interactive multimedia presentations with a non-linear structure. Prezi presentations use only one slide - a kind of mental map. The Prezi program interface is entirely in English.
PicPick 3.2.5 is a simple but very functional graphic editor with an English interface. The program is distributed free of charge. By the way, the editor is very similar to the Microsoft Paint program, but it has built-in filters and effects, and besides, it can take screenshots.
Kingsoft Presentation is an analogue of PowerPoint, available in paid and free versions. The main disadvantage is the lack of a Russian-language interface. However, if you have experience creating presentations in PowerPoint, then mastering Kingsoft Presentation will not be difficult.
Corel Show - This application is part of the Corel office suite. The program can become an alternative to Microsoft PowerPoint. This package is not free, but its cost is much lower than the package from Microsoft.
Google Docs is a free and simple program that is considered the best alternative to the Microsoft Office suite. To start using it, just register with Google and select the Drive section in the top menu, where you can create your own presentations.
280 Slides is a simple program for making presentations, which has the ability to download ready-made presentations from PowerPoint, automatic saving, adding slides and videos from Youtube.
Not sure where to make your presentation? You can try to get started with the Russian version of ProShow Producer right now! All you need is
An informative article with 20 tips for creating presentations for non-designers: from choosing the background color to the meaning of the last slide. Marketer of the Texterra agency Evgenia Kryukova figured out this difficult matter, creating presentations, and shared her thoughts with everyone who constantly needs to create presentations.
Initially, I wanted to write a large and very detailed guide on how to conduct webinars, but when I started delving into the topic, I realized that the material was so large that readers simply could not handle it. Therefore, I decided to divide it into separate articles in order to provide the most complete and useful information for each stage, and so that, dear readers, it would be convenient for you to consume this information. Today's article will focus on how to create high-quality and beautiful presentations, even if you do not have design skills. So, let's go.
What should your presentation design be?
Before moving on to specific tips, I would like to make a small digression. I’m not a designer, I don’t know how to draw at all, and all my skills in Photoshop come down to performing banal basic actions. But despite this, I love and know how to create simple, but quite nice presentations.
Why am I saying this?
If there are people among the readers who think that they cannot create a beautiful and effective presentation because they do not have the talent for drawing and proper design skills, read the following lines carefully.
Anyone can learn modern web design. Moreover, for this you do not need to study tons of professional literature or attend expensive courses. It is enough to memorize the basic rules and stock up on a large number of successful examples, looking at which you will draw inspiration. Yes, thanks to these actions, you may not become a professional designer, but you can easily create stylish pictures and presentations.
So, what rules should you follow to make your presentation fashionable and effective?
1. Avoid ready-made templates
They are soulless, dull and everyone is already wildly tired of them. Better create something of your own. Moreover, now you don’t have to have design skills to do this. There are a large number of programs and services that will do all the work for you (one of these services will be discussed at the very end of the article).
Wrong: One of the standard Power Point templates
Right: Own design (very simple, but stylish)
2. Use a good color combination
One of the most common mistakes made by people unfamiliar with modern web design trends is that they choose an extremely poor combination of colors: brown, dark blue, burgundy, mustard. If you use these colors with each other, and even with a poorly chosen font, it seems that the image came to us from the 90s. Nowadays such colors are not used in web design. More precisely, they are used, but in combination with other, more pleasant and “clean” shades (so-called flat colors).
Wrong: Poor choice of colors
Right: Flat colors - beautiful and modern
If what I said above is not entirely clear to you, and you still don’t know what colors to choose, use the resource flatcolors.net. There are ready-made palettes with very fashionable and rich combinations. To copy the code of the color you like, just left-click on it.
 Click on the color you like and its code will be automatically copied to the clipboard
Another way to find a good palette is to find a picture you like and break it down into colors using Adobe Kuler. To do this, follow the link I provided, click on the camera icon and upload the image you like.
 Adobe Kuler service
It seems to me that this method is best suited for color layout of landing pages or some simple images from design communities (such as behance.net), because They usually use a few colors and they all go very well together. But in general it can be used to layout any images.

I loaded the landing page and received the colors that are used on this landing page
As soon as the service has issued the finished palette, you need to copy the code for each color. To do this, use the free Colorzilla plugin. This is done as follows:
- Install the Colorzilla plugin in Google Chrome or Mozilla Firefox.
- Click on the eyedropper in the top right corner of your browser.
- Select the Page Color Picker Active command.
 Colorzilla plugin
- Click on the desired color to copy its code in HEX format to the clipboard (format code #ed3434 - hash and 6 characters).
 Find out the code of the selected color
- If you need the code in RGB or HSL format, click on the eyedropper, click Copy to Clipboard and select the format you need.
 Choosing the appropriate code format
- Paste the code into the program you are working in.
- Ready!
3. Use no more than 5 colors throughout your presentation.
Don't turn your presentation into a rainbow, even if your talk is on a children's topic. A large number of colors interferes with reading and perception of the meaning of the slides. It is best to use no more than 2-3 colors on one slide, taking into account the main background color. In the entire presentation - no more than five.
Wrong: Why so many flowers?
Right: 3 colors on a slide is normal
4. Maintain contrast between text and background
It's simple here: if the background is dark, use a light font. If light, then dark. The text must be clearly readable on your slide, otherwise your audience will feel uncomfortable and instead of listening to you, they will spend their attention trying to make out what you have written there.
Wrong: Poor contrast
Right: Good contrast
5. Avoid shadows, gradients and other old-fashioned effects
Try to keep up with the times and design your slides so that they don't feel like a relic of the past. After all, the level of trust the audience has in you as a specialist will depend on how well you design your presentation. A good specialist is always developing and follows new trends. Bad - does not want to perceive anything new and believes that it has already fully taken place. Do you agree? Then strive for minimalism.
Wrong: This is not how you should do it
Right: But here everything is ok: nice color and nothing superfluous
6. Avoid low-quality stock images
Wrong: Stock image I found for "team"
Right: If you really need a team photo, then let it be like this
How to distinguish a low-quality stock image from a high-quality one?
Low-quality stock images have certain characteristics. They:
- used on every second website;

We bet you've already seen a guy somewhere drawing on glass with a marker?

Or people shaking hands tightly?
- contain low-quality graphics (usually on a white background);

Oh, these white men...
- depict artificial situations and artificially smiling people.
 I never thought working in an office would be so much fun
Well, for dessert, here are some great pictures that make fun of the absurdity of staged stock photos, so that you finally understand how to recognize them:
 He jokes and jokes...
 Really, why?
 It’s even more interesting with the console turned off!
7. Use modern fonts
Calibri, Comic Sans, Times New Roman - these fonts can be used, but I would not recommend you do this, because... they are quite boring and do not produce the desired effect on the audience. Better opt for more modern fonts. For example, Helvetica, Open Sans or Roboto. These fonts are quite simple, but suitable for almost any project.
Wrong: Not the best choice for your presentation
Right: Helvetica, Roboto, Open Sans - take it, you won’t go wrong
Where can I find good fonts?
My favorite place to search and download the fonts I need is the VKontakte group " Free fonts" There is a search and a fairly convenient menu. Next to each font there is information about whether it can be used for commercial purposes or not. For example, the font in the screenshot below is completely free, as indicated by the inscription in brackets - free font.
 One of the posts in the “Free Fonts” group
I also highly recommend paying attention to the monthly collections of the website - “”. This is just a treasure trove of cool Cyrillic fonts! Each font can be downloaded with one click directly from the article. True, you will have to clarify the type of license yourself; it is not indicated in the article.
8. The font must be readable
When choosing a font, be sure to pay attention to how well it is readable. Unusual ornate serif fonts look interesting, but sometimes they are so difficult to read that it is better to avoid them altogether.
Wrong: The font is difficult to read
Right: The font is easy to read
9. Use no more than 3 fonts on one slide
There should be no more than three fonts in the entire presentation: a title font, a body font, and a font for frames (if needed). If you use more fonts, your slide will look sloppy and frivolous.
Wrong: 5 fonts on a page is too much
Right: One font for headings, one for body text, and one for frames. Everything is right here
In our age of rapidly developing information technologies, it is no longer enough to merely perceive some new idea or program by ear. Listeners also want to see with their own eyes the quality and benefits of the products offered by the narrator. Here overview photos, well-designed diagrams, drawings, and informative videos should be used. Therefore, creating a presentation on a computer today is an important accompanying element for every storyteller, and sometimes for a teacher.
In what areas are such ideas applicable?!
For example, this is marketing, economics, or even design. I believe that such a process is the key to success, unfolding before the eyes of those looking at your abilities in creativity, all kinds of paths to further growth.
The powerful Microsoft Office PowerPoint tool has become part of the Microsoft Office structure. It is both simple and powerful, a high-quality presentation builder. Using this program, you can create a productive speech. In what ways can information be presented?! This is a report, an exhibition, and even a demonstration. According to their structure, they are divided into simple or schematic, containing all kinds of graphics, illustrations, and special effects.
Action plan on creating presentations
So, let's begin:
First of all, let's define the concept. To do this, we mentally answer the questions: the purpose of our speech, who our audience is, the content and duration of the story.
Start
Let's launch the program. Find “Create Slide” at the top right and select a layout there. It may be different for each time.

Sample
When creating a presentation, this program automatically provides a template. To create a new one, you need to click “Office”, then select “Create”. A window will appear in which you need to find “Empty and Last” in “Templates” and open “New Presentation”.


Templates are also selected using the “Microsoft Office” option. There are “Widescreen Presentation”, “Modern Photo Album”, “Classic Photo Album”, “Advertising Booklet”, “Quiz”.
Subject
The “Themes” group in the “Design” tab will help you add a touch of uniqueness to your work. The necessary images in the corresponding tab will allow you to change their appearance. You just need to click on “Apply to selected slides”.


All topics present in the program are suitable for any type of presentation. The color scheme can be changed using “Effects”, “Colors”, “Background Styles”. By the way, for display in Microsoft PowerPoint, it is possible to create a theme yourself. For this, personal drawings and photographs are used.
Font
You have a good opportunity to vary the color, size and type of font. The selection steps are similar to those in Microsoft Office Word.


To write, you need to place the cursor in the “Heading”, then in the “Home” tab go to “Font”. Here you will find a font that suits all parameters.
Not many people know that all information can be divided into basic and additional. The main one must be highlighted, then during the show it will be the one that demonstrates the main idea. And we use the side one to emphasize the main idea. I recommend using a 22-28 font for the title, 20-24 for subheadings, and writing the text and data in tables in 18-22 size. And one more interesting fact is the “principle of six”: the best perception of information is provided by 6 words per line, and 6 lines per slide. I think that the most understandable fonts are Times New Roman, Verdana, Arial, Bookman Old Style, Calibri or Tahoma.
Illustrations
Graphs, drawings and photographs are used to make the presentation visual and expressive. Go to “Illustrations” in the “Insert” tab. Finding a suitable group.


I think that you shouldn’t resort to a “picture surrounded by text.” The illustration will look clearer if placed on its own slide.
Music in the presentation
You probably didn't even realize it, but PowerPoint can be equipped with music. To use it in your presentation, you need to select “Sound” in the “Media Clips” group (this is the “Insert” tab). A list of commands will appear, select “Sound from file” from it. A dialog box should pop up in which you need to select a folder for downloading music, as well as an audio file. The next step is to decide on the sound option: it can be automatic or by click. In “Working with Sound” we will need the “Sound Options” group, where we will set the necessary options.

Animation
Your presentation will become much more interesting if you use animation in it. There is a tab of the same name with a group of the same name, by going to which you need to open “Animation Settings”. Click on the required object or text. In “Animation Settings”, click “Add Effect”, after which we perform actions using effects. They will appear in the Animation Settings list as they are added. And the start of the animation and its speed are set in the “Changing the effect” section.

Keep in mind not to overload your performance with special effects. In order not to overstrain your audience and keep their attention on the main idea. Therefore, animation will be useful only in small quantities and if it carries some kind of semantic load.
Transitions
An important component of a good presentation is transitions. If the user wants to set the same transitions, in the “Animation” tab, click on the slide icon, and then in “Transition to next slide” select the desired transition effect.
To set the tempo of changing one slide to another, in “Transition to the next slide”, open “Transition speed”, then determine the required tempo. In “Change Slide” we select the type of transition: automatic or clicked. But that's not all - the change can be accompanied by sound. In "Advance to Next Slide" this is the "Transition Sound" button. If you need some sound that you don’t see in the list, you need to use “Other sound”. And I recommend making 2 copies of your speech, in which to mark the transition points. The first copy is for yourself, the second is for the technician who will help you during the show.
The final
Well, here's the finale! Now let's admire our work. To view, click “Slide show” in the right corner, below. If you see that something went wrong, you can always return to any frame using “Esc” and correct it. Then save the adjusted version of the work.
To the entry “How to create a presentation on a computer” 12 comments
Sergey, thank you very much for the article, it is very useful for me now, I am working on a fire alarm project for a trolleybus depot.
Yuri, thank you. Good luck with creating your presentation.
Thanks for the useful post. Actually, I'm not going to create a presentation right now. But I will know where to run in the future. To your site. I wish I could see an example of such a presentation)))
The description of the program is interesting and presented in an accessible way, and at the end there is also a link to a free program, I was so happy, but I didn’t have to rejoice for long, it turns out this is only a trial option. Although I intended to use it from time to time, this option is not suitable. By the way, such a shortcut “free” is also not suitable for this program.
Peter, thank you for your comment. The fact is that previously a free version of the program and Office 2007 was provided at this link. Apparently Microsoft has already removed it. It's a pity. I will also delete the link so as not to encourage anyone anymore.
After automatic Skype update started to show the “insufficient memory to complete the operation” window and the computer starts to slow down. After deleting Skype, everything is restored, but after installing another Skype, everything happens again. I scanned the computer using DrWeb, treated it with CureI, and cleaned it with Tune up. Reg Organizer. CClener. AusLogics - nothing helps. Please tell me what else can be done besides reinstalling the system.
Does this only happen with Skype or with other analogue programs too?
only with Skype
Thank you. I installed it, it works. But at first I was confused by the lack of video, although the web camera turned on (the indicator light came on) and before that it worked. I installed another camera and the video appeared. But the previous one works in a strange way - there is no video until you move your hand in close proximity to the camera. Then everything works until it turns off. Thanks again.
If everything is ok, perhaps the new version is somehow “eating” the memory. Here you need to understand on the spot for what reasons. Igor, next time you should leave questions either or in the appropriate topic. otherwise people read “How to create a presentation on a computer”, and the comments are about something else :)
Thanks for understanding!
Leave your comment
Presentation is a classic way of giving reports. Displaying the most important information on the screen makes the report more interesting and understandable to the public. Nowadays, computers and special programs are used for presentations. Thanks to this, a presentation with slides can be made in just a couple of minutes.
In order to make a presentation with slides on your computer, you will need a special presentation program. The most popular program of this kind is PowerPoint, which is included in the Microsoft Office suite of office programs. Therefore, if Microsoft Office is already installed on your computer, then you have the necessary program.
If Microsoft Office is not installed, you can install it yourself. On the website you can download a trial version of Microsoft Office, which will work for 1 month. In the future, you will need to buy the full version or purchase a subscription.
You can also make a presentation using free programs. For example, you can use the Impress program, which is included with the free office software LibreOffice. To do this, you need to go to the website, download the LibreOffice software package and install it on your computer.
In this article we will tell you how to make a presentation using the example of PowerPoint from the Microsoft Office office suite. Since this software package is very common and most users already have it installed.
How to make a presentation with slides on your computer
To make a presentation with slides on your computer, you first need to launch the program. To do this, open the Start menu, go to the list of programs and find the PowerPoint program there. You can also launch this program by searching in the Start menu or using a shortcut on the desktop.
After launching PowerPoint, a list of different designs that you can use to design your presentation. Here you can choose any option you like. In the future, if you don’t like the chosen design, you can change it without redoing the presentation from scratch. For example, let's choose a green color design called “Aspect”.

After this, the PowerPoint interface will appear in front of you in which you will make the presentation. The PowerPoint interface is divided into three parts. At the top is a toolbar divided into tabs, on the left is a list of slides, and in the center are the presentation slides themselves.
Initially, there is only one slide in the presentation. This is the title slide from which the entire presentation will begin. Here you need to enter the name of the presentation and some additional information about it, for example, the name of the organization.

After filling out the starting slide, you can proceed directly to creating the presentation itself. This is done very simply, we add a new empty slide to the presentation, fill it with information and move on to the next one. If you have worked with the Word word processor before, then filling out presentation slides should not pose any problems for you, since everything works exactly the same here.
In order to make a new presentation slide, use the “Create Slide” button, which is located on the “Home” tab. Click the arrow below this button and you'll see a full list of possible slide layouts.

From the New Slide list, select the slide layout that suits you best, and a new, blank slide will appear in front of you. The new slide will have several fields that you need to fill in with information. These can be fields for inserting a slide title, text, or image. To fill out text fields, you simply need to click on an empty field and paste the text.
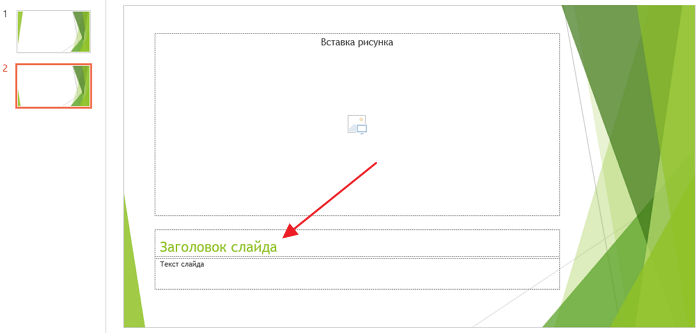
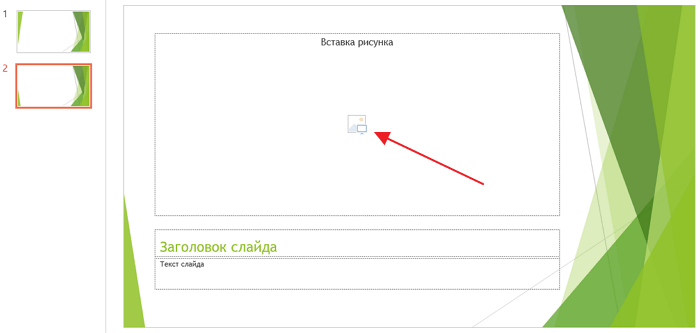
If the field requires inserting a picture, then you need to click on the icon and in the window that opens, select the image to insert. The fields of other formats are filled in similarly, click on the icon and enter the required data.
If the standard slide layouts do not suit you, then you can remove some fields or, on the contrary, add new ones. To add new fields, use the tools on the Insert tab. There are buttons that allow you to insert text boxes, pictures, tables, charts, videos, audio recordings and much more into your slides. For example, in order to add a new image to a slide, use the “Pictures” button, and to add a text field, click on the “Inscription” button and draw the desired size of the field with the mouse.

You can also change the design of a ready-made presentation. To do this, go to the “Designer” tab and select one of the proposed designs there.

In order to make a full-fledged presentation, you need to set up transitions between slides. To do this, open the “Transition” tab and select one of the proposed options. Also on this tab there is an “Apply to All” button, which applies the current transition settings to all slides in the presentation at once.

To preview the resulting presentation, go to the “Slideshow” tab and use the “From Beginning” or “From Current Frame” buttons, which start playing the presentation from the first or current frame.

The other tabs also have useful tools, be sure to explore them yourself.
How to save a presentation on your computer
After the presentation is made, it needs to be saved. In PowerPoint, this is done in the same way as in other programs, you need to open the “File” menu and select “Save As”. But, there are some features associated with the choice of file format. The main format for PowerPoint presentations is PPTX, also called "PowerPoint Presentation". When using this format, you will still be able to open the file and continue editing the presentation, so you need to save the presentation in PPTX.
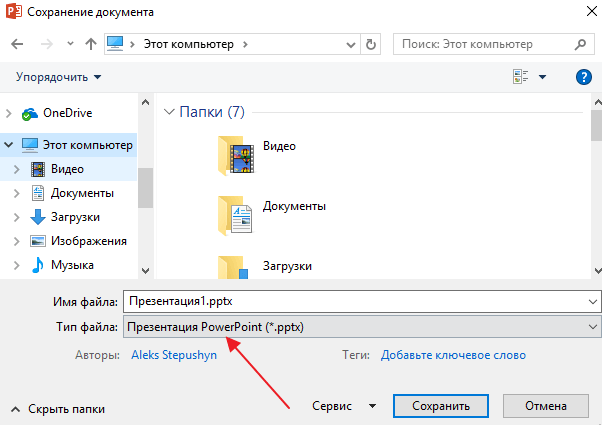
But, if the presentation has already been made and you are ready to show it, then in addition to the PPTX format, you can save the presentation in the PPSX format, which is also called “PowerPoint Show”.

A feature of the PPSX or “PowerPoint Demo” format is that when opening such a file, the PowerPoint program interface does not appear; instead, users immediately see the first slide of the presentation, which is open in full screen. This allows you to start showing your presentation immediately after opening the file. However, PPSX files cannot be edited, so you should always have a copy of the presentation saved in PPTX format.
Create a simple presentation in PowerPoint
Tsybanova Galina Anatolevna,teacher at Tver Trade and Economic College, Tver.
Description: The master class is designed for schoolchildren, students, parents,
additional education teachers, educators and teachers.
Difficulty level: Simple. Execution time, 20 - 30 min.
Purpose: Creating a presentation in Microsoft PowerPoint.
Target: Create a simple presentation project for Victory Day
Tasks:
- introduce the technology of working in PowerPoint;
- develop creative abilities;
- cultivate accuracy in work.
Work algorithm:
1. Prepare text and images on the chosen topic.
2. Open Microsoft PowerPoint.
3. Select a slide layout.
4. Select the background (theme) of the presentation.
5. Place information in the appropriate blocks.
6. Edit the presentation.
7. Save the new file to a folder on your hard drive.
Preface:
A presentation is a brief and visual presentation of information that helps the speaker reveal the essence of his work in more detail. Now it is used in many areas of our lives. Therefore, before you start, decide on a plan for your speech. Determine the main goal of your presentation, think about what you will say at the beginning, at the end - and, accordingly, what slides, with what information and in what sequence you will need.
You can create high-quality presentations using PowerPoint. It comes with the standard Microsoft Office package. With it, you can create, view, and show slide shows with text, shapes, images, graphs, animations, charts, videos, and much more.
I will introduce you to the basics of creating a presentation.
When working on a computer, follow the safety requirements:

Progress:
1. Find information in advance on the topic of the future presentation and upload it to a text file.
Save it in a separate folder on your computer.
2. Prepare the necessary images and save them in the same folder.
The images can be your photographs or pictures copied from the Internet.
You can use a scanner and digitize any photograph or drawing.
3. Open the program Microsoft Office PowerPoint
You can do this:
from the main menu Start - All Programs - Microsoft Office PowerPoint
by program shortcut on the desktop;
by the presentation file icon in the folder.

If no one has opened this program on your computer yet, then you should look for it in the folder
Microsoft Office (Start - All Programs - Microsoft Office - Microsoft Office PowerPoint)

Immediately after launch, the first tab called home, here we see an empty slide,
which you can already work with.

“By default”, a slide opens with two text blocks (title and subtitle),
which can be used as a title page.
To change the slide layout, use the command Layout on the tab home and select the appropriate one.

2. To prevent the presentation from being faded, you need to choose an appropriate background.
To do this, go to the tab Design and select the appropriate one. The presentation background can be made
and independently, but this is a topic for another master class.

Enter the title of the presentation in the top block, and subtitle information (for example, information about the author) in the bottom block.

The font size is already set, you can change it a little without forgetting
that the information on the slide should be easy to read.
This can be done in the window Font or using tab commands home

4. To create a second slide, select the command Create slide on the tab home.
If you have already decided what information will be presented on it,
select the appropriate template (header and object, two objects, etc.)

I'll create a slide with two objects and a title.
I will enter some of the information into the title block.
To do this, I will open a text file prepared in advance and copy a fragment of text to the clipboard

and insert this fragment into the top block. You can also enter text from the keyboard.

5. I will insert a picture into the left block by clicking on the corresponding icon.
In the window that opens Inserting a picture I select the desired file.
The image size can be changed by selecting the image and dragging the corner.

6. I will also place text in the right block. Now the second slide is ready.

7. I will create the next slide from Blank slide.

To insert a text block, run the command
Insert – Caption(the mouse pointer will change its appearance)

Place the pointer at the desired location on the slide, press the left mouse button and, while holding it, stretch the rectangle to the desired width. Inside the new text block, enter the required information.
8. To insert a picture, use the command Insert – Drawing.

Select the file in the window of the same name that opens (see photo in paragraph 5)
and move it to the desired location on the slide (resize the image if necessary).

To crop a picture, use the command Size and position(context menu).
I cropped the image a little at the top and bottom. The third slide is ready.

9. Create the remaining slides in the same way.
On the last slide it is customary to indicate sources of information.
If creating a presentation takes a while, do gymnastics.
The exercises are “compact”, you won’t disturb anyone
1. Raise your hands clasped together and stretch, trying to reach the ceiling;
2. Raise your shoulders (pull your head in), move your shoulders back, trying to align your shoulder blades
and release your shoulders (“through your back”), performing a kind of circular movement with your shoulders (4 times);
3. Sit up straight, look into the distance;
turn your head to the right (while looking into the distance);
tilt your head, trying to touch your chin to your shoulder (do not raise your shoulder!!!),
look at your shoulder;
raise your head, look into the distance;
slowly turn your head to the starting position, look straight (into the distance)
Repeat the exercise with a twist to the other shoulder.
4. Roll from toe to heel (although this can be done while working)
10. Be sure to save the presentation you created.
This is such a simple presentation.
There is no animation, transition between slides is carried out “by click”,
the visual and text series on the slide changes automatically, along with the previous one.
I will try to talk about setting up animation in the next master class.
I apologize in advance to IT technology specialists, maybe I used the wrong terms...
...I'm self-taught, so please don't throw away mice and keyboards...
It’s better to write in the comments what’s wrong.
Thank you for your attention.


- What does individuality mean?
- What does a person’s individuality depend on?
- Issues of formation of a cluster education system in the Russian Federation
- Unified State Exam tests in literature What is included in the Unified State Examination in literature
- How to pay transport tax for legal entities
- Card for individual accounting of the amounts of accrued payments and other remunerations and the amounts of accrued insurance premiums Card for insurance premiums per year
- Error when filling in Contour
- Desk audit: developments
- Conditions for performing the stern experiment
- System status and processes
- Alexey Sergeevich Obukhov development of student research activities
- Oriental and African studies
- Yelets State University named after
- What does it show and how to calculate the internal rate of return?
- Yaroslav Samoilov is a relationship specialist with no professional education. Do you want to save your relationship?
- Perm Pharmaceutical Academy: reviews, faculties
- Trader Dmitry Cheremushkin
- Main economic issues
- Creative competition: we enter the Faculty of Journalism of St. Petersburg State University Bachelor's training programs
- Management of a modern school using the example of creating an educational cluster