Let's draw a turtle. How to draw a turtle: step-by-step instructions for beginners. Learning to draw a turtle - a lesson for children How to draw a wise turtle with a pencil
The list of four celestial animals in Shen Shui includes the turtle. It is considered a symbol of longevity and success, which is why every home should have an amulet or drawing of a turtle. In this article we will look at how to draw a turtle step by step.
You should start working with an image of the shell. To do this, draw a semicircle. If it’s difficult to do this yourself, use a template or outline the cup. Start drawing the head and paws. Apply a characteristic relief in the form of diamonds to the shell. Don't forget the tail, eyes and mouth. Do all the work with a pencil, then color the animal. There are several ways to draw this reptile. The shell does not have to be depicted as a semicircle. Try drawing an animal from ovals. Draw the largest oval, and a smaller one on the left side. This will be the shell and the head. Draw paws under the large oval. Connect the head and shell with smooth lines. The base is ready, proceed to detailing the drawing. Draw the claws, eyes and mouth, don’t forget the tail. The shell can be drawn by applying small circles to the base.

Turtles are very ancient animals that are characterized by slow and sedate movements. They live in many parts of the world, and they can often be found in zoos. But in order to understand how to draw a turtle, you don’t have to go to the zoo, just look at its photo or watch a documentary on this topic. It’s also very good to learn how to draw a turtle from life, because these creatures are often kept in apartments as pets. And this is not surprising, because turtles are very unpretentious, not prone to aggression, and with proper care they can live an incredibly long time.
Before you draw a turtle with a pencil step by step, you must prepare the following items:
1). Pencil;
2). A pen with black gel ink;
3). Colour pencils;
4). A piece of paper;
5). An eraser.
Now, if all those office supplies that are listed a little above are already at hand, you can start learning how to draw a turtle step by step:
1. Using light strokes, outline the outlines of the turtle’s body and shell;

2. Draw legs and a small tail to the turtle’s body;

3. Draw claws on the animal’s paws. And on the turtle’s head draw eyes and a mouth;

4. Draw a pattern on the turtle’s body;

5. Also draw her shell in more detail;

6. Now you understand how to draw a turtle with a pencil. But this is not enough to make the image look complete. It is best to color the drawing of a turtle using colored pencils. But first, trace the image of the turtle with a pen;

7. Then use an eraser to remove the pencil lines;

8. Use light brown and dark brown pencils to shade the ground, and color the grass green;

9. Paint the turtle’s claws with gray color. Use green and yellow pencils to color the animal’s body. Use a burgundy pencil to fill in the spot near the eye;

10. Using a yellow pencil, as well as pencils of various green tones, color the turtle's shell.

Drawing of a turtle, completely ready! Now you know how to draw a turtle and you can teach it to your child! The drawing can be done with a regular pencil! And if you still want to color it, you can use any paints, as well as felt-tip pens or watercolor pencils, which have a wide palette of shades!

Today we will tell you how to draw a turtle with a pencil step by step. The article is suitable for those parents who want to teach their child to draw.
The turtle has a dense shell with a certain pattern on its upper part. The torso is located inside it, which can go out. The shell is colored in brownish-green tones, but the wrinkled skin of the turtle itself is green.
- colour pencils;
- medium hard sketch pencil;
- eraser
- landscape sheet of paper.
Steps for drawing a turtle:
1. Draw the body of the turtle in the form of an oval, but the head in the form of a circle. You can also determine the location of the eyes and draw it in the form of a small circle.

2. Connect the oval with the circle to get a neck. On the right side of the circle, draw the outline of the front part of the turtle’s muzzle.

3. At this stage, you should draw the outline of the paws and shell, which we will draw in the form of several circles.

4. Draw the outline of the turtle’s shell. Draw vertical stripes to create a pattern on the top of the shell. On the left side we will add a small tail.

5. Draw the lower parts of the front legs together with the hind legs. You should also draw the folds on the turtle’s neck and begin to draw the upper part of the outline of the shell in segments.

6. We finish drawing the turtle’s shell in segments so that it turns out voluminous and convex. You should also work out the entire drawing: create the outline of the head and torso, work on the paws and muzzle, draw the eyes, mouth, wrinkles and folds on the animal’s skin. Use an eraser to remove excess lines.

7. Use a light green pencil to color the entire drawing. Then we take a dark green pencil, which should give volume and a more saturated color to the skin of the reptile. This is a head with a neck, a tail and paws.

8. Apply strokes to the shell with pencils in brown tones: from light to dark shades. We work on each segment to achieve convexity.

9. Use a black pencil to create shadow areas in the turtle drawing and an outline.

10. The step-by-step drawing of a turtle with colored pencils is ready.

We hope that this article on how to draw a turtle step by step with a pencil will be interesting to both children and adults.
After today's lesson you will learn how to easily draw a turtle. Here's a special video. After watching it, you will learn how to create a drawing of such a cute turtle.
In addition to the video tutorial, I have selected several step-by-step instructions that will help you understand how to draw a turtle. Shall we begin?
How to draw a funny turtle with a pencil step by step
First draw a small oval - this is the head of a turtle. Below, draw the shell in the form of a figure resembling a semicircle.
Now you need to combine the head and shell of the turtle by drawing two curved lines from one point. Draw a semicircle shape on top.

Draw three legs (we don't see the fourth). Draw a line under the shell - this is the body of the animal. And one more important detail - a small sharp tail.

And now the most difficult thing is to draw the turtle’s eyes, or rather only one eye, because the other is not visible. You need to add folds above the eyes, and at the left eye you also need to add a corner of the cheek. Using two long curved lines draw a nose. Place a dot closer to the bottom edge, and draw a wide smile even lower. And to make our turtle drawing look more realistic, we need to add a few folds to the neck.

We are approaching the finish line - erase the extra lines and draw the contours.

I am delighted! Did you like it?

This is interesting! Did you know that turtles can live over 100 years? You can find out about age by counting the rings on the scutes that make up the turtle's shell. These animals also know how to remember people’s faces. They stretch their necks if you speak kind words to them, and if you speak rudely, they hide in their shell.
How to draw a cartoon turtle
On the left side of the paper, draw something similar to an oval. Add a line at the bottom - this is the turtle's mouth.

Now draw another oval, which will be larger than the previous one. Closer to the bottom edge, draw two wavy lines - the border between the shell and the body of the turtle.

A little more - and the drawing of the turtle will be ready. Draw the turtle's legs.


Now all that remains is to draw the eye and tail of the turtle.

Color the picture.

How to draw a sea turtle
Draw these two ovals - the head and body of the turtle.

Draw the contours of the head and complete the details: eyes, mouth and put a small dot - the turtle’s nose.


Now draw the contours of the body and draw transverse stripes on it.

It's time to draw the turtle's flippers. Yes, yes, in marine species of these animals, the limbs have turned into flippers, of which the hind ones are smaller than the front ones. These are the kind of flippers you need to draw.
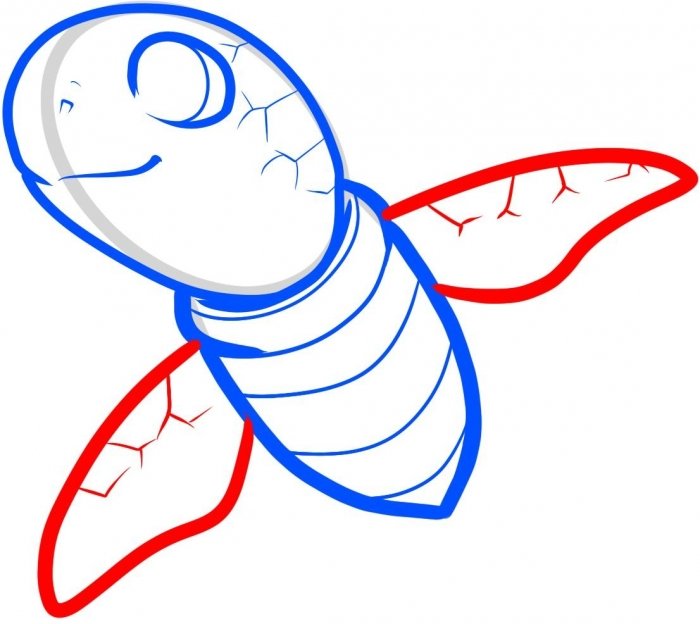


Erase the extra lines and color the drawing.


How to draw a turtle using lines
Finally, I have prepared for you this simple drawing of a turtle. I am sure that you will easily be able to draw such an animal even without explanations.
Turtles are one of the most common reptiles on our planet. Children are familiar with them from numerous cartoons and fairy tales. And surely your child would like to know how to draw a turtle pencil. And this is not at all difficult to do thanks to our step-by-step lesson, with which you will learn how to draw a turtle in a matter of minutes.
STEP #1
First of all we will draw the base for the turtle. To do this, draw a circle for the head, and add basic facial lines in it. Then we draw an oval for the body and connect it to the head in the neck area. Make small base lines for the paws.
STEP #2
At this point you need to start drawing out the shape of the head. Pay attention to our drawing, how the turtle has a nose and mouth. Then we draw the back of the neck.

STEP #3
Now you need to draw the lower lip and the front of the neck. Note the small protrusion on the neck. Once you have done this, start drawing the front legs.

STEP #4
Draw the paws and fingers of our turtle. Then, using the facial base lines, we draw the eyes and eyebrows, as shown in our picture. All you have left to do in this step is draw a small rim for the shell.

STEP #5
At the final stage, all that remains is to draw the hind legs and tail, and then make patterns on the shell. When everything is ready, erase all the extra elements and base lines that we made in the first step.


- The first pharmacy was opened
- Wonderful traveler and scientist Fedor Petrovich Litke Stamp issued in honor of the Litke expedition
- Union of the Livonian Order with the Teutonic Order
- Pizza dough - secrets of Italian cuisine
- How to make shortcrust pastry baskets
- Layers of meat with lard in onion skins - it will work, you won’t be able to pull it off by the ears Boiled lard with a layer
- Pork gravy - recipes for pork gravy in a frying pan and in a slow cooker
- Salad with chicken, Korean carrots and cucumbers
- How to make a cabbage pie from puff pastry according to a step-by-step recipe and photo
- Juicy pie with blackcurrant filling
- Waffle cake - step by step recipe with photos
- Conditions for performing the stern experiment
- System status and processes
- Alexey Sergeevich Obukhov development of student research activities
- Mars 4th planet of the solar system
- Human organ systems
- Experimental methods for recording elementary particles
- What is the Swedish match famous for?
- The best self-propelled howitzers Russian artillery
- Fedor Petrovich Litke: second circumnavigation of the world