We draw spruce branches for the new year. How to draw a branch with a pencil How to draw a Christmas tree
Coloring-hatching Christmas tree branch
What is New Year's holiday? This of course is YOLKA! And how do we distinguish that in front of them is spruce, and not pine, or fir, because they are also the same color in winter and summer? ( Yes, in the form of a tree. The Christmas tree from a distance resembles a pyramid. And the needles of the pine are long and grow in twos, the needles of the fir are soft and not prickly, and the needles of the spruce are short, sharp, hard, and bright green).
Let's draw a spruce branch. Rather, of course it is. When you draw the needles, make sure that the length of the needles is the same and notice that the needles are slightly pressed against the branch, tilted towards the end of the branch (we performed a similar task when we drew. And on both the upper and lower sides of the branch. This is where one must be very careful in order to correctly determine not only the length, but also the direction of the inclination of the needles on each branch of the branch.
- hatch, making sure that the needles are the same length and density
- cut without damaging the needles or break along the contour
Cones grow on the trees. What are they needed for? And here - under the scales there are hidden spruce seeds. (And why the seeds? Well, not only feed the squirrels. First of all, so that new Christmas trees grow from the seeds! So the cones are very important.

- draw a pattern of scales on the cone
- colorize, break along the contour (or cut out)
And here is another very tricky task: cutting sharp "needles" with the same slope without a pattern is not an easy task.

- from a strip of paper “spruce branch” according to the sample. (If it is very difficult, you can draw “needles” and cut according to the drawing, but this is very undesirable - the branch will look unmarketable - it will be lined with pencil lines. Therefore, it is better to practice and still learn to cut by eye).
- bend along a strip of paper cut needles symmetrically
The resulting branches will be useful for the design of the New Year's wall newspaper.
Christmas Tree Branch with a Ball coloring page
New Years is soon. Decorate a spruce branch - hang a ball. Just don't paint it in the same color. You need to come up with an interesting picture or pattern.
And here is the picture that we will draw, or rather finish drawing:

- hang the ball correctly (on a vertically hanging thread)
Spruce? It is very difficult to find a person who has never painted this tree in his life. But if you do not know how it is done, our article will teach you this simple matter.
Spruce - a symbol of the holiday!
Spruce - this is which everyone associates with the holiday, the New Year! This evergreen coniferous beauty for children becomes a real green fairy, delighting them on the morning of January 1 with gifts hidden under the branches. Does your child ask you to draw a Christmas tree? Or maybe you need to make some composition with her for a children's party or a matinee in the garden?
We will be happy to provide you with some simple master classes that will teach you how to draw a fir tree step by step.
Method number 1: top to bottom
The first method, which we will consider in our article, will be based on drawing a tree from its top. Learn to draw such a spruce. And then it will not be difficult for you to create a whole forest on a piece of paper!
So, how to draw a fir tree, starting from its top? Everything is very simple!

Method number 2: from the bottom up
The first way of depicting spruce is not bad, but, you see, it is much more convenient to draw from the bottom up, and not vice versa. This makes it much easier to adjust and plan the height of the tree.
How to draw a fir tree from bottom to top? Now let's show!

Method #3: Easy!
How to draw a fir tree in the simplest and most unpretentious way? We know it and will definitely share it with you. With this method, even a small child can draw a Christmas tree.
How to draw a spruce branch
But what if you don’t need the whole tree, but need, for example, only one of its branches? Well, we'll tell you about that too. Arm yourself with pencil and paper, let's get started!

The drawing is ready!

Now you know how to draw a spruce branch yourself. You can even teach it to your child, for example.
Using the methods described above, you can draw a branch of a coniferous tree or the spruce itself with a pencil, felt-tip pens and even paints. The tool in this case does not really matter. Draw, create yourself and with your children.
Today's lesson is dedicated to the brightest and most colorful holiday - the New Year. As soon as you imagine it, you immediately feel the smell of spruce paws or the crunch of snowdrifts.
Today we will try to draw a spruce paw with a magic toy and a forest beauty in golden decoration in 20 minutes.
For work you will need:
Sheet of A4 paper (preferably for watercolor, but absolutely any is possible);
paints (watercolor, gouache) - colors will be needed, mainly green, blue, ocher, burgundy and white;
brushes (columns: the largest No. 8 and one medium No. 3-5);
a jar of water (you can stock up on two jars or change the water more often);
rag.
As always, lightly soak watercolor paints - one drop is enough. We take a large brush in our hands, dip it in water, after which we draw such a “bird's paw” with green paint in natural tones (grass, light green).
Now we take a different shade. I have it blue (cobalt, azure), but you can use ocher or even soft orange, pink (alternative - highly diluted red). using too much water is not recommended. Otherwise, you need to dry the result thoroughly before painting further. Duplicate the bird's paw pattern with this color.
Next, take a dry thick brush vertically in your hand and slightly fluff it with your fingers. Then, barely touching the fluffy tip of the brush with water, lightly lower it into the paint. The color of the paint should be in contrast to what we have used so far. For example, if the background is blue, the paint should be green or burgundy. This effect is called "dry brush". This stage of work requires a lot of patience and diligence.
Holding the brush almost vertically, with light movements, apply several strokes of different colors (blue, green, ocher) imitating Christmas tree needles.
If it seems to you that the paw turned out to be “liquid”, add strokes of the main color, for example, green or blue, using the same “dry brush” method. However, it is quite possible that it will be burgundy and purple, or orange and red.
For artists younger than 5 years old, we suggest using a different stroke technique. On the brush No. 2,3,4, we collect the above-mentioned contrasting colors and draw a fence. It does not matter if it is crooked, the main thing is that the sticks go the way the needles grow on the Christmas tree. While walking in the park, carefully study with your child the structure of needles on a branch, the distinctive features of coniferous trees, etc.
Using different colors, we increase the density of the needles.
Here we have such a fluffy spruce paw. It turned out very artistic. However, it's time to decorate it for the New Year.
In the free space under the spruce branch, draw a figure in the form of a circle, rhombus or oval - depending on the New Year's ball with which you plan to decorate the branch. To make it as symmetrical and even as possible, kids will need the help of adults.
The pattern on the Christmas decoration is drawn last, when the background is dry. Then it will not spread and retain its original beauty. By the way, the imitation of scales in a fish and a cone will be the same. Color the ball with any pattern: stripes or polka dots, flowers or wavy lines.
Do not forget to draw a rope on which the Christmas toy hangs. This will add credibility to it.
When the drawing of the Christmas tree toy dries, you can do the general background. I remind you that on the side where it is light, the background should be darker, where the dark thick of the Christmas tree is lighter.
I hope that the master class will be of interest not only to adults, but also to children who will be able to draw a luxurious picture for the New Year holiday.
Room decoration for the New Year 2020 can be successfully complemented by a beautiful poster with a festive theme. As a rule, such posters depict winter, a Christmas tree. Santa Claus and other fairy-tale characters. A drawing with a beautiful spruce branch on which a New Year's toy hangs will be beautiful and appropriate. Such branches can often be seen on New Year's cards. By the way, you can also draw a New Year's greeting card yourself. Such a hand-made drawing will be a great addition to the main gift, and in some cases it will be a small New Year's present. Today we will learn how to draw a spruce branch with a New Year's toy, using simple master classes.
Example #1
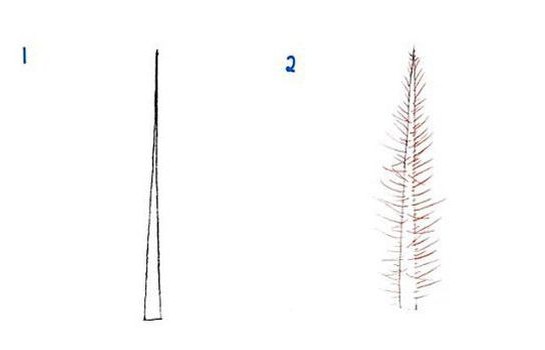
The drawing begins with the creation of the basis of the branch, i.e. you need to draw one line and additional ones emanating from it. Then you should place needles on them, drawing them one by one. Do the same with each small branch. To make it fluffier, additional touches will be required. The result is almost a real spruce branch. Then you need to depict snow, and for this you need to erase some areas on it. They can vary in length and width, but the more varied, the better. After that, you will need to draw a Christmas tree toy, depicting it in the form of a ball. Snow can also be placed on it, and this must be done in a similar way. She must have rope. At the end, such a picture can be decorated with snowflakes. Drawing for the New Year 2020 is best done with a pencil, and if desired, colorize.
Example #2

A slightly different branch will turn out if you use a different instruction. Draw a hexagon on a piece of paper. Then, throughout its entire territory, it is necessary to gradually draw branches with branches. Needles should be made large so that the branch is fluffy. On one of them, you need to depict a Christmas tree toy of any shape. After that, the extra contours should be removed and the drawing painted for the New Year 2020 with paints. It turned out a beautiful fluffy twig.
Example #3

You can learn to draw almost any branch, you can even draw it according to your ideas. By gradually observing the entire sequence of work, excellent New Year's drawings are obtained. By this method, the same beautiful sprig of spruce is obtained. On a piece of paper, draw one main line and two additional lines to it. Then they need to be shaded to make fluffy needles. In addition, it is desirable to draw a round Christmas ball.
Example #4

With the help of this master class, you will get a fluffy spruce branch. Thicker branches should be drawn on a sheet of paper, after which they should be drawn in green. When everything is dry, you will need to depict needles. You can make them with a pencil, but works made with a thin brush will look more beautiful. For decoration, a New Year's toy should hang on a branch. You can draw one or more. The ball will look the best. It may also have bumps on it. Then the image must be colored and the New Year's picture is ready. When creating a spruce branch, needles need to be hatched evenly and of the same size. The more of them, the more beautiful the drawing is. The image of a spruce for the New Year 2020, as well as its branches, is quite simple and therefore even small children will be able to do it. The drawing looks great if you decorate it with gouache. Saturated colors and neat lines will make the image much more beautiful. Drawings also look great if you use felt-tip pens and colored pencils when designing.
Also, I advise you to watch a master class on drawing a spruce branch
Conclusion
Here are some interesting options on how to simply and beautifully draw a spruce branch with a New Year's toy for a poster or postcard you have for the upcoming New Year 2020. Beautiful work is obtained even if you just copy the image from the New Year's card. A little fantasy and imagination, and you get a festive drawing that everyone will definitely like.
Getting out for a walk in the forest, we are faced with the beauty of majestic fir trees and, of course, a cone will be in our hands. Small, but interesting in its structure, it becomes an interesting attribute for creative crafts. Those who like to make an exposition from natural material with their own hands are attracted by cones for making animals, birds and fairy-tale characters. If you are reading this article, you need a lesson on drawing a cone. How to draw a fir cone step by step?
Draw step by step
For beginners in drawing, in order to reproduce the drawing, we offer a drawing technique using circles and ovals. Such a beginning is easily perceived and, by connecting the rounded parts with smooth lines, we get a real character. The fir cone is no exception. To sketch the drawing you will need a simple pencil:

Stage 1. The basis of the cone will be an elongated oval, inside which we will place the scales. Carefully draw an oval. The oval should be symmetrical.

Stage 2. In the upper part of the oval (find the upper center point), draw a small arc inside, connecting the side parts of the oval. The scales have begun. The rest will depart from the first scale.

Stage 3. Draw the scales carefully, tightly so that they are as uniform as possible. Slightly wind the side parts beyond the contours of the oval. Looking at the bump, we see that its coating is wavy.

Stage 4. We continue to apply semicircles. Closer to the center, we increase the size of the plates, slightly expanding the space between them. The cone blooms in the same way as a flower bud, and it is not entirely correct to depict the scales in the same range. There is nothing ideal in nature. The scales in the center of the cone are different in size. Try to distribute them slightly unevenly (one more, the other a little less).

Stage 5. Going down to the bottom of the cone, we reduce the scales in size and compact them. On the very bottom of the plate, draw very small and slightly pointed. Do not wind the pencil outside the oval.
Having finished sketching the scaly plates, look at the picture carefully. What catches your eye? Of course! A cone without a branch is not a finished drawing. How to draw a fir branch?
Before you start drawing a branch, erase unnecessary lines on the bump, strengthen the contours of the scales with thin lines from below.

Step 6. Distribute a slightly curved line over the cone (the skeleton of the branch). Draw the length as you wish. Add one or two side lines to the frame. Just remember - the length should be in harmony with the side branches.

Stage 7. We fluff the depicted branch. Gently, on both sides, in random order, add thin needles at a moderate distance from each other. Draw the tilt of the needles in one direction. If the branch does not seem fluffy enough, add needles.
The last stage of our creative lesson is coloring. It is impossible not to notice that both the scales of the cones and the needles of the branch have different shades.

For coloring, choose a convenient material. It can be - colored pencils, watercolors, colored crayons. We begin to decorate the cone. We shade the scales with several tones of brown. The plate is lighter underneath. We sketch the spruce branch with light brown paint, and the needles in dark green. If it’s hard for you to imagine the shades, take a ready-made drawing for the base and take a closer look at the color overflows.
Enjoy drawing!


- “Why does rice dream in a dream?
- Secrets of numbers - twenty-five (25)
- Direct and reversed meaning of the page of cups in tarot layouts
- Lenormand ring: meaning and interpretation of the card
- Karmic horoscope and karmic tasks for zodiac signs Karmic forecast by year of birth astrology
- Tarot spreads: divination for the near future
- The mice are falling. Why is the Mouse dreaming? Mice according to the dream book of Evgeny Tsvetkov
- Dream interpretation - interpretation of dreams
- Tarot Card Meaning - Page of Pentacles What do pages mean in tarot cards
- Karmic lesson, the one who was born on the "22nd"
- Online divination by heart
- Number Magic Page of Swords in Relationships
- Fitness for the brain Fitness for the brain how to assemble a cross
- Brain Fitness Iq puzzle Brain Fitness Rectangle
- Her dog was acting very strange
- Husband who left his wife with newborn twins
- A touching story about a brownie named Methodius
- Why our future depends on reading books
- Who came up with the brownie Kuzya, or how was the first cartoon about the "hereditary" brownie filmed?
- Plank exercise for beginners - rules and schedule Exercise plank: complexes