Drawings from the cartoon spongebob. How to draw spongebob with a pencil
Today we will find out how to draw Spongebob with a pencil. This is wonderful cartoon character, a favorite of many. I think the lesson will be simple and even somewhat fun. We will need:
- Good mood;
- Pencil;
- Paper;
- Eraser;
- Colored pencils or markers;
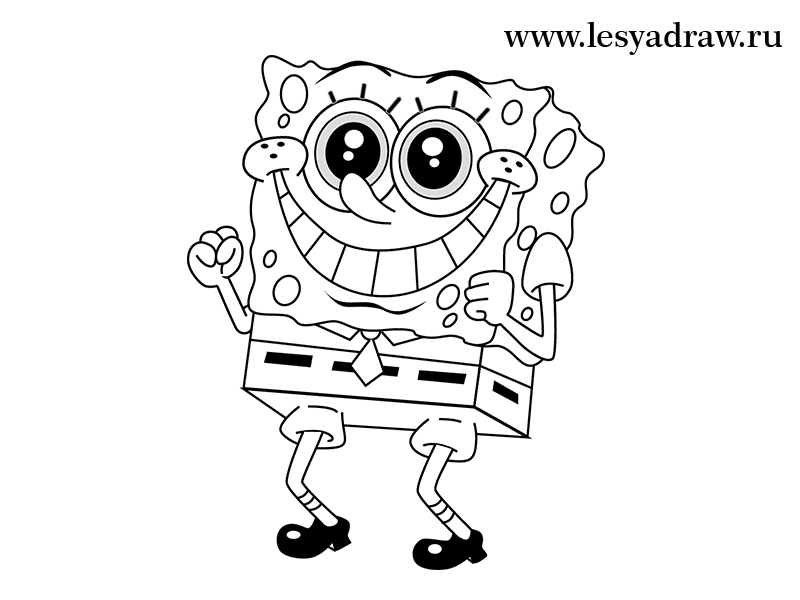
So let's get started. This is the picture you will end up with:
How to draw SpongeBob with a pencil step by step
Step one.
Now we will draw the base of SpongeBob. It's almost like a rectangle in geometry class... or even a trapezoid where the top is wider than the bottom. Let's draw two lines down from the main figure - these are the future legs. There are two arcs on the sides, as shown in the figure. Inside the main figure we will draw three horizontal lines and one vertical, these are the helper lines. The result was cells.  Step two.
We will draw arms and paws. Let's show their round shape. At the intersection of the helper lines we will place an oval nose. Along the edges of the horizontal line we can already see the corners of the smile, they are slightly rounded. Let's draw another horizontal line parallel to the bottom edge of our cartoon.  Step three.
We will draw the face. As you already know. Of course, SpongeBob is a different matter, but the basic details are the same. First - a smile. Wide and big. Then - two large teeth. Beneath them is a curved chin. And now, carefully between two horizontal lines, the same as the helper lines, draw two large round eyes. And inside, in the center, there is a smaller circle - this is the pupil. Let's add two small details: at the base of the arms and legs - two small rectangles.
This stage of the lesson is fantasy. Draw a wavy line around the square face. Let's color the pupils. It seems that SpongeBob is smiling at us. See it already? Now let's draw a tie and give our hero some respectability. And also short horizontal lines along the waist.
Let's make it perky and add freckles around the edges of the smile.  Step five. Draw the arms and legs. Let's make them thicker, show fingers and boots. We scatter characteristic spots across the face.
  Step six. The most colorful. Before coloring, don't forget to erase the guide lines! Well, everything turned out to be SpongeBob. Yellow, as it should be. You can also (SpongeBob's pet, which).
  Maybe you will be interested in how to draw SpongeBob's friends? If yes, then write in the comments which cartoon character you would like to draw next? I'm waiting for answers in the comments! You will be interested to see more how to draw.
Today's lesson is about how to draw SpongeBob correctly. In principle, this is not difficult, although some may have difficulties. Almost everyone, including adults and children, knows who he is. Cheerful character children's cartoon- "Sponge Bob Square Pants".
So, let's see how to draw SpongeBob with a pencil.
Step 1. First of all, a rectangle is drawn, placed on the short side. Schematically add lines for the legs, arms, top of the eyes and mouth.

Step 2. Exactly in the middle, draw a line with a pencil, from the top edge to the bottom edge, dividing the figure in half. Outline the eyes, nose and mouth of a cheerful SpongeBob.

Step 3. Draw a smiling big mouth with two protruding teeth.

Step 4. Draw the holes and irregularities of his body, because he is a sponge, but not to the end of the rectangle.

Step 5. The next step will be clothes. In almost all cartoons, SpongeBob has pants and a tie. This is what should be depicted, given that it is rectangular. Also draw the arms behind the back in short sleeves.

Step 6. Complete the clothing elements. And draw SpongeBob's legs, in short pants and boots with round toes.

Step 7. Now you need to erase the extra lines and color the drawing.


So the lesson is over, it turns out that learning how to draw SpongeBob step by step is not at all difficult. If you don't succeed the first time, you shouldn't give up halfway. The hero is not difficult to draw, so at most the third time it should turn out like something out of a cartoon.
For a better understanding, watch the video that shows how to draw SpongeBob
Learned how to draw SpongeBob yourself - show me step by step lesson friends on social networks.
Hi all! It's me and mine again new lesson. Today we will learn to draw SpongeBob SquarePants! For those who are not in the know (and there are only about 20% of all people), I’ll tell you a little about him and the cartoon of the same name. Sponge Bob — main character American animated series "SpongeBob SquarePants". Spongebob lives in underwater city called Bikini Bottom, in which various Marine life. SpongeBob lives in a pineapple house, which is located at 124 Shell Street. SpongeBob has acquired his nickname "Square Pants" due to the fact that his figure resembles an almost square shape. Best friend SpongeBob is a starfish named Patrick who lives under a rock. SpongeBob has a pet snail named Gary. SpongeBob works as a cook in a restaurant called the Krusty Krabs. The owner of the Krusty Krabs is the miser Mr. Krabs, who is willing to give his life for a penny.
Animated series "Sponge Bob Square Pants"(eng. "SpongeBob SquarePants") was launched in the summer of 1999 and very quickly became one of the most popular animated series on television. Over the course of its existence, the SpongeBob SquarePants series has gained a reputation as a series with good, but sometimes stupid, humor. The animated series "SpongeBob SquarePants" has an unexpected plot, originality and charismatic characters. The Russian version of this series has been broadcast on the TNT channel since 2003. Animated series "Sponge Bob Square Pants" produced by Nickelodeon.
spongebob(Sponge Bob) is called by different names. SpongeBob, SpongeBob, SpongeBob, SpongeBob SquarePants or SpongeBob! Soon I will definitely do and add lessons from other characters of this animated series! Stay tuned for updates on the website! Now let's get straight to the lesson...

Step 1. Let's start by drawing such a square and guide lines for the face and legs.

Step 2. Add two large circles for the eyes and draw a nose.

Step 3. Let's add a wide mouth and two large front teeth, and also add a few freckles to SpongeBob's cheeks.
Step 4. Now let's start giving SpongeBob's body the volume and porosity inherent in any sponge.
SpongeBob is a sea sponge measuring 10.2 cm tall and weighing 28 grams. His last name - Square Pants, due to the fact that he constantly wears them. Spongebob lives with big house with his pet snail Gary, works in a restaurant as a cook and has been awarded the title of employee of the month a million times. He likes to hunt jellyfish (he gives them names and releases them), likes to cheat bubble, study karate, study at a boat driving school, but can’t pass his license. By nature, SpongeBob is overly energetic and sociable, which often irritates the residents of the sea town where he lives. SpongeBob is a very kind, reliable, optimistic and slightly naive hero; children and teenagers loved him. Now let's move on to drawing.
Step 1. I’ll tell you right away, you don’t need to draw options “a” and “b”. SpongeBob's body shape is an uneven rectangle - a trapezoid. Option a shows a simple version of drawing a rectangle in perspective. To understand how to draw a body, you need to take a thick book or some kind of box and put it on the table (this will be option “a”). Now we need to expand the object, as shown in option “b”, i.e. tilt back a little and a little to the left. Now, to achieve result “c”, we slightly rotate the object clockwise and narrow it from the bottom (marked in red). I explained it as best I could, so excuse me. For those who have not mastered many letters, we immediately proceed to drawing option “c” by simply copying, pressing lightly on the pencil.

Step 2. Draw Bob's body. We draw a wavy line around the outline, as shown in the picture. Then we erase the auxiliary lines.

Step3. Draw the eyes and nose. First, mark the direction of view with two lines. Then we will draw two larger ovals, funny eyelashes and eyebrows. We detail the eyes - draw two ovals inside, highlights on the pupil and paint over the right eye. We don’t paint over the pupil of the left eye yet, first we draw the nose and erase with a eraser the lines of the eye that are inside the nose (shown by red arrows), after that we paint over the left pupil (in general, this is the pupil of the right eye, because you need to stand in the direction of the picture. But since you will get confused, I wrote the right eye - it will be the eye on your right hand, and the left - on your left. If you don’t understand anything, then throw what you wrote in these brackets out of your head).

Step 4. Draw SpongeBob's funny smile, cheeks and tie. Erase the lines that are inside the cheeks. Then we draw the teeth, chin and sleeve.

Step 5.Draw the legs and arms. We look at the picture, click on it to enlarge.

Step 6. We draw holes in the body and stripes on the pants, as well as stripes on the socks.

Step 7. Take an eraser and erase two auxiliary lines, lines inside the tie, lines inside the pants, lines inside the arm. Paint SpongeBob's shoes and the lines on his pants black.
Step 8. Take colored pencils and color our crazy-happy SpongeBob.
We continue to draw characters from the cartoon “SpongeBob SquarePants”. SpongeBob has already been drawn (), now let's draw his friend Patrick.
We will draw step by step with the help of guides, so try to make them not too noticeable, but draw them slightly visible with a little pressure on the pencil.

Step 1: Let's start by drawing a regular circle, which we will place slightly lower from the center. This will be the basis for Patrick's body shape.


Step 3: Now let's draw Patrick Star's head, which resembles an inverted "U" shape, tapered to the top of a vertical guide line and located at the base of the circle.

Step 4: Draw the same shape as for the head, only smaller and slightly angled, on the left side of the figure. It will be left hand. To draw Patrick's second arm, create the same "U" shape to the right of the circle, sloping slightly to the left.

Step 5: Below the base of the circle on the right and on the left side, draw two similar shapes in the shape of the letter “U”. These will be the legs.

Step 6: At the bottom of the character, draw two square shapes that will go on top of Patrick's legs. This will be the bottom of the shorts.

Step 7: Draw a small circle at the top of the character's figure to the right of the vertical line guide.
Draw another circle of the same size to the left of the first one so that they intersect each other. These will be the eyes of Patrick Star's character. Now, at the top of the main circle, draw two curved lines - this will be the mouth.

Step 8: Now the general sketch of the basic form of Patrick from the cartoon "SpongeBob SquarePants" is ready and you can improve the drawing. From now on, draw with a pencil with pressure to get sharper lines and a clearer sketch.

Step 9: Start by highlighting the outline of the character's eyes. But do not outline the part of the left eye that intersects with the right. Draw two small circles inside each eye that will be the pupils. Draw two squiggles above each eye to mark the eyebrows.

Step 10: Darken the crescent shape that represents the mouth and draw a line on the open left side to fill in the other part of the character's mouth. At the top of the smile, draw a small curve to express the character's laughter. Inside the shape, draw two curved lines to create Patrick Star's tongue.

Step 11: When making a character's head shape narrow, make it thinner than the character's main figure. Also bend its top slightly to the right. Add clarity right hand and draw it a little thinner at the bottom.

Step 12: Visually tighten Patrick Star's body by drawing a horizontal line that will be the top of his shorts. When drawing a character's body, make it narrow towards the inside of the main circle, thereby making it look a little slimmer. Draw two curved lines above its vertical guide line to represent a button.

Step 13: Make the character's shorts darker by drawing another curved line below the horizontal guide line that follows his shape. This is the belt for his shorts. Outline the rest of the outline of his shorts, except for the part of the circle above the shorts with right side. Draw a couple of flower shapes to make patterns on the cartoon character's shorts.

Step 14: Draw the character's legs and left arm.

Step 15: Like this! You now have a good sketch of the character Patrick Star from the animated series SpongeBob SquarePants. You can stop with this quick sketch or continue to refine it to a more perfect look.

Step 16: For a more finished look, carefully go over the sketch with a pen or felt-tip pen. Wait for the ink to dry and then use an eraser to get rid of any pencil lines. Now you have a finished drawing of Patrick Star from the animated series “SpongeBob SquarePants!” You can stop or move on to the next step to complete your Patrick Star character drawing.
Finishing touches: To fully complete your Patrick Star drawing, you need to color him. You can use markers or colored pencils or even crayons! Make the character's body dark pink. Paint the character's body with several red spots. Don't do too many of them or he will look sick. Make the mouth dark brown and the tongue pink. The main color of the shorts is yellow-green, and the patterns on them are purple. Like this! Now you have a finished drawing of Patrick Star from the animated series "SpongeBob SquarePants".
You can also watch the following video step by step drawing Patrick Star from the animated series "SpongeBob SquarePants."


- Russia is a multinational state We live in a multinational country
- The smallest peoples of the world Which group of peoples is the smallest
- How to change a cash receipt order in 1c
- Penalty calculation at the refinancing rate, penalty online
- Other current assets on the balance sheet are... Accounts and other assets
- Procedure for submitting calculations for insurance premiums Calculation of RSV for 9 months
- How to reduce VAT and maintain profits
- International accounting and reporting standards
- How to fill out a tax return correctly
- Crab salad with cheese - five best recipes
- Cutlets in foil in the oven
- Management project based on the example of an enterprise presentation
- Abstract: Elementary particles
- Presentation on the topic "management"
- History of the development of computer technology presentation for a lesson on the topic Historical development of computer technology presentation
- Astronomy Presentations Interesting Topics for Astronomy Presentations
- Presentation on history "counting years in history"
- Astronomy Presentations Astronomy Presentation Template
- The anniversary of the expulsion of the Karachais recalled the problem of rehabilitation of repressed peoples
- Udmurt people What peoples live on the territory of Udmurtia