Spring rain pencil drawing. How to depict rain in watercolors. Fast and easy way. How to draw rain with a pencil step by step
Everyone perceives rain differently. It makes some people sad, others have fun jumping in puddles, and others even begin to write poetry, inspired by the gloomy atmosphere. Have you ever wanted to depict this natural phenomenon on paper? Let's look at how to draw rain with a simple pencil and
Preparing materials
First, let's lay out on the table in front of us everything that may be useful in the drawing process. The workplace should be well lit and free from unnecessary things.
So, what tools will you need:
- Sheets of paper.
- Simple pencils.
- Eraser.
- Colored crayons, pencils, markers or
- Tassels.
- Glass of water.
- Palette (small board for mixing paints).
- A picture of rain (if necessary).
Learning what rain looks like
Before you draw rain, you need to get to know it better. This will help make the drawing more realistic. Find different pictures depicting rain, drizzle and look at them carefully. If possible, catch a drop of rain with your hand or clothing. Take a good look at the trail of fallen water. Look what the drop looks like. Is it big or small, round or elongated, transparent or colored? Rain is especially beautiful in sunny weather, when it shimmers with all the colors of the rainbow.
When you draw a shower or drizzle, remember what drops you saw. This will make it easier to concentrate and complete the landscape.
What is characteristic of rain?
Be sure to take into account all the details that need to be drawn. It rains in cloudy or sunny weather, in a wooded area or in an urban area, whether it is strong or not. All this will affect the drawing. If you want to make it realistic, of course.

So, what features are important to consider when depicting rain:
- Cloudiness and predominance of gray color.
Usually, when it rains, the sky becomes cloudy so that the sun is no longer visible. In this case, the painting should be done in a restrained color with a predominance of gray. Darker paints should be applied to all painted horizontal surfaces, thus simulating moisture.
- Contrast.
Nearby objects must be clearly reflected in the picture. And background objects will be hidden by the rain, and therefore they will be practically invisible.
- How to draw rain depending on the terrain.
Puddles accumulate faster on asphalt or concrete surfaces. The soil absorbs moisture well. But this does not mean that there is no need to draw puddles in the forest and field at all.
- Reflections.
In puddles, even the smallest ones, nearby objects will always be visible. How to depict this on paper? Simply duplicate the mirrored objects with elongated vertical spots.
- Additional attributes.
Rain may be accompanied by lightning, the appearance of circles on the water and people running under umbrellas.
How to draw rain with a pencil in 10 steps
- Step one. First, think about what you want to draw. For example, a person walking in the rain.
- Step two. Mark the horizon line with a pencil.
- Step three. Sketch the silhouette of a man or woman. The head may not be visible because the person is covering himself with a newspaper or umbrella.
- Step four. Sketch an umbrella or newspaper.
- Step five. Mark the background objects (road, houses, clouds, trees, lanterns, and so on).
- Step six. Now draw in detail the person with an umbrella (or newspaper).
- Step seven. Use an eraser to erase unnecessary lines.
- Step eight. Draw background objects.
- Step nine. Add shading and shadows.
- Step ten. Draw the rain itself. It can be depicted with frequent hatching, long lines, dashes with curved tips, or ordinary drops. In all the pictures in the article, the rain is drawn differently, pay attention to this.
The pencil drawing is ready. If you wish, you can give it color. By painting only individual objects, you will convey a special atmosphere in the picture.
How to paint rain step by step with watercolors
Let's start painting with paints right away. Don't be afraid to work without a simple pencil! So let's get started.
- Step one. Use gray paint to paint a cloud. This will make it clear where the rain will come from.
- Step two. Dilute the blue paint a little with water on the palette. You should get a liquid consistency, a little runny.
- Step three. Dip the brush into the resulting paint and draw the contours of small drops. Draw in rows in a vertical order, preferably moving from top to bottom.
- Step four. Draw medium sized drops.

- Step five. And then the biggest ones.
- Step six. Now fill the drops with blue paint, slightly diluted with water. This will give a transparent effect.
- Step seven. Let the drawing dry.
- Step eight. For large and medium drops, add white highlights with a light movement. The rain turned out to be real.
How to draw torrential rain? Decide on the slope of the drops. Draw them with thin vertical lines, one oblique at a time.
As you can see, rainy landscapes are not as difficult as they seem.
Drawing an autumn landscape step by step
Master class on drawing. Landscape-mood “Late Autumn”
Kokorina Elena Yurievna, fine arts teacher, Slavninsk secondary school, Tver region, Torzhok district.
Purpose of work: The drawing master class is intended for children from 10 years of age, fine arts teachers and additional education teachers. The drawing can be used to participate in competitions, exhibitions, interior decoration or as a gift.
Target: execution of a landscape on the theme “Late Autumn”
Tasks:
develop the idea that through the selection of colors one can convey in a drawing certain weather and mood characteristic of rainy late autumn;
develop skills in wet toning of paper with watercolors;
cultivate interest in landscape painting and the drawing process itself.
For work we will need: landscape sheet, watercolor, water glass, brushes of various thicknesses and hardness (squirrel or pony No. 4, No. 2; bristles No. 8), wax pencils.

It rains and rains. There are puddles everywhere
Streams pour onto the ground from the roofs.
Each day becomes cloudier and worse,
And from the acute autumn cold
You don't know where to find shelter.
All the rain and rain... the roses have faded,
The flowers are cold, they don’t bloom,
And there are only tears on the trees...
Another week - and frosts
They will come to us menacingly from the north.(M. P. Chekhov)
Late fall. Many people consider this time boring, sad and sad. That's probably true. Usually during this period it rains endlessly, the sun hardly comes out, the birds don’t sing, the days look gray, and it starts to get dark earlier. The trees are already completely bare, the leaves have fallen off. The sky hangs low with gray clouds. But there are also very pleasant days in late autumn. Suddenly the rain stops and it gets a little warmer, and fog swirls above the ground. It's easy to breathe...
Today I propose to draw a landscape that conveys the mood of late autumn, which Alexander Sergeevich Pushkin told us about in his poems:
The days of late autumn are usually scolded,
But she’s sweet to me, dear reader,
Quiet beauty, shining humbly.
So unloved child in the family
I'm attracted to you...
For the drawing, take tinted cardboard in a gray-blue hue. Using a black wax pencil we will draw the basis of our landscape.
Let's start with the tree. Let's draw the trunk and branches.

Let's outline the horizon line.

Let's draw a house.

There is a fence around the house.

Let's draw the details of the house: windows, roof.

Let's draw several large leaves on the tree branches.


We will also add a few leaves to the ground, and a small puddle in the foreground.

Let's draw clouds in the sky.

Stage two: paint over the drawing with watercolors.
Let's start by filling the background. To get blurry tones, we use the technique of tinting the paper in a wet way.
I would like to remind you of the raw toning technique. Moisten a sheet of paper with water using broad strokes with a wide brush. Then on the wet sheet we apply paint of the color we need and suitable for the given color of the picture. We apply it so that the borders of the paint touch, even slightly overlap each other. So you can highlight the earth with one color, and the sky with another, and the border between them becomes blurred.
When drawing gloomy, rainy, cloudy weather, we will use gray, black, purple, brown, dark blue... a range of colors.
To fill the sky we will use purple watercolor, iron blue and ultramarine.


Paint over the tree trunk. To do this, we take black watercolor, natural umber and sepia.

Fill the bottom part of the drawing. For autumn withered grass we use natural umber and burnt sienna.


We paint the house. For the walls we use golden ocher and natural sienna; for the roof - dark red kraplak and sepia.


Let's draw the background. To do this, take a brush with stiff bristles and draw the trees using the “poke” method.


Using short strokes we set the texture of the blades of grass in the foreground.


Let's paint the leaves on the tree and grass with golden ocher.

Use black paint to shade the foliage of the trees and emphasize the texture of the trunk of the nearby tree.

For the puddle we will use the same paints as for the sky: violet watercolor, iron blue and ultramarine.


You can finish the drawing here, but I suggest third stage: draw the details of the drawing with wax pencils.
Use a black wax pencil to highlight the gray clouds.

Introduce black, dark blue and purple pencils at the top of the sky. We place the strokes horizontally, easily. Emphasizing rather than overpowering the texture of the paint.


Using a black pencil we highlight the trunk and branches of the tree.


Insert a dark green pencil into the grass.

Use a yellow pencil to highlight the shadows on the walls of the house.


Looking closely at the drawing, we see that there is not enough foliage on the tree. Therefore, we take a brush with stiff bristles and golden ocher and, using the “poke” method, apply paint to the crown of the tree and under the tree.
Acrylic painting lessons.
You don't need to be able to draw to do this. You'll watch Donna's video tutorials and quickly realize that one half of an art brush is dipped in one color, the other half of the same brush is dipped in another color, and by moving the entire plane of the brush simultaneously across the surface of the paper, canvas, or other substrate, you get a two-color a brushstroke with very delicate, smooth shades of paint drawn on the brush.
Using this technique you can create paintings: still lifes, landscapes, bouquets of flowers, you can also paint photo frames, glass plates, boxes, vases and even furniture.
"The artist who paints the rain." How to paint a rainy day with acrylic
As professionals admit, to paint rain with watercolors you need a lot of experience in mastering this wonderful technique, while even a beginner can handle acrylic painting!
This artist makes rain streams using a disposable syringe container

And in this example, Rain is “made” using colored acrylic heavily diluted with water
MASTER CLASS PAINTING Landscape with acrylic Painting and drawing lessons Oil painting lesson
Alexander Zhilyaev - Master class on painting with acrylic paints
People without training and experience can learn the basic artistic techniques of this technique in a short time using video materials from Donna.
WHAT MATERIALS DO YOU NEED TO START?
Start practicing on paper. To do this you need to purchase:
1. a set of brushes must be branded (from "ONE STROKE") - see below;
2. acrylic paints in plastic bottles (for painting on paper) from the same company. For starters, don't buy too many bottles.
with paints, it is enough to buy two or three colors for training (the main ones are red, yellow, blue) and, of course, white, i.e. white acrylic paint;
3. palette - carousel, i.e. a round palette (of any brand and any model), inside of which there are cells for paints, separated by partitions from each other, with a lid;
4. you need to prepare a jar for washing brushes (acrylic is washed off with plain water);
5. You will also need a cloth or paper napkin to wipe the brushes after rinsing them in water.
TIPS FOR BEGINNERS from a PRO:
Acrylic paints harden quickly, because they are based on special paints. glue. If there are dried acrylic paints on your palette, you need to pour boiling water over the palette and let it stand in this hot water for about 20 minutes, after which you can carefully remove the frozen films with a thin knife
paints. Hardened acrylic does not dissolve in water, so your drawings will last forever.
When painting with acrylic paints, do not leave used brushes without water - you must rinse them immediately, otherwise the frozen acrylic will ruin the brush, and such a brush can already be thrown away, because it will not be suitable for painting - all the hairs will be irreparably glued together!
Do not leave brushes in a jar of water for a long time - the brush will lose its original shape and the hairs will become disheveled. It is not very pleasant to use such a brush, because the quality of the drawing will suffer.
Acrylic paints are convenient because they harden (dry) quickly, and on top of the dried drawing you can paint again, applying corrections with any other color.
Good luck to everyone entering the colorful world of beauty!
Donna DEWBERRY
Since 1955, Donna Dewberry has been sharing the secrets of her decorative painting techniques.
The "One Stroke" drawing technique allows you to draw easily and quickly.
Donna Dewberry, a famous American artist, developed a double stroke painting technique. This technique can be used to depict flowers, landscapes, and animals. Artists of any level can master this technique.
Teaching and learning is the center of Donna's life. She herself has already certified more than 4 thousand people to teach the FolkArt One Stroke drawing technique around the globe, including the USA, Canada, England and Japan. And the number of interested people continues to grow as classes and seminars are held in many countries around the world.
The training program, together with the Plaid company, began in 1996 with a few brushes, books and basic tools with which Donna performed a “miracle” and is still a great success. Currently, the range of products in the One Stroke series includes more than 200 items.
Donna is a Florida native, self-taught artist, mother of seven children and grandmother of eight grandchildren. She has been involved in applied arts for most of her life and has gained worldwide fame for her One Stroke painting technique. Donna is a constant source of innovative ideas for the craft industry. Her name became widely known; and she is passionate about teaching and sharing her experiences. Her dream is to teach other people to develop their talents and believe in their own strengths.
"One Stroke" painting technique - one stroke, but with two colors of paint. One Stroke's tutorials are based on drawing practice.
Read more: http://i-jvdohnovenye.ru/rospisy.htm#ixzz2y5YfzfBl
Under Creative Commons License: Attribution
Rain is not a reason to be sad. Let's create rainy masterpieces with the kids! Our ideas will help you!
book-with-pictures.blogspot.com.by
Rain is umbrellas. And umbrellas can be different...
 www.marcallante.com
Rain can be amazingly colorful and beautiful. You just need to take a closer look and pick up a watercolor. Rainbow smudges on the sheet - that’s IT!
 playinart.ru
Paint over the finished work with thick white paint (gouache, acrylic). Here comes the rain! Don't forget about stains on puddles.
Close your eyes and imagine rain. Draw what your imagination tells you.
Even a one-year-old toddler can draw rain this way. Take a sheet of paper folded in half and draw a cloud. Tell a story about how droplets suddenly fell from a cloud - you need to draw them with your finger on one half of the sheet. The breeze blew, the leaf folded and the rain imprinted on the other half!

www.moideti.com

rusbatya.ru
Or maybe a young artist would like to draw candy rain? Or strawberry? Or maybe fly agarics are falling from the clouds? The main thing is not to interfere, anything can happen in the life of the Creator, because... HE SEES THIS!!!

Don't be afraid of dark colors. In rainy weather everything looks exactly like this. While the watercolor is still wet, spray the sheet with water or sprinkle with salt.
 smiletv.org
Rain is a great artist himself! Trust him to create a masterpiece! You can take the finished work out into the rain so that the drops themselves blur the image or...
Take the tray. Put down a sheet of paper. Sprinkle with food coloring or watercolor pencil shavings. Put everything outside and the rain will paint the picture itself!
Dear readers! Have a nice rain on your paintings! Create with your children and share your impressions and creative finds in the comments.
This phenomenon is easily explained, but mere mortals refuse to take scientifically proven facts on faith and come up with their own explanation of what is happening. It’s easier for them to believe that this is a magical ritual, or that they are sending rain to the sinful earth. Therefore, before drawing the rain, I will try to dot all the i's and restore the status quo. So, rain is a phenomenon noticed only in our solar system due to the presence of Ashdvao on it. This phenomenon brings a lot of benefit and joy. For example:
- It washes away the dirt and makes the world a little cleaner. Sometimes, on the contrary, it makes big puddles and a lot of dirt, but this also only brings a lot of fun, especially for kids;
- He makes people feel sad and even write poetry.
- It acts as a natural sedative. British scientists have proven that the sound of rain has a beneficial effect on the nervous system;
- He also inspired the writing of the legendary composition by Yuri Shevchuk called Rain. (In case anyone doesn’t know, this is the DDT group). Before writing this lesson, I listened to it myself several times. I recommend it to you too, it’s very inspiring and thought-provoking.
Even during such atmospheric phenomena, thunder and lightning are also observed, but this makes it even more mysterious and epic. They are more difficult to draw and in the future I am going to do such lessons. In the meantime, I hope this lesson will be useful to you:
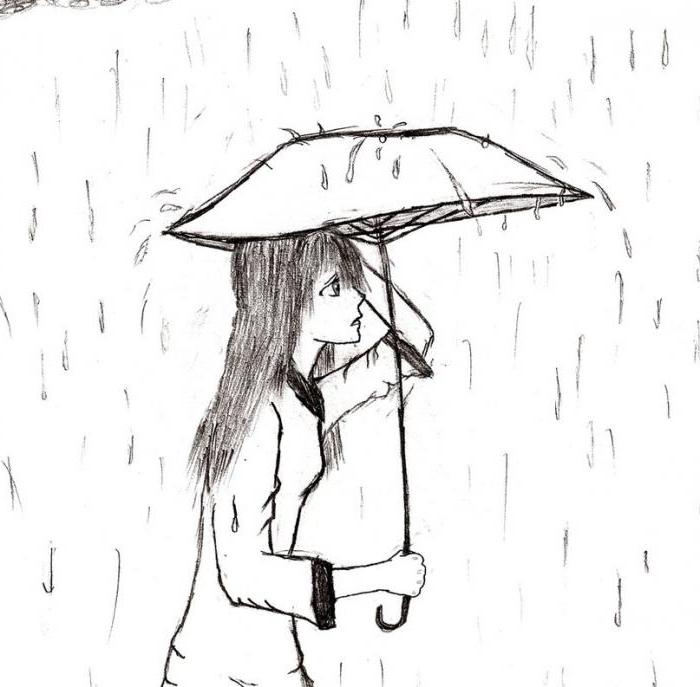
How to draw rain with a pencil step by step
Step one. Let's mark on paper the location of the girl and the umbrella.  Step two. Let's draw the details of the umbrella and the girl's body.
  Step three. Let's add droplets and shading.
  Step four. Let's add more droplets, delete auxiliary lines and correct the contours. That's all.
  What else can I recommend to you? We have lessons like this, try to imitate them.


- Experimental methods for recording elementary particles
- What is the Swedish match famous for?
- The best self-propelled howitzers Russian artillery
- Fedor Petrovich Litke: second circumnavigation of the world
- The first pharmacy was opened
- Wonderful traveler and scientist Fedor Petrovich Litke Stamp issued in honor of the Litke expedition
- Union of the Livonian Order with the Teutonic Order
- Pizza dough - secrets of Italian cuisine
- How to make shortcrust pastry baskets
- Layers of meat with lard in onion skins - it will work, you won’t be able to pull it off by the ears Boiled lard with a layer
- Pork gravy - recipes for pork gravy in a frying pan and in a slow cooker
- How to pay transport tax for legal entities
- Card for individual accounting of the amounts of accrued payments and other remunerations and the amounts of accrued insurance premiums Card for insurance premiums per year
- Error when filling in Contour
- Desk audit: developments
- Conditions for performing the stern experiment
- System status and processes
- Alexey Sergeevich Obukhov development of student research activities
- Mars 4th planet of the solar system
- Human organ systems