How to draw May Little Pony step by step with a pencil. How to draw My Little Pony with a pencil step by step
Which kid doesn't like to draw? Most children begin to make their first doodles when they are still very young. early age, and subsequently drawing becomes one of their favorite activities. Quite often, children sit for hours with their hands in their hands, trying to draw their favorite or fairy tale character from a cartoon.
There is no doubt that most children love horses. Meeting this graceful animal on a walk, as well as in a zoo or circus, causes a storm of delight and positive emotions in children. The pony evokes even more affection among little children. The little one will definitely love this amazingly kind and miniature animal, especially if he gets to ride it.
In addition, a child can see a small horse in his favorite cartoon. Currently, the animated cartoon “My Little Ponies,” consisting of many episodes and seasons, is broadcast on many television channels. Girls especially like the touching characters of this cartoon who live in fairyland, inhabited by tiny ponies.
In this article we will tell you how easily and beautifully you can draw a little pony with a pencil together with your child. To begin with, we present to your attention detailed master class, explaining how to draw the pony Cloudchaser from the cartoon "Friendship is Magic", one of the parts of the animated series "My Little Ponies".
How to draw the pony Cloudchaser in stages?

The following diagram shows in sufficient detail how you can easily draw another character from the cartoon “My little Pony" - Rainbow.

In addition to fairy-tale cartoon characters, your child may ask you to draw a real pony. Any artiodactyl animal is quite difficult to draw, but if you put in a little effort, you will certainly get a wonderful drawing. First, let's figure out what the main differences between a pony and a horse are. Undoubtedly, the main distinguishing feature is growth. The pony has very short legs, which makes its height much smaller than that of a real horse.
In addition, the pony's head is disproportionately large compared to its body and legs. Usually this miniature horse is decorated with a fluffy long tail and a large lush mane.
How to draw a real pony step by step?

If you have completed the previous lesson, then you can safely move on to today’s lesson. So, let's start drawing My Little Pony Kimono.
Step 1. Let's start drawing according to the basic principles that have already been well established by us in previous lessons. First of all, draw the head in the shape of an acorn, and add a rounded triangle for the ear at the top. Now let's draw a large bright eye and several eyelashes. At the bottom of the head we will draw a mouth and nose. After that, add the wavy mane hair. Next we will draw the legs of My Little Pony, which represent the usual rectangular shapes.

Let's move on to the next stage.
Step 2. At this stage we will draw the tail and mane of Kimono. It's very simple, you just need to draw a lot of wavy lines. It's easy, isn't it? Let's finish drawing the legs. If your sketch already looks like the one below, then you can safely move on to the next step.

Step 3. Add strands of hair in the mane and tail, i.e. just draw the necessary lines. On the thigh of the Kimono we will draw a mark in the form of lanterns. Let's add an iris to the eye. We can assume that the drawing is almost ready; we will bring it to a finished form in the next step.

Step 4. We erase all unnecessary pencil lines and our pony is ready. Your kimono should look like the picture below.

To give the finished look, color the drawing with colored pencils or felt-tip pens. We paint the body of the Kimono in dark pink tones, and the mane and tail in purple shades. The thigh lanterns will be yellow.

Congratulations, you have learned to draw the My Little pony from the animated series Friendship is Magic. I should note that the lesson itself was not easy, despite the small number of stages. But you probably succeeded. To consolidate the material, watch another video that shows how else you can draw My Little Pony.
The news portal “site” opens a series of articles that will be devoted to drawing. From our articles you will learn how to easily and simply draw one or another character of your favorite animated film, various items, animals, flowers...
Let's start with the popular ones today cartoon characters among modern children it is “My Little Ponies. Friendship is the miracle". This animated series quickly won the love of little girls, and sometimes boys also like to watch this cartoon. What is the secret of this cartoon?
The answer is simple. All actions in this bright and colorful animated series take place in a fictional fairy tale world, where charming ponies, fantastic heroes, cows and zebras, bunnies and squirrels, cats and dogs live. And nothing in this fairy-tale world, which is called Equestria, happens by chance: the sisters Celestia and Luna are responsible for the sunrise; clouds, clouds, snow and rainbows are made in a magical factory.
 Well, now, let's get acquainted with the main characters of this animated series “Friendship is a Miracle”, so fashionable and interesting to all girls.
 Twilight Sparkle
– spends a lot of time reading books, which reduces her communication with other ponies to a minimum. Throughout the entire cartoon, Sparkle is sure to learn something new and interesting about true friendship.
Twilight Sparkle
– spends a lot of time reading books, which reduces her communication with other ponies to a minimum. Throughout the entire cartoon, Sparkle is sure to learn something new and interesting about true friendship.
Rainbow Dash- manages and controls the weather in the town of Ponyville. By nature he is a daredevil.
Rarity– always bright and fashionable, a charming unicorn pony who has the very unusual talent of a real designer.
Fluttershy– loves animals and everything connected with them. She is shy and modest by nature.
Pinkie Pie– a pony who loves noisy and unforgettable parties.
Applejack is a hardworking pony who works on an apple farm.
The main characters of this cartoon are very different and characteristic. Every girl will definitely recognize herself in one of the heroines.
Well, now, let's learn to draw...
Having learned to draw your favorite characters from the cartoon series about ponies “Friendship is a Miracle”, you will be able to decorate your rooms, work desks with drawings, decorate holiday cards and birthday invitations with drawings, surprise and delight your girlfriends, friends and loved ones.
How to draw the unicorn pony Twilight Sparkle?

How to draw a pony Pinkie Pie?

How to draw pegasus Rainbow Dash?
How to draw the pony unicorn Rarity?


How to draw the Pegasus pony Fluttershy?

How to draw an Applejack pony?

 If you know how to draw well and are ready to show your creative works others, then the News Portal “site” will be happy to post your drawings on the site. Send photos of your drawings to our email address -
Most children love to draw. And if at an early age they are more fascinated by the process itself, then in school years this activity becomes meaningful, result-oriented - creating the desired image, for example, a favorite animal or cartoon character. Both are embodied by the pony. This kind and graceful creature, which children can see in the circus or zoo, always evokes affection, especially if they have the opportunity to ride it. The miniature horse can also be seen in the animated series “My Little Ponies,” which takes us to a fictional country inhabited by tiny artiodactyls. How to help your child draw a pony step by step? What other technique can interest a young artist?
Preparing to Draw
Before you start teaching a child how to draw a pony, as well as any other animal, an adult should be allowed to consider to the young artist appropriate toy. In this case, you should pay attention to large parts of the body and small parts structure of the animal, discuss how a pony differs from an ordinary horse (shorter legs, due to which it has short stature). The head of this horse is disproportionately large compared to the rest of the body. The emphasis is also on the lush mane and tail, large eyes with long eyelashes.
Before starting to draw, the student must examine the small horse and highlight the key features of its structure.
Alternatively, you can consider photographs or book illustrations.
The simplest version of the image with which to start lessons is the image of a horse from the side, when only one eye and ear are visible.
As for the technical aspects of drawing, you need to consider the following.
- To create the basis of the drawing, you need to choose a pencil that is easy to erase (for this reason, you will also need a good eraser). Before the beginning creative process You should check the quality of the tools - draw lines with a pencil and then erase them: there should be no dirty marks left on the paper. There is no need to try to draw everything at once as smoothly and correctly as possible: it is better to draw the base lines, including auxiliary ones, and then delete some of them. Corrections don't have to be scary - it's a natural part of the job.
- No need to make the image smaller. It is better to learn to draw a horse on A4 or even A3 paper.
- You can also draw with chalk on a blackboard: this makes it easier to delete lines and draw new ones. And it is quite possible to preserve such a work with the help of a photograph. As for the magnetic board, you won’t be able to erase unnecessary elements.
- When creating an image, a student does not need to rush: after all, for a creative nature, the process of drawing brings pleasure and is a form of relaxation. Moreover, if there is a father and mother nearby, who guides the child and shares with him the joy of creativity.
- The task of an adult mentor is to encourage the artist in every possible way. It doesn’t matter if the first works are unsuccessful. First, it is advisable to practice on a rough draft, and then begin the main work.
- The silhouette of the pony is always drawn first with a simple pencil, and when coloring you can use the most different materials at the request of the child - colored pencils, wax crayons, bright markers, gel pens, a wide palette of gouache or watercolors.
You can even draw a pony, including step by step, with chalk on a blackboard
How to draw a pony from the TV series My Little Pony - step-by-step instructions
If a child likes the animated series “My Little Ponies: Friendship is Magic,” then he will probably want to portray his favorite horse (girls often collect a toy collection of characters).
The animation takes the viewer to a fictional country inhabited by tiny ponies. The main characters are six little girls, each of which has its own character and is endowed with unique abilities and distinctive external features. Among them there are just ponies, pegasuses with wings and unicorns (two horses of each type).
- Twilight Sparkle - main character, unicorn, lilac, has a purple mane with a pink stripe, and a pink star on the back leg.
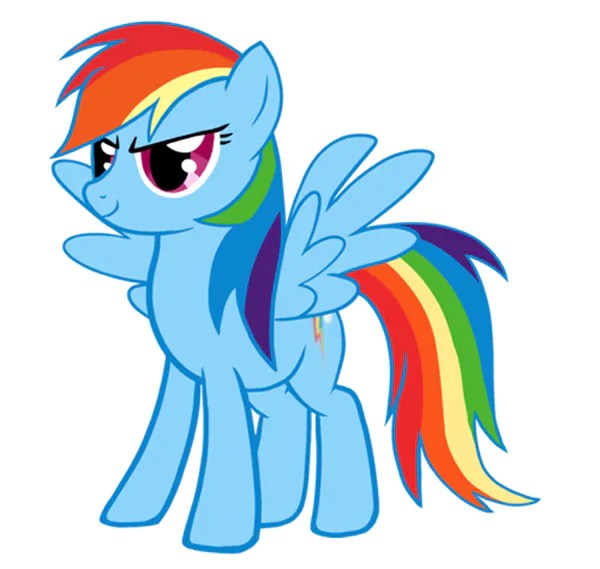
- Rainbow Dash is a pegasus, the bravest horse, blue in color, with a multi-colored mane and tail.
- Rarity is the main fashionista, a unicorn, snow-white, with a purple mane and a pattern of spots on her back leg.
- Fluttershy is a big shy person who loves and knows how to communicate with animals, a pegasus, yellow with a light lilac mane.
- Pinkie Pie is a pegasus, loves holidays and fun, pink, with a red mane and tail.
- Applejack is a very hardworking farm pony who is yellow and wears a hat.
The main characters of the cartoon also include the little dragon Spike, who is in love with Rarity.
Each horse has its own character and unique abilities
General points when drawing cartoon horses
When starting to draw one of the cartoon characters step by step, you should explain to your child important general points.
- The anatomy of any object will consist of simple figures(circles, triangles) and lines. In this case, the head is the largest circle. If the character is facing forward or backward, the circles overlap, but their size does not change.
Circles are the basis of pony anatomy, the largest circle is the head
- The circles are connected using the neck and tummy. Moreover, the lines should not be straight, but curved. The legs are drawn simply - in the form of triangles with a cut off top. To draw eyes beautifully, you should outline their line and perspective guide on the muzzle.
The connection of curved lines forms the neck and body of the horse
- The wings are very easy to draw, and the horn is depicted in the center of the head on the guide line.
The horn is located in the center of the pony's head on the guide line
- The eyes are located just above the guide line, and the height of the ear is about a third of the head. Particular attention should be paid to the distance between the ear and the eyes - it should not be too large, but not too small.
The eyes are depicted slightly above the horizontal guide, and the ears are depicted at a certain distance from the eyes.
- The neck always remains the same length and thickness in different poses, but you don’t have to draw it if the pony’s head is located almost full-face. In some cases, a long or short neck can emphasize the horse's emotions.
The neck always remains the same length. An exception is when the horse is not standing in full view or you need to emphasize its emotions
- To achieve the desired pose, the circles are arranged and overlapped in a specific order. Due to overlap, you can make the character more expressive and voluminous. If some part of the horse is hidden, then, of course, there is no need to draw it.
Any pose can be depicted by arranging and overlapping the circles as needed.
Step by step drawing of Fluttershy
Let's look at a step-by-step image of one of the heroines of the series - the pony Fluttershy. This modest beauty has a beautiful mane and a fluffy tail of a soft lilac color, miniature wings, and huge eyes.
Shy big-eyed horse is full of charm
- First, draw a horizontal oval (torso) in the center of the sheet. Above it, a little to the left is a circle (head). A wavy line extends from the oval - the future luxurious ponytail.
By using geometric shapes outlines the main parts of the horse's body
- Next, we outline the outline of the muzzle: the nose is small, slightly raised up. We draw one expressive eye (after all, the pony is standing sideways): don’t forget about the pupil, highlights and long eyelashes. We also depict a slightly pointed ear and a smile. Mandatory attribute of a beauty - long hair, divided into two parts: one in front, and the second partially hidden by the muzzle. The curls curl beautifully and fall almost to the ground.
The emphasis should be on the large expressive eye and chic curls
- Next we depict the front and back legs, flirty wings on the back (only one is possible, the second is not visible from the chosen angle). The legs do not need to be drawn too long, very thin or thick. A harmonious image will be created by observing all proportions. A chic developing tail completes the anatomy.
To achieve maximum resemblance to the original, it is important to maintain all proportions
- We detail the image: we decorate the mane and tail with longitudinal lines, and on Fluttershy’s thigh we draw a characteristic pattern of three graceful butterflies.
Characteristic details give the horse a special charm.
- The drawing is ready. All that remains is to erase the auxiliary lines.
The final image remains to be carefully colored
Photo gallery: step-by-step drawing of the remaining horses from the animated series “My Little Ponies”
Sparkle is a beautiful unicorn with a chic mane, slender and light-footed. A distinctive feature of Pinkie Pie is her magnificent pink fur, a bright pink long mane in curls, a tail and a pattern on the thigh depicting balloons Pony Rainbow Dash - a gorgeous horse with a rainbow tail, mane and an original tattoo depicting a rainbow Slender legs, a thin neck, a perky raised muzzle and a chic curled mane, a magnificent tail - everything about Rarity’s pony is charming. The mane and tail of Apple Jack are grabbed with rubber bands, and the front leg is often raised in a jump
Creating your own style when drawing a cartoon horse
When teaching a student how to draw step by step, you don’t need to simply copy a picture. It is much better if the child, in the process of creativity, develops his own art style, bring something of your own into the composition, without reducing the similarity with the original. Let's outline some possible techniques.
- The head can be of a certain shape: more oval or round, pointed or square.
The head can be drawn in a special shape, for example, resembling a circle or square
- You can experiment with the eyes (after all, they are cartoonish): make them surprised, slanted, with large or small pupils, etc.
Drawing eyes opens up great opportunities for experiments
- Drawing different ears is also interesting: they can be fluffy, more pointed, etc.
You can play with the shape and texture of horse ears
- A pony's mouth, like its eyes, can express strong emotions: it can be large or barely noticeable.
Using the shape of the mouth you can convey the character's emotions
- Real space for creative imagination opens drawing wings for pegasus. Here you can build on the plumage of real birds, making them sweeping or very modest. The wings can be straightened or folded.
There are many ways to draw wings
- The most important attributes of any cartoon horse are the mane and tail. With their help it is very easy to stylize the image in your own way. Hair can flutter in the wind or lie flat. You can depict it as gentle, flowing, or rough and hard - there are a lot of options here. The same applies to the ponytail: you can curl it in a spiral, wrap a ribbon around the tip, “cut it off” evenly, etc.
The tail and mane are the most creative attributes of a cartoon horse
Photo gallery: children's works
Baby pony: Polina Veretennikova, 7 years old My little ponies: Anastasia Igumentseva My little pony: author - 7 years old My pony: Kristina Klimkina, 9 years old Fire pony: author - Kristina Klimkina, 9 years old Pony Sparkle: category - from up to 7 years old Pony Rarity : Nadezhda Zvyagintseva, 15 years old
Step-by-step image of a realistic pony
In addition to a fairy-tale character, a child can ask an adult to teach him how to draw a real pony. Note that artiodactyl animals are quite difficult to depict, but with some effort you can get a wonderful realistic image.
standing horse
- First, select a rectangular area on a sheet of paper to create an image and divide it into 12 squares of equal size. Let's draw two circles and connect them with a rounded line.
Squares define the border of the future drawing
- Using ovals and straight lines Let's designate the contours of the animal's head, neck, back and legs.
We use ovals and straight lines to indicate body parts.
- Add details, outline the contours with a thick line.
To clarify the image, we again use ovals and lines
- Carefully erase the auxiliary lines with an eraser. We depict the eyes, a lush mane, a long tail, hooves, or rather draw the mouth.
The drawing is ready
- We shade the image with a simple pencil: we convey the play of shadows and the texture of the fur.
Using pressure, you can convey light highlights and shaggy fur.
Horses are known for their speed, so we will also consider such a nuance as drawing a running pony. The main thing in creating this image is to correctly convey the position of the legs (all other parts of the body are drawn in approximately the same way).
- First, we draw an auxiliary line - it shows the running rhythm (can be straight or curved).
The line shows the running rhythm
- We outline the torso, hips and the level of the surface where the horse stands.
The line will help in the future to correctly draw the length of the legs.
- We draw the first pair of legs (front and back, which are located facing the viewer, since we have a side view). To create the required length we use arcs.
To determine the required leg length, draw arcs
- We find the middle of the legs, and then the center of the resulting segments. After this, we outline the width of each part with segments, draw ovals around them (after all, the pony’s legs do not look like posts).
The width of the pony's legs is not the same along the entire length
- By connecting the ovals with curved lines, we get a beautiful contour of the legs.
By connecting the edges of the ovals, we can easily get a beautifully curved outline of horse legs
- In a similar way (using segments and ovals) we draw the second pair of legs (those on the other side). They will be bent, therefore the lines should be shorter.
At the last stage of work, carefully erase the auxiliary lines
Draw a pony in cells with pencils or felt-tip pens
Another way to introduce a child to creativity is exciting drawing by cells. To do this, you will need a regular notebook sheet, colored pencils or markers.
- Using this technique you can create the most different images ponies: from cartoonish to completely realistic.
A child can draw a pony by cells
- Accordingly, it stands out different levels difficulty of drawing. It’s better to start lightly: simply paint over the monochromatic silhouette of the horse or use very few colors.
Portrait of a horse
In addition to aesthetic pleasure, drawing in cells brings great benefits: it develops spatial orientation, attention, stimulates the imagination, and cultivates perseverance and patience. This activity calms the nerves well (adults can also draw) and relieves stress. This technique is a great option to increase self-esteem in children who are not very good at other types of creativity: the results obtained will inspire them to try new things.
Each child can choose a certain tactic for depicting the cells. Some people find it more convenient to draw from top to bottom, others from right to left. You can try working from the center: this works well for rounded images.
It is better for beginning artists to draw in large-checked notebooks, gradually choosing more complex patterns.
Photo gallery: diagrams for drawing ponies by cells
A simple version of the scheme The drawing is dominated by yellow and brown tones. The highlight of the portrait is the huge eyes surrounded by long eyelashes Beautiful image in profile The drawing is replete with a palette of colors Interesting plot composition A simple option without color tintsAdorable Apple Jack, painted with wax crayons
Fluttershy pony portrait
Portrait of Sparkle: pencils and markers
Sitting horse from the cartoon series
Young animal artists can spend hours sitting at the table with a pencil in their hands, trying to depict their favorite animal, for example, a charming pony. And adults can easily help them create their favorite image - a small realistic horse or a character from a popular animated series. will come to the rescue step by step drawing, representing sequential operating patterns. At the same time, you need to encourage the child not just to copy the picture, but to bring something of his own into it, to form his own artistic style. Also, a student’s creative leisure time can be diversified exciting drawing by cells.
Do you like to draw? Do you want to teach your child how to create real paintings or just decided to get creative? You will definitely enjoy drawing ponies! Now we will look different ways drawing. Step by step instructions will help you easily create vivid images pony from famous cartoon"Friendship is the miracle"!
You will be able to please yourself and those around you with beautiful pictures, teach your acquaintances and friends to draw, and create with passion with children. Such cute little horses will help you instantly improve your mood, relieve stress and fatigue, and allow you to look at everything with optimism.
Watch video about My Little Pony - songs from the cartoon, all ponies in one video:
Let's learn to draw a pony step by step right now!
openrestyTo correctly draw a pony step by step, be sure to remember useful tips, main nuances and pitfalls.
- Use pencils that can be easily erased to draw the base of the drawing. It is always better to draw the entire base lines and then erase the excess, than to try to draw everything at once, as evenly and correctly as possible. Prepare for corrections in advance! Then your drawing will be clean and bright, without darkening or streaks.
Stock up on several pencils and sheets of paper, and sharpen the leads well. It's great if the pencil fits comfortably in your hand. Try drawing with a pencil and erasing the lines. There should be no marks left on the paper.
- If you draw on a board, it will be much easier for you to erase lines and draw new ones. And such a work can also be preserved forever. All you need is a camera! You will even be able to print out your cute ponies as if these were not drawings, but real photos of magic horses from the famous cartoon.
- Try not to rush. Enjoy the process itself! Then you will draw better, and creativity will become an excellent form of relaxation.
- Be careful with your movements and use many sheets of paper. It's great if you practice first and then start working on the characters.
You and I will draw different ponies: Each character has its own character, appearance, and distinctive features.
There is no need to draw with paints and felt-tip pens right away. First make the base with a pencil.
You can draw a pony with a simple pencil, paint with felt-tip pens and pencils, or use a wide palette of watercolors or gouache. Choose the method you like! Good luck!
How to draw My Little Pony
403 Forbidden403 Forbidden
openrestyThe characters of My Little Pony are incredibly cute little girls who have long been known to everyone thanks to the popular cartoon. You can draw a charming pony right now using our tips. Follow the algorithm, carefully draw the main lines, and then erase everything unnecessary. First, get to know these ponies, and if you have already watched the cartoon, then revive the images of MymLittle Pony in your memory. IN in this case the pony in your drawing will sit with its hind legs bent, resting on its outstretched front legs. The little horse's eyes are closed, his fluffy mane is combed to one side, his tail is cheerfully raised. It's time to draw a pony with a pencil step by step. Begin!
- Draw a large oval. It should be located approximately in the center, but slightly closer to the left side of the drawing. This oval will become the basis of the pony's muzzle.

- Now we outline the lines of the body.
- We make the outline of the pony's muzzle. She has a small nose, her muzzle is turned towards us in profile. A pointed ear is visible.
 Outline the muzzle, ear and silhouette of the body.
- Now draw the legs. Your pony's front legs are straight and directly under your baby's head. You can make both legs visible. One is in front, so it can be seen entirely. It's just a long oval that you'll then erase off the top of. The second leg is visible from behind the first. It is enough to draw a straight vertical line from your pony’s chest, and then draw the hoof below.

- The pony's hind legs also need to be drawn. Since the baby is sitting sideways to us, we can only draw one leg, which is in front. We simply don’t see the other one. Remember that the pony's hind legs are bent as she sits.
- We also need to take care of the pony's hair. Draw a lush mane. Make your hair go like a wedge on your head. Look carefully at how the mane is shown in the picture, and do the same.
 On the left, the mane is slightly shorter and ends in a perky curl.
  On the right side, the mane remains behind in relation to us, but it is still clearly visible.
- Draw parallel hair lines to make it clear that this is exactly the hairstyle of your baby pony.

- Now let’s learn more about the pony’s face. Draw a small line for the horse's mouth. She smiles a little. One eye is completely visible. It is closed, so you will depict it using a rounded line with long eyelashes. The other eye turned out to be hidden from us by the pony's muzzle, but it can also be seen by its luxurious eyelashes. Don't forget about the pony's slightly raised eyebrow and two dots marking the nose.
- The fluffy ponytail curls upward. Erase all unnecessary lines.

- Add any details: decorate your hair and tail with touches. Make corrections and re-draw some lines if necessary.
Your pony is ready! Now you can color it and make colored outlines.
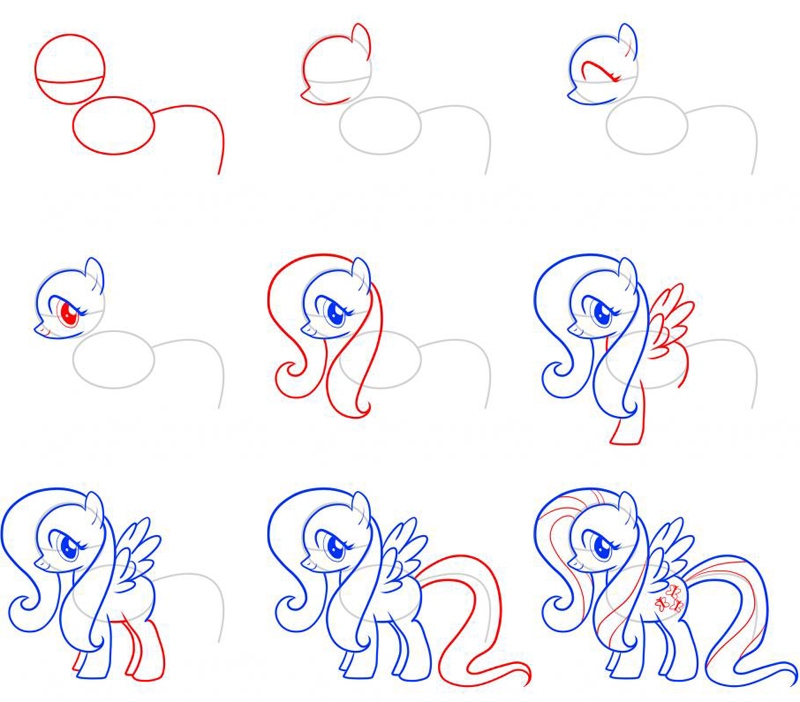
How to draw a pony Rainbow
403 Forbidden403 Forbidden
openrestyPony Rainbow Dash is a gorgeous horse with a rainbow tail and mane and an original tattoo depicting a rainbow.

You can draw a beautiful horse and then paint it with bright colors. The main thing is to carefully apply all the contours!
Let's get started.
- First you need to draw the base of the pony's face and body. To do this, you need to draw a large oval, elongated horizontally, with a circle above it. The circle should be towards the left side of your drawing.

- Proceed to more accurately outline the shape of the head. Please note: the pony's nose protrudes slightly forward, after which you simply draw the line down towards the pony's neck. From the line of the nose there is a vertical, rounded line that will become the basis for the horse’s eye. Immediately draw the pony's ear. We can only see one ear, since the other will be hidden by Rainbow's lush mane.

- Now comes the fun part! You need to draw big eyes pony. One eye is completely visible, it is slightly covered by the eyelid. You can see the pupil, reflections of light on it, small eyelashes on the side. Use a simple pencil and then you will color the eyes. The second eye is partially visible, since the horse only turned its head slightly in our direction. Look carefully at how the eyes are shown in the picture and do the same.

- Now you need to outline the nose and small smiling mouth of the pony.
- Now we depict the magnificent mane of the Rainbow pony. In front it falls onto the forehead in light curls, and in the back it falls onto the horse’s back.

- Start drawing the pony's legs and neck. The neck is outlined in one line, only in front. The mane covers it from behind. The front legs can be depicted in motion. One leg will stand straight, and the other, which is in the background, will be slightly bent. It turns out that your horse is dancing!

- Now draw the back and hind legs of the pony. It is good if the hind legs are slightly bent. This makes your pony look more natural.
- Rainbow's wings are truly magnificent! Draw them carefully. The front small wing is visible in its entirety, the rear one is also visible from behind it. Take a closer look at exactly how the wings are depicted in the picture.

- It's time to draw a bushy tail. Remember that you will have it in different colors. You can outline the curls in advance.

- Don't forget about the emblem on Dash's thigh.
 A small rainbow appears from a cloud!

All! Your pony Rainbow is ready. Now all that remains is to paint Dash.
How to draw pony Rarity
403 Forbidden403 Forbidden
openrestyDo you like charming Rarity? Now you can draw this beautiful little horse yourself on paper, cardboard or a drawing board! First, refresh your memory of her image. Slender legs, a thin neck, a perky raised muzzle and a chic curled mane, a magnificent tail - everything about this pony is charming.

In addition, we cannot forget about the design on the pony's thigh and her only horn. It's time to learn how to draw Rarity the pony step by step! Draw a horse yourself, get creative with your friends and children.
- First you will need to draw a horizontally elongated oval with a circle above it. The oval should be located closer to right side paper Draw a curved line from the oval, reminiscent of a teapot handle. Look at the picture to do the same.

- Now take care of the pony's face. You have to draw the base of the pony's eyes and outline the upturned nose. The lines should be smooth, softly rounded.

- Rarity turned sideways towards us, so now we need to draw only one ear, which we can clearly see from this angle. Mark the auricle with a light line to give it volume.

- Now draw Rarity's horn, outline the nose and mouth.

- The horn must be beautiful, in addition, it must be depicted in such a way that it is immediately clear that it is a horn. What if someone confuses it with Rarity's ear? Therefore, you need to draw several parallel lines on the horn.
- Now start with your eyes. Pony Rarity's are huge, expressive, with long eyelashes. We only draw one eye partially, since it is hidden from us by the pony’s nose. The second eye needs to be depicted clearly. Here the pupil is visible, there is a glare of light, and beautiful fluffy eyelashes will complement the impression.
- Start working on the pony's body. Outline the outline so that the back, part of Rarity's abdomen, is visible. Draw one back leg. It should be slender, set back, slightly bent.

- Now we draw another hind leg. It is partially visible, directed forward. Add one front leg. Make it straight and slender.

- It's time to decorate your charming horse with a chic hairstyle! Draw the mane boldly. It should be lush and curled. One huge curl frames the muzzle in front, on the right; part of the magnificent mane is located on the left; below, a perky curl curls very tightly.

- Don't forget about the tail either. Make it big and fluffy.
- Of course, the mane and tail should be decorated with longitudinal lines. Draw them in to indicate the curls, to show that this is exactly the fluffy ponytail and hairstyle of your Rarity.

- Now all that remains is to finish drawing one front leg and make a drawing on the pony’s hip.

- Your lovely pony Rarity is completely ready! It can be painted.

403 Forbidden
openrestyDo you remember this beautiful unicorn? Now you can learn how to draw the pony Sparkle step by step, and then you will be happy to give original pictures friends, teach them how to draw, play with children.

This beautiful unicorn with a gorgeous mane, slender and light-footed, will please everyone. He has huge, expressive eyes, a star on his hip, and an airy, harmonious silhouette. Learn to draw a sparkle pony step by step right now!
- First draw two oval shapes. These are the basics of the pony's head and body. Divide the upper oval into halves with a horizontal line.

- Draw the outline of the little horse's muzzle, ear and bangs.

- Now you need to draw Sparkle's only horn. It is thin and small.
- Draw the contours of the muzzle. Mark the nose, make the main lines for the eyes.

- Start detailing the horns, ears, and eyes of your pony. You need to make the ear voluminous, adding a light touch to it. The horn is also detailed: draw several horizontal lines on it. Carefully draw the eyes. On one eye, do only the lower lashes, since the top of the eye will remain under the bangs. Decorate the other eye with eyelashes at the top and bottom.

- Draw the pony's nose and smiling mouth.
- Now draw the front legs and neck of the pony. Sparkle's legs are slender and long.

- Draw the hind legs and torso.
- Now pay special attention to the legs and tail of the small horse. You will have a clear view of one leg, back and front. Two more legs are only partially visible from this angle, so each leg needs to be marked with one line. Sparkle's tail is lush and long, expanding downwards.

- Draw the pony's lush mane, which covers part of the chest and muzzle. Detail the bangs, draw longitudinal lines on the tail.

- Don't forget about the design on the horse's thigh. Draw small stars there, one big star.

All! You have finished drawing the pony Twilight Sparkle. All that remains is to color the picture and make a beautiful background with stars.
403 Forbidden403 Forbidden
openrestyFluttershy's pony looks really wonderful. This little horse has beautiful hair, a lush long tail, and small wings. The perky pony is full of charm. Many children are in love with the big-eyed Flattershy.

They will be delighted if you teach them how to draw this adorable horse. But to do this, you need to independently master all the stages of drawing a pony with a pencil.
- Start with a circle and an oval. The oval is elongated horizontally, located approximately in the center. The circle must be drawn above it, closer to the left edge of the paper. These are the basics for your horse's head and body. You can immediately draw a wavy line to the oval, which will later turn into a wonderful pony tail.

- Now outline the outline of the pony's face. The nose should be small, slightly turned up.

- Draw the pony's upper eyelid. Remember that she has huge eyes. But we will draw only one expressive eye, since Flattershy is standing in profile to us.

- IN this moment you need to give your horse the opportunity to breathe, see and smile. Have you guessed what we will draw? Yes, of course, you need to outline a graceful nose and smiling mouth with light strokes. The eye must be made large and expressive. The pupil, glare of light, long eyelashes - everything here should be drawn clearly.
- Long pony hair is also a must. Her head of hair is divided into two parts. One will remain on the side, partially hidden from us by its muzzle. The other part of the hairstyle is in front. The curls flow freely almost to the ground and curl very beautifully.

- Now draw the front legs of the pony, graceful wings on the back. You can only draw one wing, since the second one is simply not visible from our angle.

- Now draw the legs. Look carefully at how they are shown in the picture to make sure everything is done correctly. A pony's legs should not be too thin or thick or excessively long. Maintain proportions so that the horse is harmonious and looks like the famous cartoon character.

- Don't forget the lovely long pony tail. It curls and is thrown back.

- Complete all the details. Longitudinal lines will decorate the mane and tail of the horse. In addition, tattoos must be drawn on the thigh.
 It’s impossible to imagine Flattershy without these three graceful butterflies!
Your adorable Flattershy is ready! Now you can color it, make it bright, multi-colored.
403 Forbidden403 Forbidden
openrestyPinkie Pie is an amazingly cheerful, beautiful, bright pony. This cheerful horse laughs, plays and jumps on its high legs. Undoubtedly, distinctive feature The pony became her gorgeous pink coat, a bright pink long mane in curls, a tail and a pattern on her hip depicting balloons.

Now you too can draw your own Pinkie Pie horse! Now you will look at the algorithm, remember the recommendations to create ponies without problems. It's easy to quickly draw Pinkie Pie!
- First of all, draw two circles. One of them will become the basis for the pony's body. The other circle will then turn into a head. Place the top circle closer to the left edge of the picture.

- Now outline the contours of the torso and head. Look carefully at the drawing to repeat the lines of Pinkie Pie's nose and mouth, and to correctly outline the chest and back of the horse.

- Now the fun part: drawing the huge expressive eyes of the pink pony! She turned half a turn towards us, so both eyes are visible. One eye appears narrower from this angle, but it is no less beautiful.
 This pony's eyes are slightly elongated vertically, attracting not only large pupils, glare of light, but also beautiful long eyelashes. Draw the lower and upper eyelashes.
 - Draw the mane of a pony. This pink horse has a surprisingly voluminous hairstyle and curly hair. The mane resembles a real pink cloud. One curl provocatively protrudes forward, part of the mane frames the muzzle.

- Mark the ear, nose, and draw the mouth of the pony.
- Now draw the front legs. This pony has slender legs and quite high.

- Now it's time to draw Pinkie Pie's back legs. Look how they are shown in the picture. It’s better to make them just like that, a little rounded. Smooth lines will add dynamism to the drawing. It will seem that your horse is about to run somewhere!
- A beautiful curly ponytail also needs to be carefully drawn. Remember that this pony’s hair is very fluffy, airy, full of curls, and long. A wonderful tail is a real decoration of a pink pony!

- Don't forget to draw a tattoo on the horse's thigh. Air balloons must definitely be depicted.

- It's time to color your horse. The pony should be pink, bright, memorable!

Our Pinkie Pie is ready!
403 Forbidden403 Forbidden
openrestyThe wonderful apple pony Apple Jack has also long become a favorite of children and adults. This little horse grows apples, eats them with pleasure and gives them to everyone he knows. She wears a spectacular cowboy hat and attracts everyone with her enthusiasm and fun. The Apple Jack holds its mane and tail with rubber bands, and often lifts its front leg when jumping.

When you draw such a horse, you will definitely be able to convey energy famous character, make the horse beautiful and memorable. Remember the algorithm of operation.


")


- Abstract: Elementary particles
- Presentation on the topic "management"
- History of the development of computer technology presentation for a lesson on the topic Historical development of computer technology presentation
- Astronomy Presentations Interesting Topics for Astronomy Presentations
- Presentation on history "counting years in history"
- Astronomy Presentations Astronomy Presentation Template
- The anniversary of the expulsion of the Karachais recalled the problem of rehabilitation of repressed peoples
- Udmurt people What peoples live on the territory of Udmurtia
- Russia is a multinational state We live in a multinational country
- The smallest peoples of the world Which group of peoples is the smallest
- How to change a cash receipt order in 1c
- Day of Remembrance of Fallen Russian Internal Affairs Officers Heroism of Police Officers
- Northern coast of Neva Bay
- Enviable beauties in politics (17 photos)
- The best ballet performances
- Biography, political activity
- The magical world of crystals
- How to salt milk mushrooms: a quick recipe
- Ten Surprisingly Profitable Illegal Trades
- Management project based on the example of an enterprise presentation