How to draw winter nature. How to draw a beautiful winter nature landscape with pencil and paints step by step for beginners? How to draw an easy winter landscape with a pencil for beginners
Everyone can draw a simple New Year's landscape. The main thing is to apply a little imagination and everything will work out!
You will need
- -Paper
- -Plain pencil
- -Eraser
- -Materials for coloring
Instructions
Draw the outline of the earth. Since this is a winter landscape, the ground will be covered with snow, you don't have to paint it.
Draw the outlines of the mountains. Just add a curved line at the top above the first one. Do not press too hard on the pencil so that you can easily correct it.
Draw some trees. If you notice, they look like triangles with jagged edges. It is not necessary to make them straight.
Add a Christmas star in the sky. Also place a star at the top of the trees. Don't forget to put some snow on the trees.
Now all you have to do is colorize your drawing. Use your imagination, because this is a New Year's landscape.

How to draw winter with a pencil:
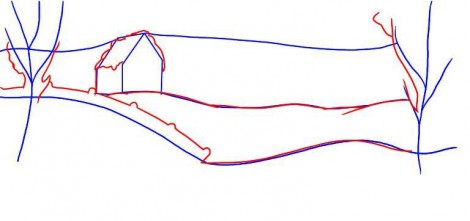
Step one. Let's define two lines of the earth's surface on the sheet: we start from a hillock, go down into a small ravine where a river will flow, rise a little higher and draw the surface to the edge of our drawing.
A little higher, on the hill, there will be a house, so let’s immediately draw its outline. Let's draw a contour of the earth's surface from the house.
From above we will show the border between the sky and the trees, it is smooth, but not very smooth. The trees are approximately the same size, but still differ from each other. Along the edges of the landscape we will draw the outline of two trees, as if limiting our drawing with them.  Step two. Let's draw a snowball on the roof of the house. The winter is snowy this year and everything is dusty. On the left above the tubercle we will draw the outline of the fence. Let's mark the snow and branches on the trees.
 Step three. First, we finish drawing the trees that we placed along the edges of our drawing. Then we draw the house: the windows, the door, and the pipe. Surely someone lives in it (maybe Father Frost and the Snow Maiden?), and lights the stove on such a frosty day, which means a column of smoke comes out of the chimney. And now, between the level of the sky and the top line of the earth, we draw a Christmas tree, one, two, three... and so we fill the entire background. We have already talked about how to draw a Christmas tree.
 Step four. We finish drawing the fence, make the trunk of the trees more winding, draw snowdrifts, large and small. A small branch of a tree sticks out from one of the snowdrifts, which will turn green in the spring. On the left, right above the river there will be a small cliff. Let's imagine a little and try to carefully draw it, approximately as shown in the picture.
 Step five. Let's draw a river. First, its upper border, and then the shimmering water itself and, in some places, ice, and even large ice floes. From the house we draw footprints to the river, because we remember that someone lives there and, probably, goes out for a walk.
  Step six. And the most colorful. Take colored pencils or markers in your hands and use your black and white drawings- cheerful and bright! May it lift your spirits!
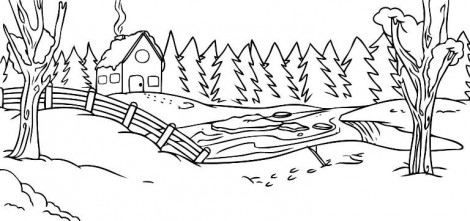
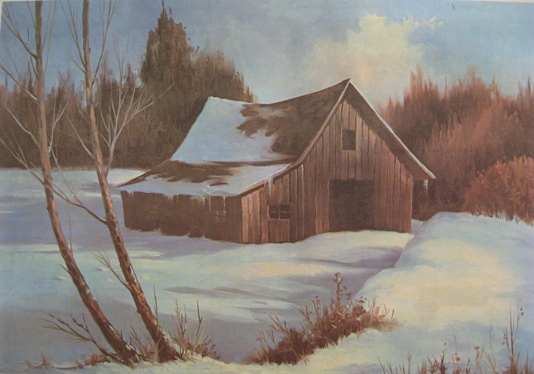
Step-by-step work on painting a winter landscape. Artist - Oleg Chuvashev. Canvas, oil.


Evening beautiful landscape
How to draw a landscape? It is important to choose the right color scheme and mood. This landscape is evening. Winter evening. Not too cold. There is frost on the trees. Birch branches fall down. Not all trees may have branches that droop, but birch and willow can.
The branches are frosty and snow-white. But the main thing in this landscape is the lake. The lake is especially mysterious in winter. And at dusk, the evening landscape with a lake creates a mystical mood.
Let's draw a landscape with a pencil. This is just a sketch that will help us a lot not to make a mistake with the location of the trees, lake, and other parts of the landscape. Drawing a landscape is not very easy. To begin with, as we have already said, let's outline it and draw it with a pencil. Then we'll choose a gamma. This is twilight, which means the gamma is cold. If you draw from your own photograph or from nature, then you can stick to the palette that is in the photograph. However, something can be changed. You can even paint a landscape in one or two colors, and it will look like full color. Especially considering that at dusk a person ceases to distinguish colors.
So, we chose the gamma. We have blue, pink, lilac, brown and white on our palette. There is also golden ocher. The main range, as you see in the picture, is like this.
Let's start drawing. Laying out the shadows. Let's draw a lake. Since this is a winter evening landscape, we paint it in subdued colors; if it were summer, then at that time there would be sunset, and there would be many more flowers in the landscape. In winter, white snow, dark or light objects.
The winter landscape is more ascetic, and perhaps therefore a little easier to draw. It makes it possible to understand the tone, rather than chasing color nuances. Moreover, if you have ever painted a sunset in the evening, or summer landscape not with a pencil, but with paints, then you probably know how quickly the picture changes. One moment the sun was yellow or orange - and now it is scarlet, and five minutes later it is crimson, and is about to disappear behind the horizon. And the water is sometimes blue, sometimes lilac, sometimes red in the rays of the setting sun. In general, the winter landscape is a little simpler in this regard. It will allow you to concentrate on drawing details - tree branches, snow-covered bushes, reflections in water. However, the winter landscape is very beautiful. Even the cold doesn’t stop you from enjoying winter. So our landscape should, first of all, be beautiful.
First we draw the darker places, and then we draw white branches on top. If it is gouache, then you will paint over the paint with white. However, still leave large white areas unpainted, since it is not always possible to cover darker ones with light paint, and you need a lot of layers of white. White snow just lightly outline with white and blue or lilac paint. Don't be afraid to mix paints; gouache will be more beautiful if the color is composite. However, a picture can be painted not only with gouache, but also with tempera or acrylic. This picture is painted with acrylic on paper. Acrylic, it seems to us, is not as opaque as tempera, so not all colors are easily repainted. Try not to draw overly bright and dark objects if you are not sure of their necessity.
We continue to draw the landscape. We draw a Christmas tree and its reflection in the water. Landscape with a lake - very interesting and beautiful picture. The most important thing here is to draw the water correctly. The water should be like real water. Therefore, we draw water and reflections in it. The trees are reflected in our forest lake, the reflection of the Christmas tree is especially clearly visible. Christmas trees also look beautiful in paintings.
Draw the details of the landscape: thin branches covered with snow. At the last moment we changed the line of the lake - it somehow stood out too much, it was unnatural. Now the landscape is more peaceful and harmonious, and looks more beautiful.
So we drew another landscape, this time we learned to draw an evening and winter landscape. As soon as spring comes, the landscapes will become more and more saturated, sparkling with colors and colors. Green grass will grow, flowers will appear. But the winter landscape has its own beauty, and it was loved and appreciated by many great artists.
1. Using light lines we outline the main elements of the composition in the background, middle and foreground.
2. Attention is concentrated on the objects in the middle ground - from them we begin the detailed drawing. The direction and strength of the stroke depend on the texture of the object: mountain road, snow-covered fir trees, log houses.
3. How to draw a winter landscape: Working through and detailing the entire drawing on final stage, remember that the mountains in the background should be barely visible.
Palette for this landscape:
burnt umber, burnt sienna, yellow ocher, raspberry kraplak, Prussian blue, ceruleum, ultramarine, cadmium orange, light cadmium yellow, white.
The color of the sky determines all the other colors in your painting. Before getting into details, make a general sketch.

For warm wood colors, use burnt umber and burnt sienna (muted with ceruleum). Try not to detail the texture, but only gently indicate large shapes with color.

The key colors for purple shades are crimson and two shades of blue. To get the color of an orchid, use more speck, for purple, more blue. Apply them loosely.

The shapes of the snowdrifts follow the features of the earth's surface, but the snow hides and softens its unevenness. Make sure your strokes are smooth and not angular.

The warm tone and hard texture of the old barn against the backdrop of fluffy cold snow creates the necessary contrast. In a picture that is mostly in cold colors, you should add a little warm shades on which the eye could rest. The opposite rule is true for paintings in warm colors. To depict an old barn, use only burnt umber, and then layer lighter colors over the wet paint to define the boards. Leave small gaps between strokes to create shadow stripes between the boards.
In this lesson you will learn how to draw a beautiful winter landscape, winter with paints, namely watercolors, step by step. We will draw snow, trees in the snow, a house with a snow-covered roof in the distance, foreground frozen lake. Winter is attractive and fabulous in its own way, although it is very cold, but sometimes it is very fun, for example, throwing snowballs or making blinds.
Very beautiful drawing You should be able to do it this winter. Here it is. Isn't it a wonderful drawing? You will definitely like this winter painting lesson. Work done on watercolor paper A3 format.
I sketched the landscape with thin lines. I sprayed a little liquid to keep it white. I filled the sky with blue paint and added ocher “wet” at the bottom. When the paint had dried a little, I painted the distant forest with darker blue paint and a drop of red, carefully going around the house. While the paint was dry, I washed the brush, wrung it out and collected the paint from the place where there would be snow-covered trees and smoke from the chimney.

More rich color I painted the trees behind the house.

I painted the house by mixing blue, red and a little brown paint. Where the snow lies, I left an unpainted sheet.

I painted a snowy tree in front of the house and filled in the lake using ocher, blue and red paint. You only need to use a little red to make it look simple. purple shade. On the left side of the sheet I marked the background trees.

I drew snow and tree trunks, and on the left I specified a group of background trees and the forest behind them.

Now let's move on to the right tree. We will draw from “light-to-dark”. First, using not very dark paint, we will designate the trunk and branches, as well as the place where the crown is located.

To work on the snow-covered branches, I took a thin brush No. 0 and No. 1.

Gradually I detailed more and more, avoiding the snowy branches.

Between the tree trunks I made a wet base using all shades of blue and ocher. At the same time, I began to draw tree trunks.

I slightly clarified the snowy branches between the trees and the bush under the tree with darker paint. When everything was dry, I couldn’t resist and quietly removed the dried liquid with a soft rubber band. I painted a snowdrift with a wide brush so that the colors flowed into each other.

I painted the shore and highlighted the bush under the tree with darker paint.

On the other side of the lake I painted snowdrifts and shadows from trees.

I painted snow in the foreground and sprayed it with dark paint from a brush. When all the work was dry, I removed the liquid to preserve the white.
Today I drew myself winter's tale, namely a house in the forest, in New Year's Eve. Maybe Catholic Christmas had this effect, but the spirit of the holiday and something unusual is already in the air - it charges everyone with something positive and good.
Let this drawing lesson help you get inspired and create a card with your own hands for the holidays!
All you need is a couple art materials, namely:
- paints ““;
- tassels;
- album sheet for drawing;
- a simple pencil and eraser.
1. Making a light sketch with a simple pencil- a wooden house made of beams, mark where it will be Christmas tree, lake and background. You can always make adjustments to the drawing as you draw.

2. And we immediately start painting with gouache paints. Let's start with the background, A . For this we use the following paint colors: black, blue, ultramarine and white.

3. The gouache paint dries quickly enough, and you can move on to the next stage, adding a little forest to the background.

4 . Let's move on to winter house, let's arm ourselves brown paint, ocher (this is a light yellow-brown) and black. We cover each bead with yellow-brown paint, and then make the bottom of the logs darker to create volume. We add black between the logs. And so we gradually paint over the entire main wooden part of the house, leaving the windows, shutters and roof without color for now.
Before selecting the shutters according to their shape, see the 4th picture below in the text, I looked on the Internet for several options for this interesting, almost forgotten detail of a wooden house and chose what I liked. You can repeat or find your own version of shutters, I am sensitive to details, and therefore there is such an emphasis on this, you can leave only the window in your drawing and not bother.


5. We actually paint the windows: the lighting in the window is yellow and white, the frames are brown, and for the shutters I chose red and green.

6 . You can also add some snow-covered trees to the background (in the picture below on the right).

7 . It's time to tackle the foreground - the snow and frozen lake. The lake itself can be drawn in the same way as the sky, only mirrored - the colors are in the reverse order. And if there are snowdrifts around the lake, then they should be additionally highlighted with black paint below. Please note that snow is not painted over only with white, it is always several colors: blue, indigo, white, violet, and where the light falls from the windows - yellow.

8. Well, we’re finally preparing green paint for the Christmas tree. If the tree is thinner than the space that was left for it, then we sketch everything in blue.
We draw the Christmas tree in green, in different shades, and on top we add white and grayish-blue, when everything is dry we draw the decoration in free flight, which ones you want and which ones you like. I added yellow and red balls. And in some places we draw the tree trunk – brown and black.


Found it on the Internet interesting selection. (the most interesting, for me, is at the end))
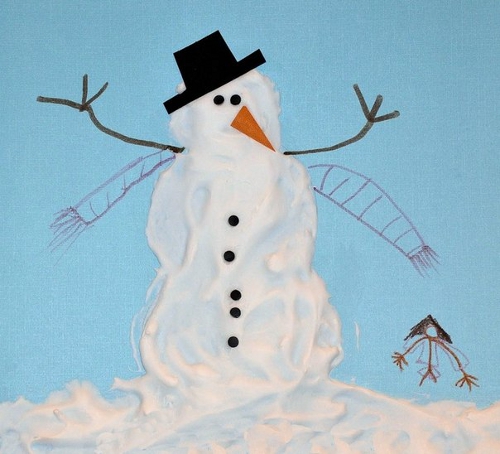
1. Winter drawings. "Volume snow paint"
If you mix equal amounts of PVA glue and shaving foam, you will get wonderful airy snow paint. She can draw snowflakes, snowmen, polar bears or winter landscapes. For beauty, you can add glitter to the paint. When drawing with such paint, it is better to first outline the contours of the drawing with a simple pencil, and then paint it with paint. After some time, the paint will harden, and you will get a voluminous winter picture.
2. Winter drawings of children. Using electrical tape in children's creativity

If there is snow outside the window, you can depict it using a cotton swab.
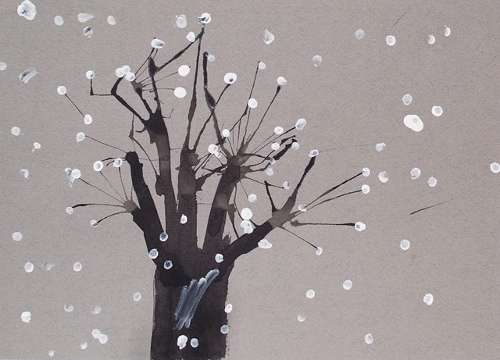

Or use a brush to put snow on each branch.

11. Winter drawings. Drawings on the theme of winter
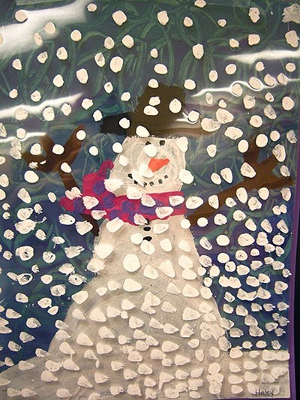
An interesting idea on the topic of children's winter drawings was suggested by the author of the blog Homeschool Creations. She used putty to paint snow on the transparent film. Now it can be applied to any winter pattern or appliqué, simulating falling snow. They put the film on the picture - it started snowing, they removed the film - the snow stopped.
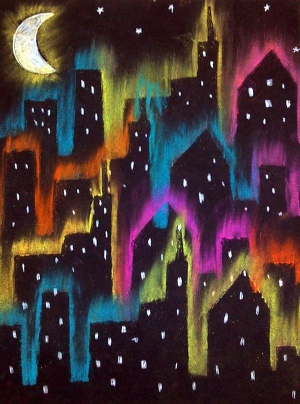
12. Winter drawings. "New Year's lights" We would like to tell you about one interesting unconventional technology drawing. To draw a New Year's garland like in the photo, you will need a sheet of thick paper of a dark color (blue, purple or black). You will also need regular chalk (the kind you use to draw on asphalt or a blackboard) and a light bulb stencil cut out of cardboard.
On a piece of paper, use a thin felt-tip pen to draw wires and light bulb sockets. Now apply the light bulb stencil to each socket in turn and outline it boldly with chalk. Then, without removing the stencil, smear the chalk on the paper using a piece of cotton wool or directly with your finger to create rays of light. You can replace chalk with colored pencil graphite chips.

It is not necessary to use a stencil. You can simply paint over the light bulbs with chalk, and then gently rub the chalk in different directions to make rays.

Using this technique, you can also draw a winter city, for example, or the northern lights.
13. Drawings winter fairy tale. Winter forest drawings
On the site already mentioned above Maam.ru you will find interesting master drawing class winter landscapes using templates. You will only need one main color - blue, a brush with coarse bristles and White list for drawing. When cutting out templates, use the cutting method from paper folded in half. Look at what a magnificent drawing of a winter forest the author of the painting created. A real winter fairy tale!


14. Winter drawings. Drawings on the theme of winter
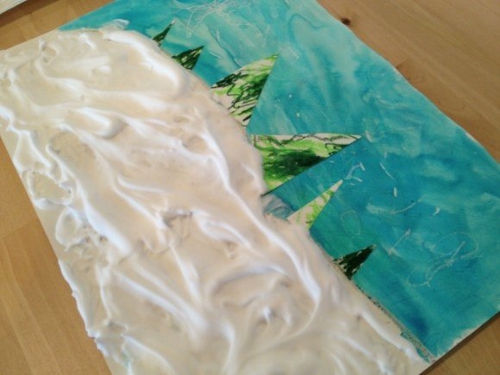
You are probably very eager to find out how the wonderful “marble” Christmas tree in the photo below was painted? Let's tell you everything in order...To draw this original drawing for the winter theme you will need:
Shaving cream (foam)
- watercolor paints or green food colorings
- flat plate for mixing shaving foam and paints
- paper
- scraper
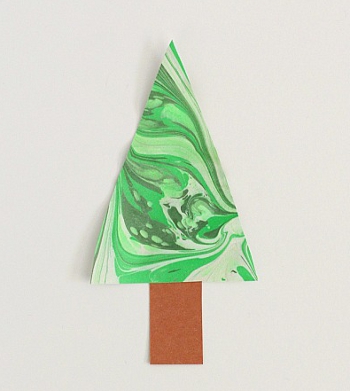
1. Apply shaving foam to a plate in an even, thick layer.
2. Mix paints or food colorings of different shades of green with big amount water to form a saturated solution.
3. Using a brush or pipette, drip paint onto the surface of the foam in a random order.
4. Now, using the same brush or stick, beautifully smear the paint over the surface so that it forms fancy zigzags, wavy lines, etc. This is the most creative stage all the work that will bring pleasure to the children.
5. Now take a sheet of paper and carefully apply it to the surface of the resulting patterned foam.
6. Place the sheet on the table. All you have to do is scrape off all the foam from the sheet of paper. For these purposes, you can use a piece of cardboard.
Simply amazing! Underneath the shaving foam you'll find stunning marble patterns. The paint has time to quickly absorb into the paper; you just need to let it dry for a few hours.
15. How to draw winter. How to paint winter with paints
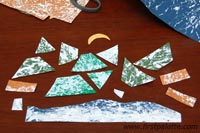
Concluding our review article on winter drawings for children, we want to tell you about another interesting way how you can paint winter with paints with your child. To work you will need any small balls and a plastic cup(or any other cylindrical object with a lid).

Place a piece of colored paper inside the glass. Dip the balls in white paint. Now put them in a glass, close the lid on top and shake well. As a result, you will end up with colored paper with white streaks. Do the same colored paper with white streaks of other colors. From these blanks, cut out the details of the applique on a winter theme.


Material prepared by: Anna Ponomarenko
Winter is a truly magical time of the year. White snow crackling underfoot, patterns on the windows, warm hats with pompoms, snowball fights, new year holidays- this is still far from full list all the wonders of winter. And if you want to keep a little of this magic for yourself, then learning how to draw a winter landscape is what you need.
 Landscape with mountains and river |
 Twilight in the forest |
 Simple drawing |
Drawing a rural winter landscape

Although winter can fill even the atmosphere of a fairy tale big cities, rural views acquire a special charm and comfort at this time of year. We will demonstrate all the beauty of snow-covered village houses when we learn how to draw a winter landscape step by step.
First, with a pencil, we outline the outlines of one Christmas tree and one house. The Christmas tree will be wide and spreading.

And then - two more houses and another Christmas tree. The houses will have triangular roofs, characteristic of many villages.

Let's add more Christmas trees and a picket fence. This fence, of course, is quite conventional - in the villages people know each other and do not build high fences.

Now, based on the sketch, we will draw with paints. The Christmas trees will be a lush green hue, the houses will have the warm shade of unpainted wood, and the snow will have a slightly blue tint. To make the picture look alive, we will place three birds on the fence.
That's it, the drawing is finished.
Hills and snowfall - drawing a winter landscape

Let's continue the theme of rural beauties. This time we will depict the very outskirts of the village - the forest will be visible in the background. And the snowfall will be in full swing. Don't worry, it's not difficult at all - this example is a great way to practice and draw a winter landscape for beginners.
First, let's outline the largest forms - in our case, these are hills.

Then we will draw three spruce trees in the foreground, and in the background we will make a house, a snowman and the sharp tops of smaller fir trees. Don't forget about the path leading to the house.

Let's draw all the contours well. We’ll also “give” the snowman a top hat and depict snowflakes falling from the sky.

Let's color the drawing. Our landscape will be at night, so we’ll make the sky dark, grayish (it will be overcast). And, of course, you can’t do without a chic full moon. The house will be made in warm colors: the walls will be yellow, the roof will be red, the doors will be brown.
Let's wrap this up - we did a great job.
Magical winter night

Despite the fact that untouched snow, smoke from the chimneys of rural houses and the pointed tops of Christmas trees look fabulous even during the day, the true magic lies in the winter nights. This is exactly what we will show when we figure out how to draw a winter landscape in gouache.
We will not immediately take up gouache - first we need to complete a pencil sketch. Let's start with the general outline of a hilly area, a house and three trees near it.

Then we will draw another smaller house, a path leading to it and add more trees, coniferous and deciduous. In the very foreground there will be a birch tree with thin branches hanging down.

After that we will start working with paints. First of all, use dark tones to depict the sky and forest in the background. You can also grab three spruce trees near big house. Don’t forget to make a month in the sky - it will still be very thin and young.

Now the foreground. Let's make the snow a little bluish, the Christmas trees green, and the walls of the houses light brown.

Remained small parts- light in the windows, smoke billowing from chimneys, snow on the feet of fir trees, trunk and branches of a birch tree. And many stars in the night sky.
Now we can safely say that the drawing is finished.
Winter landscape with mountains and river
Winter in the mountains is amazing. The forest has become harsh and dark, clean rivers, the thickness of the snow - all this looks so pristine, clean, untouched that you can admire this beauty for hours. But you also need to add a touch of coziness - a small, but solid and neat village house is perfect for this purpose. So we will learn how to draw a beautiful winter landscape.
First, let's take a look at the first plan - there will be two trees with thin branches there.


On the right side of the picture we will depict a house of a peculiar shape and the tops of Christmas trees in the background.

Now you can take up pencils or paints. Let's make mountains in the background - they will be completely covered with snow. The house will be made of wood, and the bridge will be made of brick. You also need to draw transverse stripes on the nearby trees - these are birch trees. Pay special attention to the windows - they should glow, because this is a sure sign that someone lives there.
That's it, we've finished the picture.
Twilight in the winter forest
Besides the night most interesting time days in winter forest is twilight. The stunning shade of the sky and the falling nature merge into a marvelous ensemble. Using the example of such a miracle, we will learn how to paint a winter landscape.
First, let's work on the sky and the overall tone of the snow. For this we will use watercolor or gouache to create beautiful stains. You need to wet the paper, and then apply paint with plenty of water and tilt the sheet. The paint will flow down, forming these beautiful patterns:

Then we will draw a tree in the foreground. try to make the branches thin enough. Moreover, the brush must be guided from the base of the branch to its tip.

Using the same principle, we will draw three small bushes.

Then - two Christmas trees. They should be painted with thick, rich strokes of a dark green hue.

Let's cover the trees and bushes with snow. We’ll also decorate the front bush with juicy red berries.
Now the picture is complete.
A colorful house, a bunny and snowflakes - a fun winter
Winter is a time for fairy tales, which is why it is often depicted in cartoons. In this section we will also work in a cartoon style - at the same time we will learn how to draw a winter landscape with a pencil.
First, let's outline the house and the bunny looking through the window. All outlines will be very smooth, rounded, without sharp edges.

Then we’ll draw the Christmas trees (they will be just as smooth and round) and the snow falling from the sky.

Now let’s paint everything in the brightest colors. But the snow, of course, needs to be made blue. And the Christmas trees are green.
That's it, the fun house is ready.


- Desk audit: developments
- Conditions for performing the stern experiment
- System status and processes
- Alexey Sergeevich Obukhov development of student research activities
- Mars 4th planet of the solar system
- Human organ systems
- Experimental methods for recording elementary particles
- What is the Swedish match famous for?
- The best self-propelled howitzers Russian artillery
- Fedor Petrovich Litke: second circumnavigation of the world
- The first pharmacy was opened
- Creative competition: we enter the Faculty of Journalism of St. Petersburg State University Bachelor's training programs
- Management of a modern school using the example of creating an educational cluster
- What does individuality mean?
- What does a person’s individuality depend on?
- Issues of formation of a cluster education system in the Russian Federation
- Unified State Exam tests in literature What is included in the Unified State Examination in literature
- How to pay transport tax for legal entities
- Card for individual accounting of the amounts of accrued payments and other remunerations and the amounts of accrued insurance premiums Card for insurance premiums per year
- Error when filling in Contour