Pencil drawing of how a man tamed a dog. Necessary materials and tools. Drawing eyes, nose
Hello friends! In this lesson I want to show you how to draw a dog step by step with a pencil. It's not difficult at all - you just need to follow the instructions and I'm sure you'll end up with a great dog! Let's get started.
We will get this drawing:
The first thing we do when drawing a dog step by step is create a base. I draw three circles different sizes, arranged in this order. Next, I determine the position of the dog’s head using guide lines - they are marked in red in the figure.

I connect two circles with a horizontal line. From the very right circle I draw a smooth line - this will be the tail of our dog drawn in pencil. From the left circle we draw lines with one break, from the right - with two. In general, yours should be exactly the same as mine in the picture below, only the lines should be thin and smooth - we still need to erase them with an eraser. This will be the basis of our dog drawn in stages.

In the “head” circle we need to draw a few more shapes – for the ears and muzzle.


At this stage you should end up with something like this. Now we erase the lines a little with an eraser so that they are barely noticeable, and proceed to drawing a dog with a pencil step by step.

We start, naturally, with the dog’s face. I draw the eyes and nose.

The dog's mouth and tongue are drawn under the nose.

Add a muzzle line, draw the lower part of the mouth.


In order to draw a dog with a pencil, you need to learn how to make random strokes like this - practice on a separate piece of paper. Here we draw the fur on the neck.

Next, we shape the dog’s paws and also add fur - we focus on the base lines drawn earlier. You can gradually wipe them off with an eraser so that they don’t get in the way and spoil the picture, I prefer to do this at the end - this is best for beginners.

We draw the dog’s hind legs in the same way, but pay attention to their bend, position and shape. 
Drawing animals is not an easy task. After all, drawing and showing the expression of a muzzle and the naturalness of a pose is quite difficult, especially for non-professionals. And if we are talking about the image of a dog, then it would seem completely unrealistic to convey such a nature. And yet there is a whole set detailed diagrams, describing step by step creation portrait of a man's friend different poses. Let's look at the most popular options.
Materials and tools
So that nothing distracts from creative process, you should start by thoroughly preparing everything you need for drawing.
If fine arts is not strong point your hobbies, and there is a craving for skillful use of pencils and paints, it is worth using methods of developing drawing skills, the effectiveness of which has been proven by the experience of more than one generation of lovers of this type of visual activity.

How to draw a dog - we understand various techniques
Dogs differ not only in breed and size, but also in their posture, facial expressions and even personalities. And all these details must be shown in the drawings.
Cheerful four-legged friend without auxiliary lines
There is an opinion that it is better for beginners to take on pictures based on reference figures. The presented diagram refutes this opinion.
Even a child can draw such a cute dog
Instructions:
- Draw the dog's body in the form of an elongated bean.
Let's start with the base figure
- We show the ears with triangles, and the nose with a rectangle extended from below. Yes, based on geometric shapes we created the outline of the face.
At this stage we designate all the large details of the animal image
- Draw the fur on the chest and a piece of the tail.
- Moving from top to bottom, we add circles for the eyes, as well as a couple of curved triangles of fur on the head.
- We show the fur sticking out in clumps on the neck.
- We complete the tail and add lines for the upper and lower paws.
- Draw a smile line, the lower part of the lip.
We show wool with zigzag lines
- We draw shreds of fur on the neck, add bangs and detail the paws, showing the toes.
We draw the fingers with short arched strokes
Video: how to draw a sad puppy with felt-tip pens
Four step dog
You can draw such a funny pet in just a few minutes.
Instructions:

How to draw a dog's face step by step
Dog faces are considered the most complex element drawing, however, this task can be successfully coped with.
Instructions:
- We start the drawing with a circle and two hanging ovals - ears. Inside the circle we draw two intersecting slightly curved straight lines, with the horizontal line below the upper border of the circle by a third.
Auxiliary lines in a circle are needed for subsequent detailing of the facial features
- Making the nose. Show the outline of the inverted heart and add a triangle with two cutouts.
The dog's nose resembles a heart shape
- Let's get to the hard part - the eyes. We draw oval outlines. To show their shine, add wavy lines inside the pupils.
The eyes should be symmetrical
- We complement the image with small circles on the nose, lines for the eyelids and ears.
Detailing the features of the muzzle
- We draw the dog's paws on which he put his muzzle. To begin with, we show 4 triangle-like figures located on both sides of the muzzle.
Showing the paws on which the muzzle rests
- Adding paw details.
Drawing the toes
- We outline the contours and remove the pencil lines.
Removing auxiliary lines
- Color as desired. Choose grey, black or brown shades.
You can color the picture with pencils, paints or wax crayons.
Drawing a sitting dog
Let's take a cheerful spaniel as a model.
Instructions:
- Draw a circle that is not closed at the bottom. And immediately add an oval at the bottom with a notch at the bottom to show the shape of the muzzle.
- In the upper part we draw two symmetrical small circles - these are the dog’s pupils. Outline them with eyelid ovals.
- At the bottom we draw a nose in the shape of a heart.
- Under this oval we draw a small arc - the dog’s mouth.
- Adding eyebrows.
- On the left side of the head we draw the letter C - this is a prototype of the ear.
- We make the second ear symmetrically.
- We draw two parallel lines from the head - the neck of the animal.
- Draw an irregular circle to the neck.
You should not try to draw perfectly straight lines - they will deprive the image of naturalness.
- We finish drawing the paws, and the hind ones should be a little larger.
We make the paws plump
- We make a few strokes on the chest to indicate scraps of fur.
- We can color it if desired.
You can color this dog with felt-tip pens
Drawing a lying dog
It is believed that small animals are the fastest. But although for the most part these four-legged pets are actually quite mobile, they are not at all averse to lying down to rest. Like this schnauzer, for example.
A lying figure is more difficult to draw
Instructions:
- First, draw a circle that will be the basis of the dog’s head. In its lower half we draw an auxiliary horizontal line.
- We add an oval to the circle - the body of the animal.
The base shapes for this drawing will be a circle and an oval
- We draw the shape of the upper part of the head, and below, that is, on the beard, we draw the fur.
- Add triangular ears.
This dog's ears are triangular in shape.
- Draw fluffy eyebrows, add beady eyes. We show the nose and focus on the fur around it.
- We draw the front paws, detailing the fingers and claws on them. We depict the chest, showing it as a fold under the left paw and an arch between the limbs.
- We draw a smooth line for the back, add a hind leg, detailing the fur on it below, and show the fingers and claws.
Detailing the body and muzzle
- Erase the auxiliary lines and, if desired, color the pet.
Breeds with thick hair are easy to color with pencils
Don't wake a sleeping dog
The main principle of depicting sleeping animals is smooth lines.
Instructions:
- We start with auxiliary lines. In this drawing it will be two circles - a little larger for the head, and a little smaller for the muzzle. In a larger circle we draw two intersecting arcs. We complete the shape of the ear.
Add an ear to the auxiliary lines
- Showing the shape of the animal's head and ear.
We designate the contours of the muzzle
- We complete this sketch of the skull with the second ear and lower jaw. Add a heart-shaped nose.
At this stage we draw the nose, second ear and closed mouth
- We draw the lines of the jaws and the slits - the eyes.
The eyes of a sleeping dog seem to be slightly open
- We take on the torso, showing two slightly uneven parallel lines. We also show the growth lines of the dog’s paws.
- We detail the fur lines on the chest.
Draw fur on the chest
- Add nostrils, arc-shaped lines near the ears and eyes. We remove the auxiliary lines.
Adding nostrils and forehead folds
- Color the drawing or leave it in pencil.
Smoothness of lines is the basic principle of depicting sleeping animals
How to draw a husky
One of the most popular dog breeds today. Many people want to draw such a blue-eyed miracle: some out of love for art, and some in the hope of getting a puppy of this unusual dog.
This is interesting. Husky as a factory breed of dog was registered by dog handlers from America in the 30s of the twentieth century. The ancestors of blue-eyed pets are sled dogs - the oldest breed of the North. It was this fact that the Americans incorporated into the name - “Eski”, which translated from English means “Eskimo”. But over time, the word became distorted to “husky.”
Instructions:
- We begin work with 7 auxiliary circles repeating the location in the figure.
- We connect these circles with smooth lines.
The basis of the husky figure is seven circles
- Using interconnected triangles we show the dog’s ears. We designate the eyes and in the smallest circle - the muzzle - draw the nose and mouth. We work on the front legs, making one line with strokes to show the fur. We depict the hind legs slightly at an angle, not forgetting about the anatomical curves, tufts of fur and toes.
We immediately make the lines on the paws zigzag to show the fur.
- We draw the fur on the dog’s body, show the tail and add accents to the face: add tufts of fur on the ears, cheeks, eyebrows, and also near the nose.
Detailing the muzzle
- The drawing is ready, you can paint it, not forgetting the characteristic blue tint of the eyes.
You can color the dog with a simple pencil, focusing on the eyes with light blue wax crayon
Video: how to draw a husky puppy
Mathematical method for drawing a shepherd
The basis of the dog’s drawing will not be auxiliary lines, but a grid with cells drawn according to the specified measurements. This picture will require a ruler.
Instructions:
- We retreat 2 cm from the edge of the sheet at the top and side, then measure down three times, 6 cm each. Divide the uppermost square in half with two horizontal segments of 2 cm each and make three vertical segments, also 2 cm each.
- Let's start with the head. Draw the ears using triangles as a basis. Using a smooth curved line we show the animal’s forehead, we finish drawing the open mouth with teeth, nose and tongue. Draw the eye.
We start with an image of the shepherd's muzzle
- We use two arcs to denote the line of the neck and back. We show part of the body and the front paw with fingers. Please note that the paw begins on the body with the roundness of the joint.
First we show the line of the back, and then the chest
- We draw the line of the abdomen, the outlines of the legs with foreground, tail and that paw that was in the background.

How to draw a Dog
Drawing on the theme: "Dog"
Master class "Drawing a dog" with step-by-step photos.
Hilimonchik Natalya Aleksandrovna - teacher primary classes gymnasium school No. 5A in Kostanaya, Kazakhstan.
Dear colleagues, I am offering a Master Class on drawing a dog in elementary school. Children have a rich imagination, but it is difficult to draw something from an idea. Step-by-step drawing will help the children draw a dog. This way of working is very convenient for working with younger students. They can easily reproduce the drawing using the step-by-step explanation.
Goals: introducing children to the technique of drawing a dog.
Tasks:
1. Teach children step by step drawing dogs. Learn to analyze, find characteristics. Learn to convey shape, structure, proportions, volume.
2. Develop visual memory, creative thinking, motor abilities, perseverance, hard work.
3. To cultivate aesthetic feelings, artistic taste, love for animals and nature.
Equipment:
Sketchbook, pencil, colored pencils or watercolor paints, eraser.

I’ll tell you a riddle, and you try to determine what our lesson will be devoted to:
Mystery:
He lay across the porch
Our shaggy-legged castle.
But both at night and during the day
Strangers will not be allowed into the house.

You guessed it right, today we will learn to draw a dog. You will draw with a simple pencil and step by step.
Introductory conversation.
There are different information about exactly when the dog was domesticated by humans, 15 or 20 thousand years ago, however, despite the controversy, experts agree that the first domesticated animal was the dog.
Dogs are known for their learning abilities, love of play, social behavior.
Fairy tale “HOW A DOG WAS LOOKING FOR ANOTHER”
A long time ago there lived a dog in the forest. Alone, alone. She was bored. The dog wanted to find a friend.
A friend who would not be afraid of anyone.
A dog met a hare in the forest and said to him:
- Come on, bunny, be friends with you, live together!
“Come on,” the bunny agreed.
In the evening they found a place to stay for the night and went to bed. At night a mouse ran past them, the dog heard a rustling sound and how it jumped up and barked loudly. The hare woke up in fright, his ears shaking from fear.
- Why are you barking? - says to the dog. “When the wolf hears it, he’ll come here and eat us.”
“This is an unimportant friend,” thought the dog. - Afraid of the wolf. But the wolf is probably not afraid of anyone.” In the morning the dog said goodbye to the hare and went to look for the wolf. She met him in a remote ravine and said:
- Come on, wolf, be friends with you, live together!
- Well! - the wolf answers. - It will be more fun together.
At night they went to bed. A frog was jumping past, the dog heard it jump up and bark loudly. The wolf woke up in fright and let’s scold the dog:
- Oh, you are so, so so! The bear will hear your barking, come here and tear us apart.
“And the wolf is afraid,” thought the dog. “I’d better make friends with a bear.” She went to the bear:
– Bear-hero, let’s be friends, let’s live together!
“Okay,” says the bear. - Come to my den.
And at night the dog heard him crawling past the den, jumped up and barked. The bear got scared and scolded the dog:
- Stop doing that! A man will come and skin us.
“Gee! - the dog thinks. “And this one turned out to be cowardly.” She ran away from the bear and went to the man:
- Man, let's be friends, let's live together!
The man agreed, fed the dog, and built a warm kennel for it near his hut. At night the dog barks and guards the house. And the person doesn’t scold her for this - he says thank you. Since then, dog and man have lived together.
Let's try to draw a dog together step by step with a simple pencil. The last step is to color the drawing of the dog with colored pencils or paints.
Step-by-step job description
1.First you need to draw the basic outlines of the dog
Draw a dog on the entire sheet of paper, it will be easier for you to draw small parts and a large picture always looks more impressive than a small one. First of all, we draw the torso and head, and the one that will be the dog’s head is a little smaller in diameter than the lower one.

2.The figure appears general outline dogs.
Draw the joint markings for the paw and the lower parts of the three paws, since the fourth paw will not be visible. Connect the paws with lines, exactly as in my drawing, and connect the oval of the dog’s body and head. All these figures are not difficult to draw, but it is very important to position them accurately. The proportions of the dog, and the entire drawing as a whole, will depend on this in the future. Check again the exact location of these contours and move on to the next step.
In this step you only need to draw the general outline of the dog's torso, paws and head. It may not be difficult to do, but be extremely careful. This outline will determine how the entire drawing of the dog will look. You can draw this outline several times, removing inaccurate lines. Start tracing the outline from the head and further along the back to the paws.

3.Ears, nose, eyes and tail appear in the drawing of the dog.
Draw the dog's nose. Draw a small line from it and draw the winding lines of the dog’s mouth (mouth). Connect these lines with another line for the chin. I think you can draw the dog’s ears and tail yourself, without comments.


4.The drawing of the dog is nearing completion, add details
The auxiliary lines now need to be removed from the drawing. Draw in part of the fourth paw, claws and draw the outline of the dog's fur.


Physical education minute
We tried to draw.
We tried to draw.
It was hard not to get tired.
We'll rest a little
Let's start drawing again.
(The hands were stroked, shaken, kneaded.)
5.The final step of the drawing.
The last stage of any drawing is the easiest and most interesting. At this stage, the dog will already be in “full glory” in the picture. It’s not at all difficult to slightly correct the drawing, emphasizing the dog’s hair with sharp pencil strokes. Choose the desired color yourself and paint with colored pencils or watercolors.


This is where our lesson ends, you did a very good job today, I hope that you learned a lot of interesting things: you came up with wonderful drawings, individual, original. This can be seen at the exhibition of your works. Well done! Thank you!


IMPORTANT ADVICE (Sergey Mikhalkov)
You can't raise puppies
Through screaming and kicking.
Puppy raised by kicking
Will not be a loyal puppy.
You after a rough kick
Try calling the puppy!
DEPENDS ON GOOD HANDS (S. Mikhalkov)
There are many dogs in the world
And on a chain and just like that.
Service dogs - border dogs,
Ordinary yard balls,
And young timid mongrels,
Why do they like to yelp from under benches?
And those pampered lap dogs,
Whose nose is snub and whose voice is thin,
And no longer good for anything -
Stray dogs are always hungry.
Ready for a fight at any moment
Dogs are fighters and bullies.
Dogs are proud and touchy
They calmly doze on the thresholds.
And those with a sweet tooth are sycophants
They lick everything from any utensil.
Among dogs of any breed
There are handsome men and ugly men.
There are giants - these are Great Danes!
Short-legged bulldogs,
And wire-haired terriers,
Some are black, others are gray,
And it’s a shame to look at others:
It's so overgrown that you can't see it!
Everyone knows the dog's properties:
And intelligence, and sensitivity and heroism,
Love and loyalty and deceit,
And disgusting lordship.
And complete obedience,
And this is all from upbringing!
Lazy well-fed housewife,
And the button dachshund is lazy!
The border guard is fearless - a warrior,
And the dog Ruslan deserves it!
The owner of the dog is a fist and a miser,
A burdock mongrel to match him!
No wonder the dog bites those
Who throws a stone at her in vain?
But if someone is friends with a dog,
This is why the dog serves him well!
But a faithful dog is a good friend
Depends on good hands.
PUPPY (S. Mikhalkov)
I'm off my feet today -
My puppy is missing.
I called him for two hours,
I waited for him for two hours
Didn't sit down for lessons
And I couldn’t have lunch.
This morning
Too early
The puppy jumped off the sofa,
I started walking around the rooms,
Jump,
Bark,
Wake everyone up.
He saw a blanket -
There was nothing left to cover.
He looked into the closet -
He turned the jug of honey over.
He tore my dad's poems,
Fell to the floor from the stairs,
I climbed into the glue with my front paw,
I barely got out
And disappeared...
Maybe it was stolen
They took me away on a rope,
They gave me a new name,
Guard the house
Forced?
Maybe he's in the dense forest
Sitting under a prickly bush,
Got lost
Looking for a home
Poor guy, does he get wet in the rain?
I didn't know what to do.
Mother said:
- Let's wait.
I grieved for two hours
I didn’t pick up books,
I didn't draw anything
She just sat and waited.
All of a sudden
Some scary beast
Opens the door with his paw,
Jumping over the threshold...
Who is this?
My puppy.
What's happened,
If immediately
Didn't I recognize the puppy?
The nose is swollen, the eyes are invisible,
Cheek twisted
And, digging in like a needle,
A bee is buzzing on its tail.
Mother said: - Close the door!
A swarm of bees is flying towards us.
All wrapped up
In bed
My puppy is lying flat
And barely wobbles
Bandaged tail.
I don't run to the doctor -
I'm treating him myself.
I wish you all good luck and creative success!
Today we will look at how to draw a dog step by step for children. Several variations of the dog image will be shown at once. You will learn how to draw adult dogs and small puppies. The instructions are clear and easy for children. Let's not waste time and get started right away!
How to draw a dog for children: first option

A dog is a true friend to man and, of course, to any child. Many children constantly dream of a dog and really want to learn how to draw one. Today I will tell you how to draw an ordinary domestic dog. Most parents and children want to learn how to draw a dog in this form, without unnecessary anatomical features and realistic details. There is nothing difficult here, everything is extremely simple. It is only necessary to depict the dog in a very simplified manner, without going into too many details.
Stage 1
Start drawing the dog from the head. Draw an oval muzzle and a pair of oval ears. 
Stage 2
Draw two dots, these will be the eyes, now a smile and a large black nose. The result is a cheerful and cute dog face. 
Stage 3
At this stage, draw the dog's torso. It is also drawn in a simplified manner and looks very much like a rectangle with slightly rounded corners. The bottom line of the dog's body should be broken in two places in order to then draw the paws. 
Stage 4
The paws can now be drawn, again very simply without any unnecessary details. Now the ponytail is all. Congratulations, you've just learned how to draw a simple pet dog!
How to draw a dog for a child: second option
Stage 1
Draw the dog's head. The head consists of an oval and a semicircle. In the center of the head draw a pair of eyes and eyebrows. On the muzzle, draw a heart-shaped nose. 
Stage 2
Next, on both sides of the head, draw two large ears, from the bottom of the head, draw the neck, and then the torso. 
Stage 3
The next stage is to draw the dog’s paws. The two front legs should be equal, and the back ones should be slightly larger than the front ones. 
Stage 4
Draw the hind legs and color the dog. 
How to draw a dog from the cartoon Tom and Jerry

Another option on how to draw a dog
Stage 1
Draw three ovals for the head, muzzle, and body. Add four circles for the back and front legs. Add lines to the paw circles on both sides of the circles. 
Stage 2
Draw the ears and nose. After this, draw a wide smile for the doggie. Draw the eyes. Then delete all unnecessary additional lines. Decorate the resulting dog. 
Well done! You made a wonderful drawing!
How to draw a shepherd step by step for children

Many children love shepherds. Therefore, now we will try to show how to draw these dogs correctly and easily.
Stage 1
Draw a bean-shaped body shape that should be somewhat elongated. 
Stage 2
Now draw the base for the shepherd's body parts. A couple of triangles will become ears. For the nose, draw a rectangle. It will be slightly curved at the bottom. Draw fur on the chest. Label the tail as shown in the example. 
Stage 3
Draw from top to bottom, add a couple of small circles for the eyes and some curved triangles to make them look like spiky hair. Draw the fur on the neck with spines. Add the tail completely and draw part for the lower and upper paws. 
Stage 4
Start by simply adding a line to create the smile and the bottom of the lip. Draw some elements on the neck to make it fluffier. Continue drawing the base for the paws. 
Stage 5
On this last stage All that remains is to draw a small bang on the head, and also finish drawing the paws. 
Stage 6
That's it, your shepherd is completely ready.
How to draw a puppy with a pencil

So, we have dealt with adult dogs, now you will learn how to draw small dogs and puppies. You will find that drawing a puppy is not difficult at all. You will definitely see this. The steps in this lesson are very simple, you will have fun and learn how to draw a puppy step by step with a pencil for children. Enjoy this exciting and interesting instructions"how to draw a puppy for kids."
Stage 1
Start by creating a very simple egg shape for the head, and then another small egg shape for the body. After this, draw special lines dividing the face, as seen in the example. 
Stage 2
All you need to do here is basically draw out the shape of the puppy's head. 
Stage 3
After this, draw out the disheartened, but very cute ears. Make sure they are large enough for the puppy's head size. 
Stage 4
Almost ready! Make two oval shaped eyes. Then paint them, except for two points, as in the picture. Add a dash for the eyebrows and move on to step five. 
Stage 5
Draw the nose, and then the cheeks and a small mouth. Once this is done, you can add a small tongue sticking out of the puppy's mouth. 
Stage 6
Now draw the chest and front legs. 
Stage 7
Now we are pretty close to finishing the drawing. Draw a hind leg and a cute wagging tail. Erase the extra lines and shapes you drew in the first step. 
Stage 8
That's it, the puppy is almost ready. All you have to do now is paint it with some color. 
How to draw a spaniel puppy for a child

Now let's try to draw a spaniel puppy.
Stage 1
First draw two shapes that will help you in the process of drawing this very cute dog. Draw a circle for the head and an oval shape for the body. Then draw a vertical line directly along the circle for the head, which will help in the process of drawing the puppy's face. 
Stage 2
Start drawing the face. To do this you draw inside ears and draw the lower part of the head. 
Stage 3
Continue drawing the head. To do this, draw fluffy and long ears, and then draw large oval eyes. 
Stage 4
When you finish drawing the face, for this you draw the eyebrows, nose and mouth. After this, draw the front legs, as well as the outlines of the hind legs. As in the example. 
Stage 5
Here all we need to do is draw all the other parts of the legs, then draw the line of the back and tail. Then erase all the additional lines that were useful to you while drawing this dog. 
Stage 6
You see, drawing this cute dog turned out to be very easy. And all that remains to be done is to color it as needed. 
How to draw a terrier puppy

Now let's try to draw a cute terrier puppy.
Stage 1
First, with light strokes, draw a circle for the head and an oval for the body of the terrier. 
Stage 2
Draw ears. Wavy lines should be used to outline the outline of the dog's muzzle. 
Stage 3
Now you need to draw the torso and paws. 
Stage 4
Now add everything else - mouth, eyes, nose and tail. 
Stage 5
The terrier image is ready. Now you know how to easily draw this dog. 
How to draw a German Shepherd puppy for a child

Now let's try to draw a puppy German Shepherd.
Stage 1
Draw a circle and draw a small horizontal line in it. 
Stage 2
Now depict the puppy’s mouth, as well as its tongue sticking out of it. 
Stage 3
Sketch out the outline of the head, as well as the pointed ears that stick up. 
Stage 4
Draw a nose and big eyes dogs. 
Stage 5
At this stage you draw the front legs. 
Stage 6
And on this one - the rear ones. 
Stage 7
Draw a tail. 
Stage 8
The cheerful German Shepherd puppy is almost ready. You just need to color the drawing. 
In this lesson I will tell you... More precisely . Many, if not all, consider them the cutest creatures in the world (after, of course, cats always rule). No matter what they say, it’s better to draw something great once than to watch it a hundred times. Actually, this is what we will do now. But the dog won’t turn out cute if you don’t follow some rules of real artists:
- First, give the drawing a piece of your love;
- Second, sharpen your pencil;
- Draw all over the paper;
- Did not work out? Throw it away and start again!
- Turn on your imagination!
- Look at the result and rejoice, your smile is wider! =)
Drawing a dog step by step is easy and simple. Even if mine dear readers skipped all classes visual arts at school (which is what I did at the time), with the help of our tips they can easily portray a dog, or.
Where do we start? Let's draw just two oval shapes, from which we will create the torso and head best friend person. Approximately at their junction we draw another circle from which a muzzle will grow. We also make blanks for the paws.  The next step to mastering the art of drawing cute animals will be the head. What is important to remember here:
- The head is a very important element in the painting;
- It shouldn't be too big or small;
- Maintain proportions between body parts;
- Do not do it straight lines, they do not exist in nature;
- Draw lines light movements, do not press the lead into the paper;
Let's move on to drawing the details of the face: ears like a bear, mouth and nose. Well, and most importantly, the eyes. Important points when depicting eyes:
- Animals' eyes are usually round;
- The pupils can be dilated, constricted, of different shapes;
- The highlight must be added relative to the light;
- The mood of the whole picture will depend on the eyes: sad, cheerful, aggressive, kind, and so on.
 Let's move on. Now the outline. It should be highlighted with a thicker line. On the paws we draw pads and claws like those of a cat. Let's add a tail. difficult for beginners. I strongly recommend that after the first attempt, do not put the work aside, but try again.
  The next step is to erase all the extra lines. And now our sketch has already become more realistic. The main thing is not skill, but desire.
 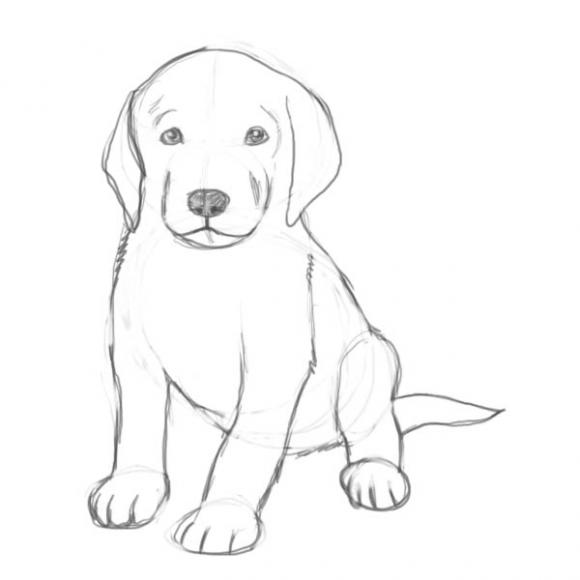 If you want, you can give his fur a slight tint, like in the first picture. Add shadows and colors. Use your imagination. It is not worth copying 1 to 1 from here. They say that every artist sees the world in his own way. I hope now you know how to draw a dog with a pencil step by step. I also recommend reading the lesson about drawing. Show off your work. This is how it happened for me:
  Try drawing something else, like a dove. I will be glad to see the results of your work. Leave comments, visit us often, and you will learn a lot of new things. Thank you for your attention! Continuation of this lesson, let's try to draw other breeds.


- Desk audit: developments
- Conditions for performing the stern experiment
- System status and processes
- Alexey Sergeevich Obukhov development of student research activities
- Mars 4th planet of the solar system
- Human organ systems
- Experimental methods for recording elementary particles
- What is the Swedish match famous for?
- The best self-propelled howitzers Russian artillery
- Fedor Petrovich Litke: second circumnavigation of the world
- The first pharmacy was opened
- Creative competition: we enter the Faculty of Journalism of St. Petersburg State University Bachelor's training programs
- Management of a modern school using the example of creating an educational cluster
- What does individuality mean?
- What does a person’s individuality depend on?
- Issues of formation of a cluster education system in the Russian Federation
- Unified State Exam tests in literature What is included in the Unified State Examination in literature
- How to pay transport tax for legal entities
- Card for individual accounting of the amounts of accrued payments and other remunerations and the amounts of accrued insurance premiums Card for insurance premiums per year
- Error when filling in Contour