How to draw leaves. How to draw leaves. Final step
Reading time: 3 minutes
Almost all children, without exception, love to draw, but many parents, due to their own laziness and excuses like “he’ll get dirty himself and smear everything around him,” “I don’t know how to draw to show an example of how to do it,” “he’s too small, he’ll still get full.” these colors” they don’t give brushes and paints to kids, which is a pity... We hope that our marathon of children’s drawings on an autumn theme will inspire creativity for everyone without exception. There are plenty to choose from, dear Creators!
We tried to collect for you the most interesting drawing ideas in order to organize your child’s leisure time more interestingly when the rainy season comes, “ dull charm"and sitting at home. Read on for ideas on what you can do at home with your child in bad weather.
Idea #1

You need to put the dried leaves between sheets of paper, and then paint over the sheet with solid strokes using soft colored pencils or crayons. A sheet with all the veins will appear on the white paper. Using this method, you can create compositions: a bouquet in a vase, an autumn landscape, etc.
Idea No. 2

A similar method, only you need to rub the leaves with wax (a candle or white wax crayon), and then cover a sheet of paper with watercolors. It is convenient to paint large surfaces with a wide squirrel brush or a foam sponge.
Idea No. 3

Paint is applied to the sheet from the vein side. Then the sheet is applied to the paper and an imprint is made. The effect will be different depending on what paint you use.

You can come up with many compositional solutions: the imprint of a large leaf can become the crown of a tree if you complete the trunk; A few prints are already a whole forest!

Prints made with white paint on a colored background look impressive. You can combine several techniques and complete the images with pencils or felt-tip pens.

Idea No. 4
 kokokokids.ru
By blowing paint through a straw you can paint fancy trees. This method gives you endless possibilities for experimentation! You can, for example, draw trees using a previously prepared background.
Idea No. 5

Fill your child with the background yourself or offer him some colored cardboard. Let him draw the crown of a tree and fallen leaves, dipping his finger in the paint.
Idea #6

The crown looks voluminous if you make it clear of colored pencils. Apply glue precisely to the desired places and sprinkle with small shavings. The trunk and branches can be blown through a tube or drawn in any other way.
Idea No. 7


It is convenient (and completely non-marking) to draw the crown with a cotton swab. In the same way you can depict a bunch of rowan berries, a sprig of currants or other berries.
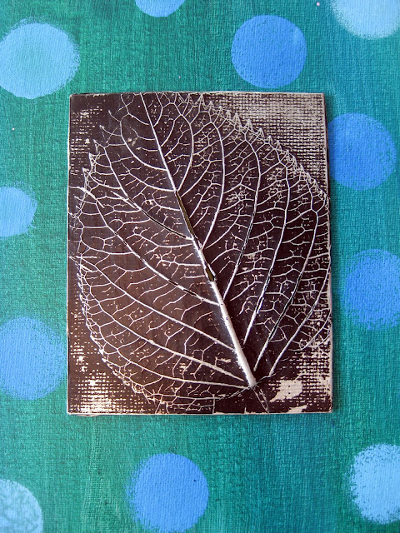
Idea #8

A very unusual picture can be made using foil. Place the dried leaf (or several) on a sheet of cardboard, veins up. Cover it with thin foil and carefully, so as not to tear it, smooth it with your fingers so that the design appears. Cover the foil with dark paint (you can use gouache, acrylic, tempera, ink) and let it dry well. Rub the painting very gently with a stiff dishwashing sponge. The protruding veins of the leaf will shine, and dark paint will remain in the recesses. Now you can frame your work!
Idea No. 9


Those who love textures will surely enjoy filling different silhouettes with patterns. Draw or trace an autumn leaf according to the template, divide it into small planes, like a stained glass window. Have your child fill in each piece with a different pattern. You can do this gel pen, felt-tip pens.

Idea #10
A similar task can be performed using the scratching technique. Paint a sheet of smooth (polished) cardboard with paints and rub it with wax (candle). Can be used to create a background wax crayons. Cover the surface with black ink and dry. Scratch the drawing with a sharp object.
Idea No. 11
Using a stiff bristle brush or toothbrush, splatter paint. This method is suitable for drawing tree crowns and creating compositions based on plant imprints.
If you have no imagination or want to plunge a little into the autumn magic, spend time with your child drawing a maple leaf. This is an interesting activity with lots of bright colors and a positive charge of emotions.
The maple leaf is one of the most beautiful. Besides what he has original form with five pointed ends, its color is very bright and colorful. It doesn’t matter for what purpose you need to draw this drawing, for children's competition or autumn landscape, This a useful pastime for anyone.
Paint Maple Leaf ik simple. They will help you with this step by step sketches:
- First of all, you should draw the frame of the leaf. To do this, you need to draw an arched vertical line - this is the stem of the leaf.
- Then draw two horizontal crossing lines by hand. This is the basis for its five-pointed shape.
- Trace the ends of the drawn lines, and then erase the sketch inside the drawing. The base is ready!
After that, start detailing your drawing. It is necessary to make sharp tips along the edges of the leaf to make it look realistic.
 Detailing the drawing
 After this, erase the extra lines of the sketch and draw characteristic veins on the leaf.

 Veins on a maple leaf
 After that, all you have to do is paint the sheet in colorful colors: yellow, orange, brick, brown, red, green. The sheet can be plain or have many shades.

 Maple leaf coloring option
 Image and outline of a maple leaf, template
If you don't have the artistic skills, time, or even desire to painstakingly draw a maple leaf, you may template will come in handy. This template can be circle on clean slate paper and then color it to your liking. This is how you get neat and beautiful drawing.
Templates for drawing a maple leaf:
 Maple leaf, template. Option #1
 Maple leaf, template. Option No. 2
  Maple leaf, template. Option No. 3
 Maple leaf, template. Option No. 4
 Autumn maple leaf: drawings for children
You can get ideas for creativity and draw a maple leaf (one or a whole bouquet) with your child by studying ready-made works.
Drawings for children with maple leaves:

 Realistic drawing maple leaf
  Children's drawing: Maple Leaf
 Colorful maple leaf: drawing
  Maple and maple leaf: drawing
 Beautiful maple leaf: drawing
 Each sheet has its own main characteristics or features. What is on each sheet?
1. Stem, also known as the main axis.
2. A leaf plate that has a certain shape.
3. Veins.
To draw leaves you need to start with the axes. Below is a simple example of drawing a branch with leaves. To begin, we will draw the lines of the trunk and the lines of the axes of all the leaves. Then we will give the leaves a shape using leaf plates, and the final step will be to add veins. That's all you need for the initial sketch of trees with leaves.
Another example of how to draw leaves using veins.


Drawing an oak leaf
Below is an example of how to draw an oak leaf step by step. Based on this, you can draw another leaf of any tree. Here everything depends on your artistic attentiveness and observation.
As we can see from the following sketches, first we need to draw the central axis and borders of the sheet. Next, draw the veins or wreaths of the leaves. After this, at the third stage we draw appearance sheet - a wavy arc. And the last step is general form and finished strokes - small shadows near the center and at some veins, so that the viewer and you can clearly see that the oak leaf is not flat, but has volume and some shapes.
Ceram Kioto offers hinged ventilated facades Moscow. Curtain facades made of porcelain stoneware imitating natural stone, wood and other materials. Facade of any complexity and for any building from professionals.


How to draw a maple leaf
If you still have questions and unresolved problems with drawing this part of any deciduous tree, then here's another example for you. In this example, we will analyze it step by step, how to draw a maple leaf. In principle, drawing a maple leaf is not much different from an oak leaf or other tree, except that the maple tree has not one central axis, but five, according to the number of leaf petals.

Use dots to mark the lower edges of the petal, where it will merge into the next petal. This is necessary for convenience and creating precise symmetry. If you do not make such marks, the sheet may turn out uneven and asymmetrical. 
Next, draw the spine (the spine is an important part of the leaf, especially if the leaf has fallen off the tree). Using careful movements, connecting all the control points and observing the characteristic shapes of the maple leaf, we draw it and as a result we get a neat leaf that can be painted over and get a realistic look.

By the way, there is an interesting way of coloring using colored corrugated paper. You must first draw leaves on paper in exactly the same way with white wax crayon. After this, tear corrugated paper into small pieces autumn flowers(red, yellow, orange, brown) and, thoroughly wetting each piece in water, stick them on the drawing. Make sure that there are no two pieces of paper of the same color next to each other. Let the paper dry a little (but not completely!), and then remove it from the drawing. You will get a wonderful multi-colored background. Leave the work to dry completely, then put it under the press.

Method 2.
You can make an interesting autumn craft if you place the leaf under thin foil. The foil should be placed with the shiny side up. After this, you need to carefully smooth the foil with your fingertips so that the design appears. Next you need to cover it with a layer of black paint (this can be gouache, ink, tempera). Once the paint is dry, very gently scrub the painting with a steel wool pad. The protruding veins of the leaf will shine, and dark paint will remain in the recesses. Now you can glue the resulting relief onto a sheet of colored cardboard.
Autumn leaves. How to draw autumn
Method 3.
A very simple and at the same time effective technique is to print leaves on paper, onto which paint is first applied. You can use any paint, just apply it to the side of the leaves where the veins appear.

Link
Here are prints of rowan leaves. And any kid can draw rowan berries - they are made using cotton swab with red paint.

Link
You can create a beautiful autumn design if you print leaves with white paint on a sheet of dark-colored cardboard. When the paint dries, you need to color the leaves with colored pencils. It will turn out beautiful if some leaves are left white.


The background can be left as is, or made colorful by painting with paints using a sponge. In this case, you need to leave a small unpainted space around the leaves.


If you decide to make the background colored, then the leaves themselves can be left white.

How to draw autumn leaves. Autumn crafts
Method 4.
To add volume to your drawings, you can use the following interesting technology. You will need thin wrapping paper or white crepe paper.


Method 6.
Another original autumn pattern, made in warm and cold colors. The leaves themselves are drawn in warm colors (yellow, red, orange), the background is drawn in cold colors (green, blue, purple). To do this job you will need a compass.

1. Draw several leaves of different shapes on paper.
2. Now, using a compass, draw a circle of small radius in the lower left corner of the piece of paper. Next, adding about 1 cm at a time, draw circles of larger and larger radius, as far as the compass allows.
3. Now do the same in the upper right corner.
4. Finally, color the autumn leaves with felt-tip pens or pencils in warm colors (the colors should alternate sequentially), and the background in cool colors.
Maple Leaf. Maple leaf drawing
Method 7.
Help your child draw a maple leaf on a piece of paper. Divide it into sectors with veins. Let the child paint each sector of the leaf with some special pattern.


You can combine two methods.


Autumn crafts for children
Method 8.
Another unusual autumn pattern.

1. Draw leaves of different shapes on paper. They should occupy the entire sheet of paper, but not touch each other. Some of the leaves should start from the borders of the sheet of paper. Draw only the outlines of the leaves, without veins.
2. Now using a simple pencil and rulers, draw two lines from left to right and two from top to bottom. The lines should cross the leaves, dividing them into sectors.
3. Choose two colors for the background and two colors for the leaves. Color them in the chosen colors as in the picture.
4. When the paint has dried, trace the outlines of the leaves and the drawn lines with a gold marker.
Drawings on the theme of autumn
Method 9.
To make this autumn crafts you will need regular newspaper and paints (including white paint).
1. Draw a maple leaf on a piece of newspaper.

2. Paint it and, after the paint has dried, cut it out.


3. Take another sheet of newspaper and use white paint to draw and color a large square on it.

4. Place your sheet over the paint and wait for it to dry completely.

5. This is what you should get in the end!
Hi all!
Today we will talk about how to draw autumn leaves (and not only autumn ones). I will show you diagrams for drawing leaves.
So, how to draw a maple leaf?
I offer several options and several schemes.
To begin with, I would like to draw your attention to the fact that all large veins should go into the stalk.
Moreover, the midrib divides the leaf exactly in half.
Drawing a maple leaf (diagram No. 1)
To draw a maple leaf, start with an oval. Divide it in half with a vertical line, outlining two halves. Draw each half more clearly. Add cloves along the edges of the leaf and get a maple leaf.
Drawing a maple leaf (diagram No. 2)
Start by displaying the leaf shape. Please note that the maple leaf has five main veins that converge into one “knot”. Mark each vein. Connect them with lines to make the sheet even. Then draw the jagged edges.
Drawing a maple leaf (diagram No. 3)
Let's start with a square. Let's divide it in half, depicting the spine. From the middle of the sheet we draw three veins, as shown in the figure. And then around each vein there are teeth.

Drawing a maple leaf (diagram No. 4)
We start with the veins. We draw them as shown in the figure. We mark the deepest cuts in the sheet with dots. Then we draw the spine. And then – the most protruding parts. Smoothly connect them to the designated points and get a maple leaf.
How to draw an oak leaf?
Very simple. We start with a narrowed oval. In the middle of the oval we draw a vein that goes into the root. Then the edges of the sheet, which look like waves.
Drawing an oak leaf (diagram no. 2)
We start with the shape of the leaf and divide it in half, drawing the vein that goes into the root. We form the borders using a wavy arc. Give it a clear shape and edges.


- What does it show and how to calculate the internal rate of return?
- Yaroslav Samoilov is a relationship specialist with no professional education. Do you want to save your relationship?
- Perm Pharmaceutical Academy: reviews, faculties
- Trader Dmitry Cheremushkin
- Main economic issues
- Creative competition: we enter the Faculty of Journalism of St. Petersburg State University Bachelor's training programs
- Management of a modern school using the example of creating an educational cluster
- What does individuality mean?
- What does a person’s individuality depend on?
- Issues of formation of a cluster education system in the Russian Federation
- Unified State Exam tests in literature What is included in the Unified State Examination in literature
- Christmas fortune telling for children
- Sergey Yesenin Yesenin's work more information
- Ancient Slavic calendar Daaryan circle number of the god Kolyada dar Slavic Vedic calendar
- Slavic fabric amulets dolls: their meaning and how to make them with your own hands When you need to say goodbye to a doll
- Festive cutting of dough
- Festive cutting of dough
- Portfolio of professional activities of a trainer-teacher at the BMU DoD "Dyussh" Portfolio - Document Pa
- Oriental and African Studies
- Yelets State University named after