Master class: Draw autumn leaves using the alla prima technique. Drawing autumn leaves for children using the poke method step by step with a photo
Hello!
Today we will talk about how to draw autumn leaves (and not only autumn ones). I will show you the patterns of drawing leaves.
So how to draw a maple leaf?
I offer several options and several schemes.
To begin with, I want to draw attention to the fact that all large veins must pass into the stalk.
Moreover, the midrib divides the leaf exactly in half.
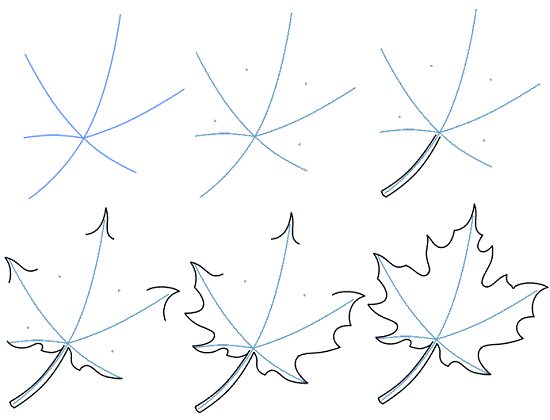
We draw a maple leaf (scheme No. 1)
To draw Maple Leaf, start with an oval. Divide it in half with a vertical line, outlining the two halves. Draw each half more clearly. Add cloves along the edges of the leaf and get a maple leaf.
We draw a maple leaf (scheme No. 2)
Start by displaying the leaf shape. Note that the maple leaf has five main veins that converge into one "knot". Mark each vein. Connect them with lines to make the sheet even. Then draw jagged edges.
We draw a maple leaf (scheme No. 3)
Let's start with a square. Divide it in half, depicting the spine. From the middle of the sheet, draw three veins, as shown in the figure. And then around each vein - teeth.

We draw a maple leaf (scheme No. 4)
We start with veins. We draw them, as shown in the figure. Dots mark the deepest cuts of the sheet. Then we draw the spine. And then - the most prominent parts. We smoothly connect them with the marked points and get a maple leaf.
How to draw an oak leaf?
Very simple. We start with a tapered oval. In the middle of the oval, draw a vein that goes into the spine. Then the edges of the sheet, which look like waves.
We draw an oak leaf (scheme No. 2)
We start with the shape of the leaf and divide it in half, drawing a vein that goes into the spine. We form the borders using a wavy arc. We give it a clear shape and edges.

detailed lesson will help you learn how to draw leaves step by step with a pencil. Leaves are an indispensable element of any summer or autumn landscape. The nature on our planet is incredibly diverse, and therefore there are many varieties of leaves, so drawing them is always very interesting. Drawing leaves is not difficult at all if you have very little time at your disposal, as well as suitable materials. We will show you how to draw leaves with a pencil step by step. Try to draw with us, and you will definitely like both the process and the result.
An easy way to draw a maple leaf in 6 steps:
We draw a simple autumn leaf. This lesson will be useful if you are drawing a detailed tree. Pay attention to what colors we use and what transitions they have.

Draw an oak leaf in four simple steps. You don't even need to use an eraser, it's so easy!

And now - a more detailed lesson on drawing a leaf.

So, to draw the leaves, we need Blank sheet paper, a simple pencil and an eraser. First of all, let's mark the sheet, draw the base, so that in the future it would be easy and convenient for us to draw. IN this case we are drawing a beautiful maple leaf, so the base will look like this. You will only need four lines to draw the base for the leaf.

Now we need the shape of the sheet so that the further drawing is neat and beautiful. Focusing on the previously depicted lines, we begin to draw cone-shaped figures, in total we should get five of them.

Next, we begin to draw the outlines of the sheet over the sketch. The base lines should be barely noticeable, otherwise the leaf pattern will turn out to be dirty and ugly. The jagged outline of the leaves is not difficult to draw if you try. If it doesn’t work the first time, use an eraser, you can practice on a draft until it starts to come out pretty.

Gradually draw the entire outline of the leaves. You should end up with something like this. Next, you will need to arm yourself with an eraser again and delete all unnecessary lines, leaving only the outline.

To make the drawn leaves look natural, you need to draw a twig and veins. The veins will not be even, so just draw by hand, do not use a ruler.

The final step will be coloring. You can draw the leaves with colored pencils, watercolor paints, gouache and other materials, you can choose exactly those that you like best. In the end, this is what we ended up with.
The following picture shows how to draw beautiful tropical leaves in the shape of a heart.
- First, draw a base that resembles a heart. Draw a line in the middle.
- We begin to draw the edges. There are notches on the edges of such tropical leaves, they must be marked.
- We draw the veins with a double line, here they should be neat and repeat the shape of the leaf. I also add some holes to the surface of the leaves.
- We color the painted leaves in a tropical style. I use cool turquoise green, you can get it by mixing green with blue. On the edges, I add warm shades - they are easy to get by mixing yellow and green. Don't forget to leave the holes unpainted.

There are many more ways to draw leaves. For example, if you are a complete beginner, you will love the doodle technique. To draw such leaves, you will need paper and a pen.

Summary: Autumn crafts for children with their own hands. Autumn drawings. How to draw autumn. Autumn leaves. Drawings autumn trees. Paintings on the theme of autumn.
What is the most remarkable in autumn? Of course, autumn leaves! In autumn, the leaves are not green, as in summer, but bright, multi-colored. Leaves on trees, bushes, fallen and lying on the roads, on the paths, on the grass... Yellow, red, orange... At this time of the year, even if you are not a photographer or an artist, you just want to pick up a camera or a brush with paints to capture this wonderful time of the year in all its glory. We will help you with this. In the second part of the article "Autumn crafts for kids: how to draw autumn" we will teach you how to draw autumn leaves in different ways.
Autumn drawings. Draw autumn
Under a sheet of plain paper for printers, place the sheet with the veins up, then shade it with wax crayon, located flat. You will see how a leaf pattern with all the smallest veins appears on paper.

To add a little magic, you just need to take white chalk and hold them on white paper, and then let the child paint over the sheet with paint with a sponge. See link >>>>

By the way, there is an interesting way of coloring with colored corrugated paper. You must first draw the leaves on paper in the same way with white wax crayon. After that, tear the corrugated paper into small pieces. autumn colors(red, yellow, orange, brown) and, wetting each piece well in water, stick them on the drawing. Make sure that there are no two pieces of paper of the same color next to each other. Let the paper dry a little (but not completely!), Then remove it from the drawing. You will get a wonderful multi-colored background. Leave the work to dry completely, then put it under the press.


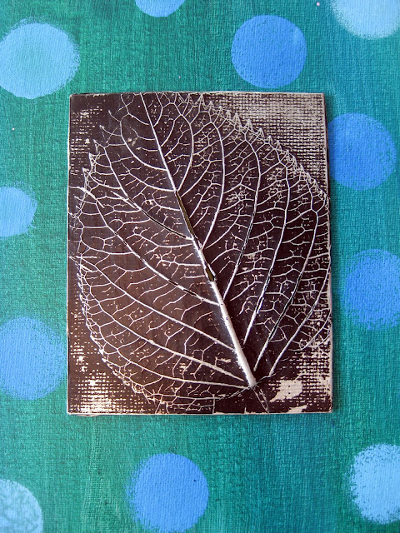
An interesting autumn craft will turn out if you put a leaf under a thin foil. In this case, the foil should be placed with the shiny side up. After that, you need to gently smooth the foil with your fingertips so that the pattern shows through. Next, you need to cover it with a layer of black paint (it can be gouache, ink, tempera). When the paint is dry, rub the painting very gently with a steel dishcloth. At the same time, the protruding veins of the leaf will shine, and dark paint will remain in the recesses. Now you can stick the resulting relief on a sheet of colored cardboard.
Autumn leaves. How to draw autumn
A very simple and at the same time effective technique is to print leaves on paper, on which paint is previously applied. Any paint can be used, only it must be applied to the side of the leaves where the veins appear.

Here are the imprints of rowan leaves. And any kid can draw rowan berries - they are made using cotton swab with red paint.

A beautiful autumn drawing will turn out if you print the leaves with white paint on a sheet of dark-colored cardboard. When the paint dries, it is necessary to color the leaves with colored pencils. It will turn out beautifully if some leaves are left white.


The background can be left as is, or made colored by painting with paints with a sponge. In this case, it is necessary to leave a small unpainted space around the leaves.


If you decide to make the background colored, then the leaves themselves can be left white.

How to draw autumn leaves. Autumn crafts
To give volume to your drawings, you can use the following interesting technique. You will need thin wrapping paper or white crepe paper.

1. Tear it into pieces of irregular shape and stick it on a thick sheet of paper with PVA glue. Try to get more "folds", "wrinkles" at the same time, they will subsequently give the picture texture, volume.
2. When the glue dries, using a stencil, draw and cut out three maple leaves from this paper (large, medium and small).
3. Paint them with colors in autumn colors, then stick them on a sheet of black cardboard.
More detailed instructions with photos, see the link >>>>
DIY autumn crafts


Another original autumn drawing, made in warm and cold colors. The leaves themselves are drawn in warm colors (yellow, red, orange), the background - in cold colors (green, blue, purple). You will need a compass to do this job.

1. Draw several leaves of different shapes on paper. 2. Now, using a compass, draw a circle with a small radius in the lower left corner of the sheet of paper. Next, adding about 1 cm, draw circles of larger and larger radius, as far as the compass will allow. 3. Now do the same in the upper right corner. 4. Finally, color the autumn leaves with felt-tip pens or pencils in warm colors (the colors should alternate sequentially), and the background in cold colors.
Maple Leaf. maple leaf drawing
Help your child draw a maple leaf on a piece of paper. Divide it with veins into sectors. Let the child color each sector of the leaflet with some special pattern.


You can combine two methods.


Autumn crafts for children
Another unusual autumn drawing.

1. Draw leaves of various shapes on paper. They should occupy the entire sheet of paper, but not touch each other. Part of the leaves should start from the borders of the sheet of paper. Draw only the contours of the leaves, without veins. 2. Now with simple pencil and rulers, draw two lines from left to right and two from top to bottom. The lines should cross the leaves, dividing them into sectors. 3. Choose two colors for the background and two colors for the leaves. Color them in the chosen colors in the same way as in the picture. 4. When the paint dries, trace the outlines of the leaves and the drawn lines with a gold marker.
Drawings on the theme of autumn
For the manufacture of this autumn crafts you will need a regular newspaper and paints (including white paint).
1. Draw a maple leaf on a piece of newspaper.

2. Color it with paint and after the paint is dry, cut it out.


3. Take another sheet of newspaper and draw and paint over a large square on it with white paint.

4. Lay your sheet over the paint and wait for it to dry completely.

5. This is what you should end up with!

DIY autumn crafts
Method 10.

Autumn drawings. Draw autumn
Method 11.
In the article "Easter cards with your own hands" we talked about interesting technique drawing with wax crayons. See link >>>>
In this way, you can draw autumn leaves.

And here, in a similar way, autumn leaves are painted with paints.


Finishing our overview article on the topic "How to draw autumn leaves", we will tell you about two more ways.
Autumn crafts for children
Method 12.
Lay out the leaves on paper, then use an old toothbrush or flower sprayer to spray the paint. In order not to stain everything around, you can do the above procedure in the bath.


How to draw autumn leaves
Method 13.
And finally - stamps of leaves with a roll of toilet paper. In this way, it is very cool to make gift wrapping with children.


Material prepared: Anna Ponomarenko
Other publications on the topic of this article:
How to draw autumn leaves for children step by step with a photo
Sredina Olga Stanislavovna, educator, CRR MDOU No. 1 "Bear cub", Yuryuzan, Chelyabinsk region.
Target:
Creation of educational or creative (competitive, exhibition) work
Tasks:
Learn how to infuse color into color
Develop imagination, the ability to arrange different-sized objects on a sheet (in particular, leaves)
Improve practical brush skills
Cultivate artistic taste
The target audience:
preschoolers and elementary school students
Materials:
Paper, dried leaves, glue stick, wax crayons, watercolor (24 or 36 colors)
brushes No. 1, 3 (pony, squirrel or kolinsky)
Preliminary work:
Introduction to watercolor techniques
There are several watercolor techniques. This is glazing (multi-layer painting, when each layer is superimposed on the previous one only after complete drying), a la prima (Allaprima in Italian) - painting on wet. They reveal the possibilities of watercolor in different ways, as well as Additional materials(salt, shaving foam, soap).

These beautiful stains appear when color is poured into color.
Quote:
Getting on the wet surface of the paper, the ink spreads over it in a unique way, making picture light, airy, transparent, breathable. Combining various color combinations with a variety of tonal solutions, you can achieve amazing overflows and transitions between the subtlest shades. The a la prima method, since it does not involve multiple registrations, allows you to maintain maximum freshness and richness of colorful sounds.
In addition, an additional advantage of this technique will be a certain time saving. As a rule, the work is written "in one breath", although, if necessary, you can additionally wet the paper in the process of creativity. In quick sketches from nature and sketches, this method is indispensable.
Introduction:
It is difficult for preschoolers to independently and quite realistically depict maple or oak castings. Therefore, we resort to the help of such a technique as PHYTOPRINTING. By getting a real "photo" or even an "X-ray" of the leaves, we can cut down on painting time and focus on working in color.
Working process:
After creating a sufficiently large collection of dried leaves, you can leave part of it to create applications, and use part of it for drawing.

To work, we will need to pre-glue the dried leaves in a certain order on an A4 sheet (landscape), or (optionally) on an A3 sheet. But for preschoolers, the A3 format will be too big. Even if you use large oak and maple leaves. And birch leaves will need too much to fill the space. Therefore, we will focus on the landscape format.
Children try to independently select and distribute the leaves of various tree species in random order. The teacher gives the following instructions:
1 - Take leaves of various sizes, different tree species (you can take several small leaves)
2 - Use a small amount of material, do not clutter up the space, leave "empty spaces"
3 - Some leaves overlap each other
4 - Do not place the leaves as in the herbarium, rotate them.
5 - Select the format of the picture as desired (vertical or horizontal)
6 - Do not overload the middle of the sheet, but do not rest on the edges.

Not all children succeed at once interesting composition. The teacher can suggest, but not interfere with the exciting creative process.
This stage can be performed with children in advance, or in the process of creating applications.
After the teacher sees and approves the arrangement of the leaves, they can be glued. To do this, you need to use a glue stick. It is better to smear not a sheet, but paper, lifting the leaflet and roughly, “by eye”, outlining the place where the glue is applied. Dried leaves are brittle. Putting them on the intended places, put a clean sheet of paper on top and slightly smooth it, press the sheets to each other.
We take wax crayon Brown color and we begin to go through the entire sheet, lightly touching the paper. When the contours of the leaves appear, you need to press the crayon a little harder, so that the veins and edges of the leaves become more clearly visible.

We remove the bottom sheet with dried leaves glued to it (it may come in handy more than once) and take out the watercolor.
It is best to work on two drawings at once. This is necessary so that the watercolor from the leaves does not flow out onto the background and does not merge with it (despite the fact that the wax crayon holds back the paint, such streaks are quite possible for preschoolers). We will draw the leaves that have fallen on the grass and the leaves that have fallen on the water. You can use the same composition, create two different ones, or just change with your neighbors.
1
We circle the leaf along the contour with a brush with some color.
You can pre-moisten the leaves with water, and only then draw paint on the brush, but it is difficult for preschoolers to keep track of the colorless line, so we start with color. Then you can fill the outline of the sheet with water and pour paint into the outline. You can not do this, but just take it on a brush more water and less paint.

We begin to randomly fill the sheet with autumn, warm colors: (lemon cadmium, medium cadmium yellow, yellow ocher, natural sienna, golden ocher).

We work quickly before the paint dries.


By wet surface sheet with a thin brush we draw several veins. Brem for this dark green color.

We begin to paint the second maple leaf without first drawing the entire contour line.

We continue to use the entire autumn palette, but in different proportions and combinations.

We draw the veins in dark brown.

Each small leaf has its own palette: one is yellow-green, the other is dark red, with a drop of yellow, the third is almost all written in ocher.


We finish the veins and leave the sheet to dry

2 We take the second sheet and start working with small birch leaves

Ocher draw veins
We prescribe two maple leaves mainly scarlet and red (kraplak, carmine),


Here are both drawings completed. It remains to add a background.

We start with grass. We use all ready-made green colors (yellow-green, emerald green), mixing them with other colors and different amounts of water, brightening, intensifying, randomly pouring into each other, carefully bypassing the contours of the leaves.


Rotate the sheet the way you like.

Once again, we refine and draw the veins

Select the final format (vertical) and draw a blade of grass with a thin brush.
We depict water on the second sheet by pouring in various shades (blue, purple, blue, turquoise)


Add small waves (ripples on the water)
In the previous lesson, I showed . This lesson will be like an addition to it. Here we will consider how to draw leaves with a pencil step by step. As an example, I will show how to draw a maple leaf. The drawing process is not difficult.
Step one. I start with markup. I draw something that looks like a hieroglyph. Each of these lines represents the main network of veins.  Step two. Let's draw the contours of the maple leaf itself. Remember that this is still a sketch, so you do not need to put pressure on the pencil. We will erase these lines later.
  Step three. We take a colored pencil. I leave the choice of color to you. I took green, even though it's already autumn, but I like green. We trace the contours and erase the auxiliary lines that I talked about in the previous steps.
  Step four. We take another colored pencil and decorate our sheet as we wish. I got completely green. But you can make any color. In nature, there are many different leaves, so there are no restrictions. The result will be something like this: But this is not the end. This time I decided to show how to draw leaves with a pencil completely, from sketch to coloring, and not just coloring as in the previous lesson about autumn. It turned out very realistic, what do you think?
And I also give you a cheat sheet (or just remind you how they look) the leaves of other trees. I collected the collection myself. My classmate and I walked through the park and picked leaves for ourselves. This is how we have fun:  I also really wanted to draw chestnut leaves, but I did not find any good copy, already all fell down. Therefore, I give a picture from the network:
  And here is the entire harvest:
  That's probably all. You can also draw other vegetation.

 Types of traffic lights")


- How perestroika began in the USSR
- History of Russia from Rurik to Putin!
- Can you dance while pregnant?
- History of Russia from Rurik to Putin!
- Vasily Zaitsev: the unknown story of the legendary sniper Sniper duel in Stalingrad
- Ikaria island in greece healing water springs
- Belarusian Soviet Socialist Republic: territory, flag, coat of arms, history
- The Best Fisheye Lomography Cameras: Dynamic Depth Shooting
- Diet for pregnant women
- Lomography breaks all the rules of photography at the same time
- Scythian legends. Legends of the Scythians. Legends of Crimea Legends and myths of the Scythians
- Benefits of onions for dental health
- Dream interpretation why teeth fall out in a dream
- What does it mean if you dreamed of lard - salty, fresh or with a layer
- Seven good reasons why there might be life on other planets
- The most famous mummies of the world and their mysterious stories What does a mummified body look like
- Sleep dead baby boy girl
- Posts tagged ‘multi-shot crossbow’
- The longest rivers in the world
- Compilation and solution of chemical equations