Drawn little dragon. How to draw a dragon with a pencil step by step
Illustration fairy tale characters- it's always interesting. The monster in the guise of a winged fire-breathing serpent plays a significant role in the mythology of many cultures around the world. For example, a dragon in classical chinese style- a sign of water, associated among the people with the good and bright beginning of yang, and the European one, on the contrary, means evil, dark force, the devil. The appearance of the lizard differs when comparing these two cultures. Therefore, the drawing of one or another character will be very different.
Step-by-step drawing of a cartoon dragon
 Fire lizards- Russian heroes folk tales and legends. Their image is still used to this day in science fiction films and cartoons. If it is difficult for a novice artist to draw a dragon, you can first find a picture to sketch. It could be a specific character from your favorite movie.
The first difficulty that an artist faces is how to draw a dragon head. It’s easier to depict the body, the main thing is to maintain proportions. The head requires drawing the smallest details. This is important because emotions should be depicted on the lizard's face, especially if he is an evil, negative character.
The work plan is as follows:

When the main work is completed, you can add some details of your own: for example, horns or brushes on the tail. These elements are often found in European dragons.
Drawings of dragons for children to draw

If a child wants to draw a fiery serpent and an illustration is being selected specifically for him, then you need to pay attention to other styles in which dragons are depicted. It could be cute little dragon, a cartoon character for the age category up to 5 years.
It won't be possible to find such a picture. a lot of work, since there are many illustrations of fairy-tale characters made specifically for teaching a child. Drawing them is not difficult because they do not require knowledge academic drawing: laws of light and shadow, proportions, perspective. As a rule, a child can choose the color, shape, and pose of the hero independently, and this will not spoil the drawing.
How to learn to draw dragons from scratch?
 Novice creators can try their hand at creating a character from scratch, but such work requires confident ownership pencil. But you can experiment in any case if you simplify the task for yourself.
How to draw a dragon with a pencil step by step:

To draw a dragon in Chinese or European style, you need to practice a lot. The characters are detailed and require careful development of each individual element. Creating a dragon in a realistic style is not an easy task even for a professional. Beginning creators should pay attention to simplified pictures for sketching.
Drawing a dragon step by step


Dragon anatomy is a problematic topic, mainly due to the fact that they are mythical creatures. However, I can show you how to create a believable body for this mythical creature based on basic theory anatomy. In this tutorial you will learn about the dragon's skeleton, muscles and movement. If you want your dragons to look real, this material is for you!
1. Skeleton
We all know that dragons, like dinosaurs, have six limbs - they are able to actively fly and breathe fire. They lay eggs and are covered with scales or plates. They are also carnivores with sharp teeth and long claws. These are the only statements that all dragon fans will agree on. The remaining statements are questionable - are dragons warm or cold-blooded? Covered with fur and/or feathers? How long is the tail, how many fingers do they have? I will try to give you the most universal tips for building a dragon. The rest is up to your imagination!
Step 1
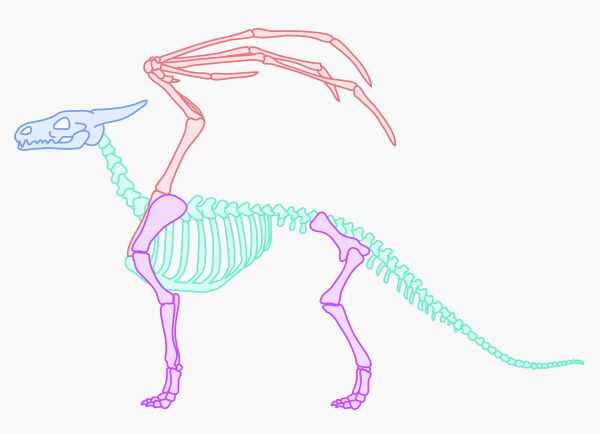
The ideal place to start is with the skeleton. Convincingly placed bones and joints will ensure your dragon looks completely realistic no matter what you do with it! To create this skeleton, I mixed a dog, a Tyrannosaurus rex, and bat.
Step 2
Did the previous photo annoy you? You thought, “Hey, dragons have shorter legs/longer necks/bigger wings/etc.” Everything is fine! This image is just a template that you can modify. Want a huge, heavy silhouette? “Try on” this one.

Step 3
Or maybe a winged dragon? They aren't technically dragons (only four limbs), but they are certainly close relatives. Besides, Wyverns were popularized as dragons in Skyrim, so maybe it's time to change the definitions?
As you can see, you can change a lot of things in the skeleton and find your favorite position. Just remember:
- The elbow should be positioned at the same level as the knee;
- There should be space between the chest and hips; the more, the wider the range of their movement;
- Wings must be at least as long as the body. The bigger, the better.
- The neck should start from the back of the skull (not the bottom);
- Joints must have a limited range of motion to additional information about this, see the next step.

Step 4
Even the most correctly formed anatomical structure will not save you if the joints have no restrictions. They are crucial for correct posture. You know what a dislocated joint is, don't you? Don't do this to your dragons!

Step 5
I'm certainly not advocating that you draw a full skeleton every time you draw a dragon. This is what you should really see when looking at a collection of bones:

Step 6
With this picture in your head you will eventually draw desired position:

2. Muscles
Step 1
Drawing the muscles of dragons is quite problematic, because... There are no animals with both arms and wings. Here you have to use your intuition. Although, of course, the wings should be built just like another pair of arms (more on wings). To draw other body parts, you can borrow muscles from any other animal with the same movement style as your dragon. I took partly a dog and a horse.

Step 3
Although it is quite easy to create a dragon's muscle structure, it is usually very difficult to remember. And we don't want to constantly have to resort to a pattern when we draw a dragon! I will try to show you a mnemonic diagram so that you can better remember the location of the muscles. It's not very perfect, but it should help you with the most complex parts.
Let's start with the front leg (arm). Do you see a heart with legs and a cute creature with large, fin-like arms? Draw them!

Step 3
In the forearm we see a bird covering two sticks with its wings.

Step 4
When drawing the hind legs, rely on the skeleton. Both bones should be covered with large chunks of muscle.

Step 5
Now pay attention to the knee and three more sticks between it and the heel.

Step 6
A large winged creature is trying to eat the thigh!

Step 7
Now just connect both parts to both muscles.

Step 8
It's time to draw the wing muscles. It's quite easy to remember the hand - first cover the bone with the constricted muscle...

Step 9
Then just add biceps.
These were the hardest parts. The rest of the muscles should be easy to remember, even without mnemonics - just look at them.

Step 10
If your dragon is completely armored, you don't need to sketch out all the muscles. Just outline the body shape. If your dragon is covered in scales like a snake, you need to emphasize the muscles.

3. Paws
Step 1
How many fingers does your dragon have? It doesn't have of great importance. I personally prefer the T. rex-like paws with three toes, but you can do it differently. The important thing is that the middle finger/fingers should be the longest and the outer ones should extend slightly beyond for better support.

Step 2
Let's draw the leg. Start with two circles and draw three or four finger lines.

Step 3
Draw a circle at the end of each finger. Again, the middle finger/fingers should be larger. Last lap in the background it looks the smallest, because he is the farthest from us.

Step 4
Add other circles connected to the previous ones. They should be larger and fairly consistent in size. Leave a space between them and the first two circles.

Step 5
Add claws. Don't make them too pointed! Plus, they look (and perform) better when slightly curved.

Step 6
Now you can simply connect all the circles with lines, creating the body.

Step 7
You can use the same shapes that you used when drawing the wrinkles on the foot. They should help you draw the skin correctly.

Step 8
Here is my dragon with paws:

4. Tail
Step 1
Okay, you're right - everyone knows how to draw a tail! However, if you don't want it to look flat or unnatural, this tip may come in handy.
The basic rule is quite simple - the tail has two sides, and both of them cannot be fully visible at the same time. The more you see on one side, the more the other side disappears. To achieve a natural effect, first draw the center line (pink) and then add a little on both sides.

Step 2
The dragon's tail does not help you fly. It's usually heavy (dragons can smash buildings with them, right?) and too rounded to help lift into the air. You can make it more useful by adding some fins to it.

Step 3
When it comes to the tail, there is another thing that evolved from dinosaur anatomy. A bare ponytail looks pretty boring, so we'll add some pseudo-practical decorations. Empty inner spikes will work, but a large, heavy ball is dangerous to lift into the air. When you want to add any interesting features to your dragon (anywhere on the body), always think about the practical side first.

Step 4
Our dragon's body is almost ready!

5. Dragon armor - scales and plates
Step 1
Before you start drawing the armor, you need to think about what it's really for. Just adding scales here and there won't be practical for the dragon. Certain areas on his body have different purposes and therefore different coverage needs.
- Weapon ( yellow color) - created for impact and these places will most likely seek contact with the body or weapon of the enemy. They are solid and very well protected.
- Front end ( Green colour) - although this area is easy to defend with its claws, an attacking dragon will aim for it. Needed here good protection!
- Rear end ( Pink colour) - this area is far from attack weapons, so it cannot be defended. The dragon tries not to expose this area to the enemy. However, it must also be covered with armor, since there can be many enemies, or one, but fast.
- Flexible seats ( purple) - large, rigid plates are best for protection, but they can barely move. Some areas require stronger flexibility - small plates or scales that will not restrict the dragon's movement.

Step 2
There are many shapes you can use for the scales. They can look like leaves, hands, rocks, or simple ellipses. You need to see which ones are suitable for the areas we just identified.
Advice: no best exercise for drawing scales than sculpting a clay dragon. This will help you understand what the purpose of their shape and size is.

Step 3
There are two types of scales:
- Lamellar scales are similar to large shields on knightly armor - they are hard and tough. The more plates, the stronger and heavier the armor. They also enhance the silhouette because they are not attached too tightly.
- Suture scales are smaller and are used to connect the plates - like chains between armor plates. The more seams between the plates (and the smaller they are), the more mobile the dragon. In addition, the smaller they are, the closer they are to the skin.

Step 4
Once you know how to separate the scales, you can dress the dragon. There are many ways to do this - you just need to follow the four area rule to create beautiful and realistic armor.
Step 7
Add a row of small seam flakes. On the tail, they directly connect the top and bottom.

Step 8
Now just fill in the empty space with whatever fits.

Step 9
Now you can do whatever you want with your line art. If you want to achieve the same effect as shown below, when drawing traditionally, use gray/brown paper and watercolor, then touch up the sketch with a black marker.

Step 10
You may ask, why did I show you the entire muscle structure if it is completely invisible under the scales? There are two reasons for this:
- The skeleton determines the position, but it is the muscles that give shape to the body;
- When you want to draw a lithe, lean dragon like the one below, you won't use large plates and the muscles will be visible.

RRR! Now you can draw... a real dragon!
Now you know how to create your own dragon based on realistic anatomy. You can adapt these rules to your imagination, because only an artist can make a dragon come true!
It's a dragon mythical creature, and everyone represents it in their own way. But, to summarize, a dragon is a flying lizard, possessing strength, power, endowed with wisdom and surrounded by an aura of mystery. When drawing a dragon, try to convey the plasticity of a reptile and the grace of a bird.
How to draw a dragon lung
Draw 2 circles next to each other (one slightly smaller is the head). Below them draw an oval (torso), inside the oval draw a circle, and under it a “carrot” placed on its side (hind leg). Connect the torso and head with a curved line (neck). Mark the position of the tail and wing with curves.
Draw the outline of the eye in the large circle of the head, outline the eyebrows. Draw a curve connecting the circles to indicate the dragon's upper jaw. Outline the top contour of the head and neck. Mark the boundaries of the wings. Focusing on the auxiliary lines, draw a thick tail for the dragon. Draw the second hind paw and divide the edges of the paws into toes. Select a location for the front paws.

Draw the position of the lower jaw, and start working on the dragon's front legs. Draw a zigzag line from the tip to the base of the wing, outlining the hind legs.
Add details to the dragon by drawing a crest on the neck, a pupil in the eyes, teeth, and a nostril. Don't forget to highlight the claws on your paws.
Erase the auxiliary lines and you will get a very cute and kind dragon.
How to draw a dragon easily

Draw 2 circles, one larger (head), the other smaller (nose). Below, draw 2 more circles (the larger one is the chest, the smaller one is the back of the torso). Connect the circles with smooth lines, as shown in the figure.

Connect the head and torso by drawing the neck and the curve of the back. Draw 2 wings.

Add a tail to the dragon design, which is a curve that smoothly grows from the body. The dragon's feet "grow" from the circles you drew earlier.

Inside the wings, in their upper part, draw a line that follows their outline. From head to tail draw spikes.
Muzzle. Draw the nostrils and mouth line of the dragon. Draw an eyebrow and draw an eye underneath it. Add a spike under the chin.

Outline the dragon's cheekbones and lower jaw, draw the paws. Add realism to the wings. Erase the auxiliary lines.

Draw contour lines. Add detail by drawing spots and folds on the scales, indicating the pectoral muscles.
How to draw a dragon video
If you still don’t quite succeed in how to draw dragons, or you still have questions, watch the video.
How to draw a dragon with a pencil step by step

Draw the corner (top of the mountain). Place an inverted comma (torso) on it. Outline a circle (head), and in it draw the peeking ends of the scissors (mouth). Starting with the front left, outline the approximate location of the paws and the articulation of the feet on them. Draw the dragon a serpentine tail, thick at the base and gradually tapering. Use auxiliary lines to mark the position of the wings. Please note right wing will be larger than the left one.

Draw the contours of the dragon, making the lines smooth. First, draw a wavy line along the bottom of the right and then the left wing. Based on the construction lines, draw the paws and work out the mouth.

On the neck, draw the outline of a ridge so that it resembles flames. Mark the location of the eyes above the mouth. Draw spikes on the tail; their size should decrease as they approach the end. Apply a pattern to the wings and draw the claws.

Use a soft pencil to outline the outline. Shade the dragon, taking into account the different sizes and shapes of the scales. Draw a rougher, bumpier surface on the chest, tail, and body. Draw the teeth and claws on the paws. Work the surface of the mountain. Apply shadows to the drawing.
How to draw a dragon with a pencil

Draw a long, winding line (the body) and mark the location of the paws on it.

Add 2 lines showing the location of the wings, draw toes on the paws.

On the sides of the auxiliary line, outline the contours of the dragon’s body. When drawing the tail, gradually reduce the distance between the lines. Draw the outlines of the dragon's paws, neck, and head.

Detail the wings by drawing a central bone from which several lines extend (the basis for the membranes). At the bottom, the wings are connected by a smooth, sinuous line.

Erase the auxiliary lines. Add believability to the dragon by drawing the head and drawing a crest, eyes, and teeth on it. Add claws to the wings. There should also be growths on the back, the size of which decreases as you approach the tail.

The dragon is almost ready. All that remains is to apply the scales and shadows.
How to draw a dragon step by step

Draw a small irregular circle (the head). From there, draw a short curved line (the muzzle) and outline the approximate location of the eyes. Under the head, draw an elongated oval (torso), At the right edge of the body, draw another oval, elongated down, with a curve branching at the end (the base of the hind leg). In the upper part of the body, draw a circle (shoulder) and from it the base for the front paw. Draw another paw nearby. Add lines for future wings and a curve for the tail.

Draw the head, giving it a shape and drawing growths on it. After this, you can draw the neck and add lines to the front paws.

Modify the dragon's face. Draw the nose, lower jaw, eyes, folds and spines. When you're done, sketch out the dragon's chest with clear lines.

Start drawing the neck and pectoral muscles, and the outlines of the paws. Detail the wings.

Work on the back of the body and paws. Add detail to the wings. Draw the surface of the muzzle, and apply the base of the spiky ridge to the neck. Draw the front paws with claws.

Draw the ridge to the end, draw the hind legs. Draw large scales on the belly. Apply membranes to the wings, you can make them slightly cracked, this will add age to your dragon. Draw the tail.

Add folds to the wings.

This is a very labor-intensive stage. Cover the dragon with scales. It is small on the head and tip of the tail, larger on the neck and back. Add a few touches to the chest and stomach.
This is an average difficulty lesson. It can be difficult for adults to repeat this lesson, so I don’t recommend drawing a dragon using this lesson for young children, but if you have a strong desire, you can try. I also want to note the lesson “” - be sure to try it again if you still have time and desire to draw today.
What you will need
Please note that this technology lesson and it can be done either in pencil on paper or in a graphics program.
In order to draw a dragon we may need:
- Paper. It is better to take medium-grain special paper: beginning artists will find it much more pleasant to draw on this kind of paper.
- Sharpened pencils. I advise you to take several degrees of hardness, each should be used for different purposes.
- Eraser.
- Stick for rubbing hatching. You can use plain paper rolled into a cone. It will be easy for her to rub the shading, turning it into a monotonous color.
- Graphic editor GIMP. You need to download a new GIMP and install it.
- Download brushes for GIMP, they may come in handy.
- Some add-ons may be needed (instructions on how to install them).
- You need Photoshop program.
- A little patience.
- Good mood.
Step by step lesson
Drawing characters from films, cartoons and stories is much easier than drawing real people and animals. There is no need to adhere to the rules of anatomy and physics, but each character is unique in its own way. The authors created them using special patterns, which must be repeated quite accurately. But if you want, when you start drawing a dragon, you can always make the eyes a little bigger. This will give it a more cartoonish feel.
By the way, in addition to this lesson, I advise you to pay attention to the lesson “”. It will help improve your skill or just give you a little fun.
Please note that each item, each Living being, each phenomenon on paper can be depicted using simple geometric objects: circles, squares and triangles. They are the ones who create the form; they are the ones the artist needs to see in the surrounding objects. There is no house, there are several large rectangles and a triangle. This makes building complex objects much easier.
Tip: create a sketch with as thin strokes as possible. The thicker the sketch strokes are, the more difficult it will be to erase them later.
The first step, or rather the zero step, is always to mark a sheet of paper. This will let you know where exactly the drawing will be located. If you place the drawing on half of the sheet, you can use the other half for another drawing. Here is an example of marking a sheet in the center:
Instead of an introduction
I decided to translate this drawing lesson because it covers the anatomy of a fictional animal well. This shows well how to draw fictional characters: It is necessary to think through every little detail. As a result, we should have a picture like this:

When drawing a dragon, you should pay attention to some important parts of its body. The following picture shows what the neck, armpits and waist width should be. The arms are attached to the chest (upper part) in the place where the neck smoothly meets the shoulders and are carriers.
The base of the arm is quite thick and muscular, as it must withstand the load of the very complex flying system of such a massive creature. When drawing relief muscles, you should not get too carried away so that the dragon does not look implausible.

The following drawing of a diagram of a winged dragon perfectly shows the construction of the dragon's body. All parts of the body from up to the tail are clearly visible on it. Since almost all winged dragons have spiny tails, a tail with a double spike is drawn here.
The chest of a winged dragon protrudes strongly and resembles a chest. This happens because this type of dragon, like birds, has two legs and two wings. Since the dragon has to land after flying, attack prey while hunting, and defend itself from the attacks of strong predators, its legs must be quite thin and long.

There are three main types of dragon heads. The top head is very rough, it fits a thick, massive and very strong dragon. For a skinny dragon, you can use a narrow head at the bottom. Such dragons are wonderful hunters, as they move very quickly and are very agile and flexible. The last head is average and very similar to a bird's; it is better to use it with a thin but fast dragon. In order for the image to be complete, you need to choose the right shape specifically for your purpose.
The following picture shows the face of a dragon. This angle adds menacingness to the image, because the dragon is looking at the viewer. The upper lines of a dragon's chin taper and extend upward towards the horn located between the and the skull area. The lower jaw is longer and narrows only at the end.

Drawing a dragon
It is recommended to start drawing a dragon with a sketch. For this it is better to use Graphics tablet, not a mouse. Create an image the right size, it is desirable that it be larger: 1600×1200, for example. In GIMP, it is better to create a new transparent layer for the sketch. The color of the brush does not matter, and the size should be comfortable for you.
As in most drawing lessons, it is customary to draw sketches and drawn details on different layers, so that in the future it is easy to delete the sketch and make it easier to work on small parts, for example the lesson “How to draw a tree”. To delete a sketch, you will need to turn off the visibility of the layer with the sketch (the eye icon to the left of the layer).
Start drawing the dragon from the head, and then proceed to the rest of the body (torso, pelvic area). After that, draw a sketch of all the limbs: arms, legs, neck. Connect the pelvis and torso with lines using short brush strokes.


The detailing of the head also takes place on a separate layer. It shows how best to draw teeth, tongue and eyes.

On this same layer, don’t forget about the dragon’s horns. They start growing from the low part of the chin and remain not very large in size. Adding detail to the horns.

Our head is already ready, so on a new layer we begin to schematize the neck, its back part, draw part of the chest, and then part of the shoulder.

This is what the first hand diagram looks like, don’t forget about detail and definition. We highlight the muscles and begin to draw out the bones of the finger that connects the underlying skin tissue to the hands.

The following figure shows how to complete the hips and partially the legs. Then we draw a long tail with a curl. Legs must be muscular.

Now the moment has come when it is necessary to finish drawing the tip of the tail. The tail can end either with skin or with skin, so here you can give free rein to your artistic fantasy. After the tail, we begin detailing the skin. Winged and ordinary dragons are reptiles, which means we look at the skin of familiar reptiles - lizards and snakes. Remember that it is better to do detailing on a new layer.

We will draw the wing from the front view. It seems to hang over the dragon itself and has the shape of an arc.

It is very important to pay enough attention to the image of the wing. The dragon is a strong predator and this will be reflected in the wings. The wings should be wrinkled, wounded, and torn in some places. Folds and stretches on the wings will also give the dragon a natural look.

I also recommend adding scraps of skin at the end of the neck. Look at your drawing - the detailing on the dragon should look nice. At the same step we draw the second wing. It is also depicted by an arc and contains detail and definition by analogy with the first.

Finally, we add soft fabrics to our winged dragon. We draw skin elements throughout the entire tail, horizontal paths from the top of the neck to the very bottom, which creates the appearance of the softness of the dragon’s belly. Now we clean up the drawing - we erase the shapes and sketches that were made in the first step. The drawing now looks clean.

You can turn off the sketch layers and look at the result. The author came up with this:

In the lesson it is not written how to add volume to the dragon and paint it, because this is a rather difficult process. There are two main techniques here. 1. First, the volume is applied with black and white paints, and then the black and white image is colored. 2. Volume is added immediately along with the colors, as, for example, this was done in the lesson “Drawing a flower”.
In any case, in order to draw beautifully you need to practice a lot and hone your skills. And at some point you will be able to draw a dragon like this:
It is quite difficult to draw a dragon anatomically correctly, since it is a mythical creature. However, in this lesson we will consider this possibility based on basic knowledge of the anatomy of other animals. This lesson will look at the skeleton and muscles of a dragon in motion. If you want your dragon to look real, then this tutorial is for you.
The end result will look like this:

Lesson details:
- Complexity: Average
- Estimated completion time: 2 hours
1. Skeleton
We all know that dragons are like dinosaurs and have six limbs. They can also fly and breathe fire. They lay eggs and are covered with scales. They are also predators with sharp claws and teeth. This common features, with which everyone agrees. Other questions about dragons remain open. Are they warm- or cold-blooded? Do they have fur or feathers? How many toes are on their paws? How long is their tail? In this lesson we will look at the most universal characteristics of a dragon, everything else depends on your imagination.
Step 1
It's best to start with the skeleton. The placement of the joints and bones will allow the dragon to look quite realistic no matter what you plan to do with it later. We use a mixture of dog (T-Rex) and bat skeletons.

Step 2
If you think the dragon doesn't look entirely believable, you can change it. Let's make the legs shorter, the neck shorter and the chest larger.

Step 3
You can change a lot about the skeleton to make the shape as good as possible in your opinion. However, there are some things to keep in mind:
- The elbow should be placed at the same level as the knee;
- There should be space between the chest and hips - the more, the wider the range of their movement;
- The wings must be at least the size of the body. The bigger, the better;
- The neck should start from the back of the skull, not from the bottom;
- Joints must have a limited range of motion - consider the next step for more information on this.

Step 4
Even the most anatomically correct body will not save you from the unnatural appearance of an animal if you use your joints without any restrictions. They are crucial for correct and natural posture.

Step 5
Of course, it is not necessary to draw its skeleton every time you draw a dragon. This is just a visual example for you. Here's what you need to see when you look at a pile of bones:

Step 6
Our sketch is ready:

2. Muscles
Step 1
Correctly drawing the muscles of a dragon can be problematic, since in nature there is not a single animal with a pair of wings and a pair of front legs. At this step you need to use your sense of intuition. IN in this case muscles were examined using the example of a dog and a horse.

Step 2
It is quite difficult to remember the location of each muscle. So that you don't have to look at an example every time you want to draw a dragon, let's use a special tactic to remember the placement of muscles.
Let's start with the front paws. Do you see a heart on legs and another creature behind it with arms like tentacles? Make a sketch like this.

Step 3
In the forearm we can see a bird that covers two sticks with its wings.

Step 4
The hind legs are quite powerful parts of the body and they should be covered with large muscles.

Step 5
Now pay attention to the knee: as if three sticks are connecting it to the heel.

Step 6
Association with the following muscle: a large crab trying to eat the thighs.

Step 7
Let's connect both parts of the paw with two muscles.

Step 8
Time for the wing muscles. They are easy enough to remember.

Step 9
...adding biceps.
We've covered the most difficult parts of the muscles, the rest are easy enough to remember.

Step 10
If your dragon will be completely covered in scales or armor, then you don't need to draw all the muscles. Just set the body shape and that's it. In our version, tense muscles are mandatory.

3. Limbs
Step 1
How many toes should there be on a dragon's paw? It doesn't really matter. In this example there are three of them, as you can see in the image below.

Step 2
Let's start with the foot. Draw two circles and three or four lines for the fingers.

Step 3
Draw a circle at the end of each finger. The middle or middle fingers should be the largest. The last circle in the background will be the smallest because it is the furthest from the viewer.

Step 4
Let's add other circles above the previous ones. They should be larger and approximately the same in size.

Step 5
Add slightly curved claws. Don't make them spicy.

Step 6
Now you just need to connect all the circles with lines.

Step 7
Draw the folds on the legs.

Step 8
This is what the dragon looks like at this stage:

4. Tail
Step 1
The most important rule is to remember that the tail has two sides that cannot be fully visible at the same time. The more you see of one side, the less you see of the other. For a natural effect, first draw the center line (pink) and then add the two sides of the tail.

Step 2
You can add fins to the tail.

Step 3
When it comes to the tail, there is one more thing to consider and consider. A bare tail looks pretty boring, so we'll draw some pseudo-practical decorations to go with it.

Step 4
Our dragon is almost ready!

5. Dragon reinforcement
Step 1
Before you start creating armor for a dragon, you need to think about exactly where protection is needed.
- yellow - weapons - the area is well protected.
- green - foreground- This is where protection is needed most of all.
- pink - back - the area should be fairly well armored, as it is easily accessible to a potential enemy from behind.
- purple - movement points - large areas on which it is necessary to install protection so that it does not limit the movement of the dragon.

Step 2
There are many shapes that can be used for scales. You can choose any one you like.

Step 3
There are two types of scales:
- large and immobile, which can hinder the wearer’s movements;
- small plates that are connected to each other.

Step 4
Now we can create beautiful and realistic armor for the dragon.
Step 7
Add smaller slabs. On the tail they connect the upper and lower parts.

Step 8
Now we cover empty space such slabs that fit in size.

Step 9
Now you can do whatever you want with your drawing. To achieve the effect as shown in the image below, use gray/brown paper and watercolor. Then add a few strokes with a black marker.

Step 10
You may wonder: why did we look at the structure of the dragon's skeleton and muscles from the very beginning if they are invisible under the shell? There are two reasons for this.
.
 Elder Macarius of Egypt")


- Oven pies with potatoes
- Recipes for simple and tasty salads with croutons
- Recipes for simple and tasty salads with croutons
- Fish soup Sea bass recipes for cooking fish soup
- Chicken hearts in sour cream
- Chicken hearts in sour cream: recipes
- Recipe for lavash envelopes with cheese
- Preparation of canned fish from mackerel
- Mackerel in oil in a slow cooker: a recipe for preparing delicious canned food for the winter
- Red currants, pickled for the winter
- Masago caviar: what it is, where it is used, description and nutritional value
- Reverend David of Serpukhov
- Venerable Macarius the Great, Egyptian (†391) Elder Macarius of Egypt
- What does the “Desperate One Hope” icon help with?
- Church of the Assumption of the Blessed Virgin Mary
- Boris Khramtsov. Eyes looking to the sky. "he knew something that I had long forgotten"
- The tomb of Blessed Alexandra and the August icon in the darna
- Temple of the Placing of the Robe on Donskoy
- Temple of the Tikhvin Icon of the Mother of God on Ave.
- Step-by-step recipe for making pies with potatoes in the oven