Draw hands holding the globe. How to draw hands. Online drawing lessons
Many will agree that drawing a person's face is not an easy task. However, among some artists there is an opinion that drawing a hand is even more difficult. What is more difficult to draw - a face or hands - I cannot say. Probably for some people. But what can be stated quite definitely is that drawing hands and fingers correctly is really difficult. But this is possible if you understand the basics of plastic anatomy and know the proportions. To do this, I have prepared a series of drawings with visual diagrams. They will help you understand key points, which you need to learn to pay attention to when drawing hands.
1. Brush size

The size of the hands is approximately equal to the face (not the head). If you measure from the wrist to the tip of the middle finger, then this segment will be equal to the distance from the chin to the top of the forehead. This is the size of an adult's hand. The younger the person, the smaller the hand will be relative to his face. In small children, the palms are equal to the distance from the chin to the eyebrows.
2. Skeleton and muscles


The shape of the fingers and the entire hand depends on the shape of the bones and muscles. You can verify this by looking at the given anatomical drawings of the hands.
3. Middle of the hand

During the drawing process, it is important to compare distances and check proportions. A good starting point for this is a line corresponding to the middle of the brush. Having outlined it, it will be much easier to avoid mistakes in the future. Therefore, at the very beginning of the drawing, you should not immediately draw fingers and details. It's better to outline general outline brushes, similar to a mitten. Then determine the middle. And then you can proceed to the details.
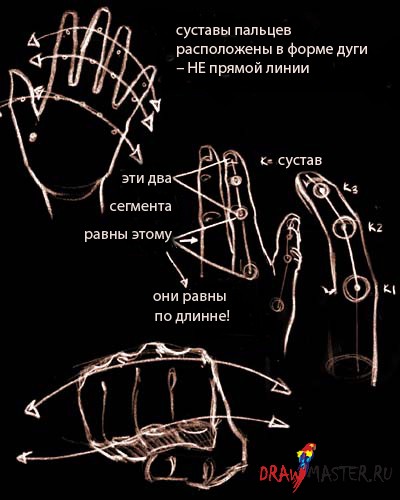
4. Middle of fingers

To ensure that the fingers in the drawing do not turn out crooked, you need to correctly determine the length of each phalanx that makes up the fingers: proximal, middle and distal. The following will help with this schematic drawing, in which the middle of the fingers is easily visible. Having determined the middle of each finger, further comparison of proportions will be much easier.
5. Length thumb

The thumb will end at 2/3 of the proximal phalanx index finger.
6. Length of index finger and ring finger

The length of the index finger is equal to the length of the ring finger. However, different people this ratio may be slightly different.
7. Little finger length

The tip of the little finger is located at the level of the joint between the distal and middle phalanges of the ring finger. By comparing the length of the little finger to this level, it is easy to check your drawing for errors.
8. Nail length

The length of the nail of each finger is 1/2 the length of the distal phalanx of the corresponding finger.
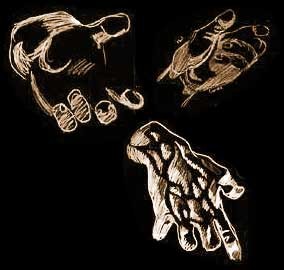
9. Location of the metacarpophalangeal joint of the thumb

When a person looks at the hand, he simply sees some bumps and depressions. But an artist who studies plastic anatomy sees behind each such “tubercle” joints, ligaments, bones, muscles... On our hands (more precisely, hands) there are three key joints, “tubercles”, which are important for determining the size and further marking of the drawing. If you identify these three points at the beginning, then further drawing will be much easier, since you can start from these points. Therefore, to draw the thumb, it is better to start with its metacarpophalangeal joint (2nd point). And to determine its location, you need to remember that it is located approximately halfway between the metacarpophalangeal joint of the middle finger (1st point) and the head of the ulna (3rd point).
10. The hand fits into the circle

The hand fits easily into the circle. Therefore, you can draw hands using a circle as an auxiliary line.
11. Concave brush shape

On the inner, palmar side, the hand has a concave shape, repeating the shape of a ball. The hand is not flat.
12. Fingers slightly curved towards the center

The fingers have a subtle bend. They are curved towards the middle of the hand. Fingers are not absolutely straight.
13. The bends of the fingers on the palm and outer sides of the hand are at different levels

The phalangeal joints of the fingers form folds of skin. These folds on the palmar and outer sides of the hand are located at different levels.
14. The shape is based on geometric shapes

From the above figure you can see that by dividing the hand into geometric shapes, it will be easier to understand its shape.
15. Model of the hand, corresponding to the main anatomical features
To learn how to draw hands, you need to be able to see the main shape among many little things. Be able to see the nature of the form. To do this, you can imagine the hand in the form of volumetric geometric shapes. Just as in the drawing of the head, artists use a model called “chipping,” so in the drawing of the hand, you can use the given diagram. Such a conditionally schematic image corresponds to the main anatomical features. It will help novice artists understand the concept, and therefore draw hands more confidently.
Summarizing the above, we can add that beginners should accustom themselves to pay attention to the proportions indicated in this article. If you constantly compare values, compare sizes, then the drawing will be easier and will become much more competent.
Although the proportions of the hands may differ depending on individual characteristics human, these differences are unprincipled and insignificant (for example, the length of the index and ring fingers may vary). Therefore, the proportions and features outlined in this article generally
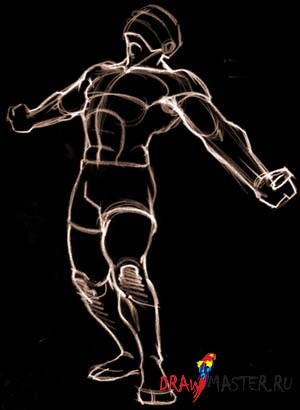
When drawing a person, special attention should be paid to both the face and hands. Firstly, besides the head, the arms are the most exposed areas of the body. Secondly, they are also expressive and mobile. Along with this, due to the complexity of the connecting joints, the convex and flat parts of the hand, the hands can, and usually do, become the most the hard part when studying the structure human body.
The first mistake when drawing is having too small hands. And here the ability to draw a head comes to the rescue. If you know how to correctly build the proportions of the head, then you can assume that you already have the correct proportions for drawing a hand. If you put your hand to your face, the tip of your middle finger will be at the hairline, and the hand will end at chin level. Here's your main way to measure brush parameters.
I hope you now understand the importance of knowing how to draw the human body. If you can draw a human body, you can draw anything for two reasons: 1) you now know enough about the three-dimensional shape of the human body; and 2) if you place this body in a room with various items, you can easily determine the dimensions of these objects in relation to the body. And you will also already know that all these objects have their own volume and shape.
Let's return to the topic - Building a hand.
The hand has two volumetric convexities: one is at the base of the thumb (B), the second is the palm (the remaining part of the hand) (A). Double rows of finger bones, or carpal bones, are connected to the hand, creating a single unit. The wrist does not exist separately, and it is not attached to the hand with a ball-and-socket joint, like in wooden dolls. The movement of the hand starts from the wrist. It tapers slightly at the junction with the forearm. The wrist can also be considered a universal connector because it moves in all directions - up and down, side to side, and can rotate.

The center of the palm is slightly lower than the rest of the hand. For example, if you place your arm straight on a table, palm down, you will notice that your wrist does not touch the surface of the table. You will notice that the wrist rises where it connects to the hand.
The area of the thumb is significantly larger than the area at the base of the little finger. The hand is wider at the base of the fingers than at the junction with the wrist: however, closer to the wrist it is higher. Now pay attention to your hand: your palm is longer than yours reverse side. The thumb is attached to the palm by an independent and highly mobile ball-and-socket joint, which allows it to actively move independently of the rest of the hand. The palm consists of elastic and soft areas - pillows. The surface of the fingers and the entire palm are covered with many pads. The tips of the fingers are pointed, the middle finger - the longest - is the most high point brushes The pads on the fingertips are pointed so that they are directed towards the middle - towards the middle finger. If you measure the length of your thumb from the top side, it will be equal to the length of your middle finger. The thumb is more powerful than the rest. The components of the fingers are more square in shape than it might seem at first glance; on the last square is the nail, almost triangular in shape, with bulges on both sides, forming the place where the nail grows. You will better remember the structure of your hand if you study the structure of the skeleton of the hand, after which problems with drawing your hand will never arise again.
Knowledge of the structure of joints, their movement and limitations in movement is very important. The first joint of the thumb and the first two joints of the remaining fingers are hinged. They can only move up and down, but not sideways or rotationally. When you spread your fingers, the topmost knuckles of each finger bend back. The lower knuckles of the fingers will bend forward, while the upper knuckles or fingertips cannot be bent even at right angles. Note that the top two hinge joints can only bend at 90 degrees. The lower joints of the fingers, like those on the wrist, are ball joints. There are a ton of hand positions and structures for you to learn. Even when you are drawing, you can use your free hand as a model. Place a mirror in front of yourself and it will give you more possibilities study the positions of your free hand.
1. The first step when drawing a hand in motion is the position of the fingers and hand. Draw the hand in motion and determine the approximate position of the hand.
2. Then highlight the volumetric areas - divide the brush into parts, this will help you determine where the convex and where the flat areas are.
4. Finally add shadows.

Remember this lesson, buy an anatomy textbook and study it. You could study the structure of a hand forever, and you might never be able to draw a hand in the same position twice. Every time you practice drawing a hand, you learn something new. Remember, your hands are just as important as your face. And they require the same attention and close study.
I hope you find this tutorial helpful.
Happy work!
This lesson is related to "How to Draw a Person" and if you look in more detail, in this lesson I will tell you “ How to draw a hand»
First, we should pay attention to our hands. They consist of three parts: the shoulder, forearm and hand. Each of them can be depicted as ovals, or you just need to learn how to draw a hand right away. If you are depicting a lowered hand, then the fingertips will reach the middle of the thigh, and the elbows will be level with the waist.
So we looked at the method with a simplified hand shape, now let’s improve it so that it looks more natural. When you draw hands, you don't want to draw them too straight. We start with the shoulder, it has a smooth bend, near the elbow the arm narrows a little and widens again in the place where the biceps is located.
The elbow will be somewhat difficult to draw, because it is not just a bend, it is a connection, a hinge.
Next is the brush. Let's imagine each of the segments as a cylinder, and now turn your hand over, palm up, and you will see three almost identical segments on each finger. Well, because all the fingers are different in length, the pads and folds that are between them do not line up in one line.
Let's get started draw a hand from the joints of the fingers from the bones. The first joint is the largest of all three. The second joint is located between the two (in the middle), it is smaller and shorter than the first, but longer than the third joint - the tip of the finger. It is not possible to draw all fingers using this method, since each finger has a different length.

On top of the phalanges of the fingers you need to draw straight lines, and on the side of the palm - rounded.
But let's not forget that a man's hand is slightly different from a woman's. Male hand more massive and more sinewy. There are three options for drawing a hand: Muscular, toned and weak hand. 
What conclusions can be drawn from this lesson?! There is only one conclusion: draw a hand not as difficult as it might seem at first glance
The human hand seems to be the most difficult to learn to draw, as it can take many shapes and express different emotions. Animation is no exception. You will have to learn to draw hands in different angles so as to show them in dynamics and attract the viewer’s attention to them. Don't underestimate the power of a well-drawn hand in animation - it will save your work from monotony!
What you need to know
In the comments to my courses, I was asked several times how I draw characters in different poses and with different expressions. The point is that with experience you will begin to develop your own drawing style. Without other people noticing, you will have your own little tricks. These tricks are the poses and expressions you'll use more often than others, as well as certain hairstyles and clothes you'll be best at drawing. This is quite common and professional artists resort to this secret all the time!
However, this is very difficult to achieve in hand drawings! Let's take the head as an example. The only moving part there is the lower jaw. We can change facial expressions, but the eyes, nose and mouth remain in place (at least in real life!) With the hand everything is different. With any new movement of the brush, everything changes radically. In fact, in a scene with dialogue, the facial expression may barely change, but the hands will move very actively and at different angles.
The goal of this activity is to turn a human hand into a cartoon hand, so let's not waste time learning the names of the bones and muscles of the hand. (On the Tuts+ platform, by the way, you will have extensive opportunities to learn this too). We, in turn, will try to find a simplified way to draw a hand in a way that is practical and effective.
1. The hand in its most simplified form
 "Mom, hi! I'm on the Internet!"
 The hand is made up of a variety of bones, especially in the fingers. This means that all fingers are different sizes and can bend in different ways. different directions. For this reason, it is important that you learn to draw a hand in the most simplified way possible and be able to look at it like a small puzzle with a few key pieces. Let's try to divide it into blocks:
Step 1
Let's start with the back of the hand. Let's draw a simple semicircle:

Step 2
Now let's draw a triangle that is attached to one of its sides. Like this:
 Calm down: we are not drawing a cup of tea!
 Step 3
Above the triangle we will draw something resembling the tip of a knife.

Step 4
It's time to draw the fingers. IN mirror image draw the first shape at the top. "Puzzle from the hand" is ready:

Step 5
Great! All that remains is to fill in the missing details with soft contours:
 The outline of the thumb is the trickiest - it needs to be gently combined with the center of the palm.
 Note that the fingers have different formats due to differences in their sizes.
2. At a glance
You need to know a few more details of the palm. Let's take a look at them:
Step 1
Again we repeat the process above, following the basic pattern:

Step 2
Something new appears - the palm now looks a little more complex, and there are characteristic differences in its shape that need to be taken into account. Fortunately, a few simplified forms are enough to show it.

Step 3
Now we can add outlines to complete the drawing with the necessary details.
 Please note that we end the sketch with soft, rounded lines. Think of the palm of your hand as a delicate sculpture.
 Profile view
When the hand is turned in profile, we can see the prominence of the muscle at the base of the thumb.

The more “childish” your drawing style is, the simpler and smoother your lines will be. Here are my little secrets that helped me understand that hands can be drawn based on simplified shapes. The most important thing is to strive for a style that will reflect personality and dynamics in the drawings at the final stage.
3. More shapes and a 3D hand
Now you can draw a flat hand for the rest of your life, right? If you want to draw hands with convincing depth, use the same technique above, just change the camera angle! Play with this technique until you feel confident.

To form your fingers, imagine them as cylinders stacked on top of each other. This technique will help us draw fingers from different angles, because with its help it is easier to “see” the hand in space.
 Hand or robot?
 The shapes into which a human hand can be formed are countless. When the palm is open, the same rules apply; when closed - others! The same thing happens when the hand holds an object, and it must adapt to its shape.
Let's learn how to draw a fist. A slightly different process, but in the end you will see that it all comes down to a simplified drawing of the basic geometric shapes.

Step 1
To begin with, we simplify the bend of the little finger, draw something similar to the letter “u”.

Step 2
We kind of “wrap” the little finger around the letter “y”. Don't forget to highlight the curve that goes from the little finger to the wrist.

Step 3
We continue to draw fingers in space. This time we draw only three fingers. I'll explain why later.

Step 4
Lastly, draw the thumb and the protruding muscle at the base of the thumb.

Step 5
Fine! In a few steps we have completed a simplified drawing of a fist on one side. See how the shape of a fist can be roughly depicted using “boxes” different sizes.
 Notice how you can fit the outline of a fist into three-dimensional rectangular shapes in space.
 Obviously, if we try to simplify each hand position using various techniques, we will quickly get tired. Therefore, remember that the real secret to simplifying a hand drawing is observations from life.
 View from the opposite side: simplified drawing.
 4. The Fab Four
It is common in animation to draw characters' hands with only four fingers. This allows, in addition to enhancing the character’s dynamics, to make the artist’s life easier. This way he doesn't have to worry about too many details.
 Hands with four fingers of different styles and sizes.
 Note: When using this technique, you will need to adapt your knowledge of a five-fingered hand to a four-fingered one. Concepts need to be adapted to achieve a suitable and interesting result.
It is worth paying attention to your fingertips. In animation, the more rounded and movable the fingertips are, the more interesting and dynamic they are. When you create characters, think of their hands as if they were separate characters!
 See how this hand has its own character?
 Another good reason to draw hands with four fingers: in this case, you have the opportunity to increase the size of the fingers, which means making them more expressive! A number of famous cartoon characters able to stand out thanks to this technique: The Simpsons, Bugs Bunny, The Flintstones and Mickey Mouse.
The Mystery of the Little Finger
One of the most big secrets The design of such a brush is to make maximum use of the little finger! If you place it at a different angle in relation to the other fingers, you will break up the monotony in the perception of your hand.

 Highlight the position of the little finger in the frame. See how the nature of the action changes with this technique. The viewer's attention is now focused on the main subject in the frame, and the character's personality is given a special twist.
 5. Talk to your hand
When we need to express emotions in an animation drawing, the role of hands is irreplaceable! Look at the images below: the hands visually support and echo the characters' facial expressions and body language.

- "I have an amazing idea!"
- "How do I look, honey?"
- "I can't believe...I'm being awarded an Oscar!"
- “I don’t understand anything... he was just here!”
- "Ahhh! My head is pounding!"
No matter how strange it may seem, hands have their own character! Not only do they maintain facial expressions and body language, they can express their own emotions!
 Do you see the greatness in these gestures above?
 However, you will often find yourself in a situation where your hands should not distract attention. In this case they should be minor character. Characters in action scenes tend to be exaggerated more than characters in quiet scenes.
 Notice that in the dramatic scene there is little movement. There is no room for exaggeration here. Hands should emphasize the feelings of the characters - this is one of the most complex processes in design.
 6. Test of knowledge
I have prepared a short test to test your powers of observation. Analyze the pictures below and try to determine what feeling the best way describes each. Can you guess everything correctly?
 Can you guess what the hand expresses in each of the drawings?
 Raise a hand!
Now you know all the secrets of the art of drawing cartoon hands, congratulations!

Although hands are a very fun part of the body to draw, the ability to create hand designs in different styles is not so simple, and only with the help of hard training can you achieve natural results. Even if your goal is to draw for animation, it doesn't hurt to buy a good anatomical atlas to understand how the muscles and bones in the hands work. There is no need to memorize each one in detail. It is enough to understand how the hand works in motion. Remember that a character's expressions are much more important than what's underneath the skin.
Last tip: When you need to draw hands, place your own hands in front of a mirror, or just watch your hands. One of them will remain stationary while you draw (unless you've learned to draw with both hands at the same time!)

The brush is probably one of the most complex parts bodies for drawing and causes a lot of trouble for illustrators. Let me remember again the book, where she admits that many artists spend half the time allotted for creating a sketch drawing hands. The artist Gustavo Fernandez once said that you can make a good career only through the ability to draw your hands well and expressively.
To build a model of a hand, you can use the same principle: first the frame, then the flesh.
Four bones radiate from the wrist, the continuation of which are the fingers, divided into three phalanges. Middle finger the longest, index and ring ones are approximately the same length. The thumb is attached to the hand at the wrist:

One of the most difficult aspects in constructing a palm is where the fingers are attached to it. The most convenient technique was given to me by Natasha Ratkowski: you need to designate your palm in the form of a segment of a coconut shell, immediately determining its volume.
You also need to draw balls in place of all the joints. The fingers are marked with cylinders of suitable thickness:

The conditional model obtained in this way is outlined, the phalanges of the fingers and protruding knuckles are indicated in the right places:


Using this principle, you can build a hand in any position. When outlining the base, you should try to give your fingertips and nails a beautiful natural shape. If the palm is clenched, you should draw folds that form in the middle. There is a muscle around the thumb that does not contract and is always indicated by an arch.
Cartoon hands are still easier to implement because they do not require such realism in the image, but there are still rules that will make them the most attractive. This collection contains all kinds of examples of drawing hands + drawing recommendations from various sources.
Christopher Hart "How to Draw Everything You've Learned About Cartoons":


Hands of the main characters of the animated series Homer, Bart and others.


")


- Abstract: Elementary particles
- Presentation on the topic "management"
- History of the development of computer technology presentation for a lesson on the topic Historical development of computer technology presentation
- Astronomy Presentations Interesting Topics for Astronomy Presentations
- Presentation on history "counting years in history"
- Astronomy Presentations Astronomy Presentation Template
- The anniversary of the expulsion of the Karachais recalled the problem of rehabilitation of repressed peoples
- Udmurt people What peoples live on the territory of Udmurtia
- Russia is a multinational state We live in a multinational country
- The smallest peoples of the world Which group of peoples is the smallest
- How to change a cash receipt order in 1c
- Day of Remembrance of Fallen Russian Internal Affairs Officers Heroism of Police Officers
- Northern coast of Neva Bay
- Enviable beauties in politics (17 photos)
- The best ballet performances
- Biography, political activity
- The magical world of crystals
- How to salt milk mushrooms: a quick recipe
- Ten Surprisingly Profitable Illegal Trades
- Management project based on the example of an enterprise presentation