Drawing a portrait in cartoon style. "we draw semi-realistic portraits" Portrait in cartoon style
In this tutorial I will show you how to draw a portrait of the writer Edgar Poe with his beloved cat Pluto in a cartoon style, using standard brushes.
Final result
Step 1
Create a new document with the following dimensions: 1800px height and 1200px width. First we'll set up the brush we use to create the main lines. In the brush set, select brush number 30, Hard round(Hard Round) Opacity(opacity) brushes 75%, Pressure(Flow) brushes 35%.

Step 2
Now, go to settings Brushes(Brush Presets (F5) To apply the following settings, check the option Dynamics of shape(Shape Dynamics) and Broadcast(Transfer), and also set the value Interval(Spacing) 1%. You can see the final shape of the brush in the screenshot below.

Step 3
Create a new layer, name this layer “Poe”. Using the brush we have set up, start painting the face, neck, shoulders. Vary the size of the brush, use thicker strokes for clothing, thinner strokes for the face, hair and neck. Apply smooth strokes without paying attention to details later using the tool Eraser(Erase Tool), hide the extra areas of strokes. Using a tool Eraser(Erase Tool), create the pupils.

Step 4
Next, create a new layer. Name this layer ‘ Body &Pluto'(Translator's note:‘Body and Pluto’). Draw the body of the writer and the cat Pluto. In the screenshot below you can see that the strokes simply define the basic shapes using common features instead of precise lines. Also, using the tool Eraser(Erase Tool), delete certain areas, such as Pluto's eyes and Poe's fingers.

Step 5
Create a new layer. Name this layer ‘ LowerBody'(Translator's note: Lower body). Paint the area between Poe's body and Pluto. This action will help separate the two elements of the composition so that they do not merge together. Notice the area that is erased to the side of Pluto's head.

Step 6
Now, let's create our own watercolor brush. On a new layer, paint two brush strokes as shown in the screenshot below using a soft round brush. Please note that the strokes are not symmetrical, this will improve the final result. Next, let's go Editing - Define Brush(Edit > Define Brush), we can name our brush “watercolor”, now the brush will appear in the brush set, ready to use.

Step 7
Next, in settings Brushes(Brush Presets (F5), apply the following settings, check the option Dynamics of shape(Shape Dynamics) and also set the value Interval(Spacing) 1%.

Step 8
Next, check the option Diffusion(Scattering), set the settings as shown in the screenshot below. Same for option Broadcast(Transfer). In the preview you can now see the shape of the brush.

Step 9
Finally, check the option Double brush(Dual Brush), select brush number 45 with the following settings, which are shown in the screenshot below. So, our watercolor brush is ready for use.

Step 10
Select a tool Finger(Smudge Tool) and using a watercolor brush, smudge the strokes that we drew earlier. Vary the value Intensities(Strength) to obtain the desired result.

Step 11
Create a new layer. Name this layer 'Details'. Using a hard round brush, paint small parts, such as a cat's whiskers, as well as individual hairs of fur. Next, using the tool Finger(Smudge Tool), select a soft round brush, add fur to the cat using a small diameter brush.

Step 12
Next, we'll create another brush, this time a texture brush. Using brush number 30 as your base brush, apply the following settings to the options Dynamics of shape(Space Dynamics) and Diffusion(Scattering).

Step 13
Apply the following settings for options Broadcast(Transfer) and Double brush(Dual Brush).

Step 14
Select a tool Eraser(Eraser Tool), install the brush we just created. Using an eraser, work around the edges of Poe's jacket to simulate a watercolor dry brush effect.

Step 15
Next, create a new layer. Name this layer 'Pluton's Eyes' ( Translator's note: eyes of Pluto). Draw the pupil of the cat, yes, do not forget that we will only have one pupil....and also draw shadows on the eyeball. Using a brush white, draw the fang, and also make the eye lighter.

Step 16
To create shadows on Poe's face, select brush number 30. Apply the settings shown in the screenshot below.

Step 17
To create shadows on Poe's face, create a new layer. Name this layer 'Poe Face Shadows' ( Translator's note: Shadows on Poe's face). Set the blending mode for this layer to Normal(Normal), layer opacity 60%. Start painting shadows on the cheeks, chin, eye sockets, etc. Apply a few strokes to achieve a darker shade.

Step 18
Now, let's create the background. Create a new layer below all the other layers we have created. Name this layer 'Background'. Select a tool Gradient(Gradient Tool), select a brown tint as the gradient color, the gradient type is from base color to transparent. Drag the gradient from bottom to top as shown in the screenshot below.

Step 19
Next, we'll add some highlights. Create a new layer, name this layer ‘Highlights’. Using the brush we created in Step 16, brush color white, paint the highlights, I chose the center lighting so it affected the top areas of the image as shown in the screenshot below.


Step 20
To add a vignette effect to the background, go Filter - Distortion - Distortion Correction(Filters > Distort > Lens Correction), in settings Vignettes(Vignette) install Effect(Amount) darkening -40, this will be enough.

Step 21
To create the Paper texture, we'll add an actual paper image. Create a new layer, name this layer ‘Paper Texture’. Change the blending mode for this layer to Multiplication(Multiply), layer opacity 30%. Next, copy/paste the Paper texture onto this layer.
Translator's note: Place the Paper texture above the gradient fill layer.

Step 22
Next, we'll add a highlight effect behind the Poe image. Create a new layer, name this layer 'Highlight'. Change the blending mode for this layer to Replacement with light(Lighten), layer opacity 50%. Using a tool Oval area(Elliptical Marquee Tool), draw a circle. Place the circle behind Poe's shoulders. Fill the created circular selection with white. Next, let's go Filter- Blur- BlurByGauss(Filter > Blur > Gaussian Bluer) and blur the edges. To prevent the white glow from overpowering Poe's image, use a layer mask to hide the extra areas.

Step 23
We continue adding textures. Create a new layer, name this layer ‘Watercolor Texture’. Change the blending mode for this layer to Replacement with light(Lighten), layer opacity 80%. Copy/paste the watercolor texture onto the created layer. The result should be like the screenshot below.

Step 24
Add more texture…..Create a new layer, name this layer “Worn Texture”. Change the blending mode for this texture layer to Soft light(Soft Light), layer opacity 80%. In the same way, add another watercolor texture to give the painting an aged look. Note that the textures are placed below the Po and Pluto layers to keep their images clean on the remaining surface.

Step 25
The lesson is almost over. Create new group, move all layers into the created group. Next, save the working image in .JPG format, and then open the saved file in our working document, placing it on top of all other layers.

Step 26
Using a tool Clarifier(Dodge Tool), lighten certain areas of the image a little to add contrast. It is good to use a watercolor brush for this purpose.

Step 27
Let's add the vignette effect again, let's go Filter - Distortion Correction(Filters > Lens Correction), set the vignette darkening value to -30.

Step 28
Finally, we'll add a little noise effect to our painting. Create a new layer, name this layer “Noise”. Change the blending mode for this layer to Multiplication(Multiply), fill this layer (Shift + F5) with white. Next, let's go Filter - Noise - Add Noise(Filters > Noise > Add Noise), set the noise amount between 8 and 10, this will be enough.

I will try to express my thoughts accurately and simply, despite the fact that I am aware of my stupid habit of explaining everything in too much detail :)
So. These are the three who were ruthlessly chosen to become victims of my artistic abilities. I apologize in advance.
3 golden rules in drawing:
Find images of the person you will be drawing from different shooting angles. Despite what you may think, a face can change a lot depending on the angle you look at it from!
- Find distinctive features your character! Eyes are always the most important part when determining character, but the nose, mouth, and other facial features are also equally important. Think about it: what makes your character so unique? Since you will be simplifying his or her face, it is very important to emphasize who he or she really is.
- Compare with another character. For example, if you are unsure about the process of drawing his/her eyes, try comparing his/her eyes with the eyes of another person! Believe me or not, you will immediately notice the differences and then working with the character will become even easier.
Cillian Murphy / Robert Fisher Jr.
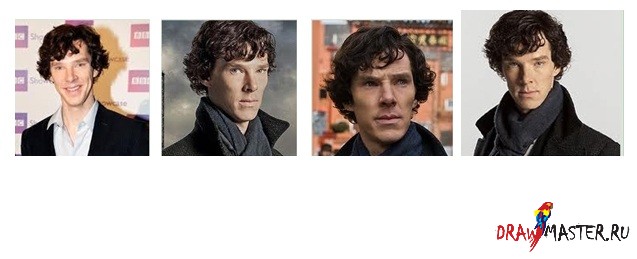
Set of images. Collect photos from different perspectives.

And for God's sake, look for BIG photos. These images were taken as an example for the lesson, I actually can hardly see his face in these pictures :)
Identify facial features!

Rest:
Light shadow under the eyes
-Eyes and eyebrows are set close together
-The bridge of the nose is straight. Triangular.
-An angular back of the head
Make a sketch
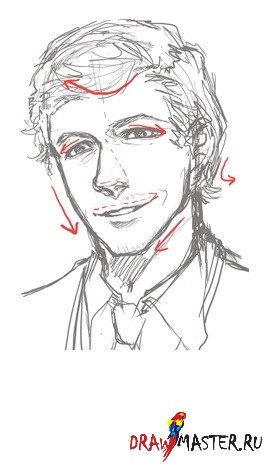
Not forgetting everything described above, start drawing a sketch. Since this is NOT realism, don't be afraid to highlight or exaggerate certain aspects. In this case, I made his eyes larger and his cheekbones more pronounced.
Also: don’t forget about emotions! A person’s face sets the initial perception of him by others. Murphy's Fisher looks serious, cautious, and perhaps even a little tired and worried. In order to convey all this, I arched his eyebrows a little, the line of his lips is vague, and his eyes look tired.

Lineart and shadows
It's very hard for me to catch the right expression faces without applying shadows.
I use shadows to make his eyes more expressive (make them sunken), highlight his cheekbones, hair movements, triangular nose, etc. Oh yes, and his lips :)
I can say that the work is more or less finished. You ALWAYS need to concentrate on the eyes, I don’t even know how else to convey the importance of this xD I repeat that it is the eyes that define a person, regardless of how well or poorly drawn the rest of the facial features are. If you ruin the eyes, you will ruin the whole portrait.

Benedict Cumberbatch / Sherlock Holmes
I've already described the process, so I won't go into detail this time unless it's absolutely necessary.
Collect photos.
Identify facial features
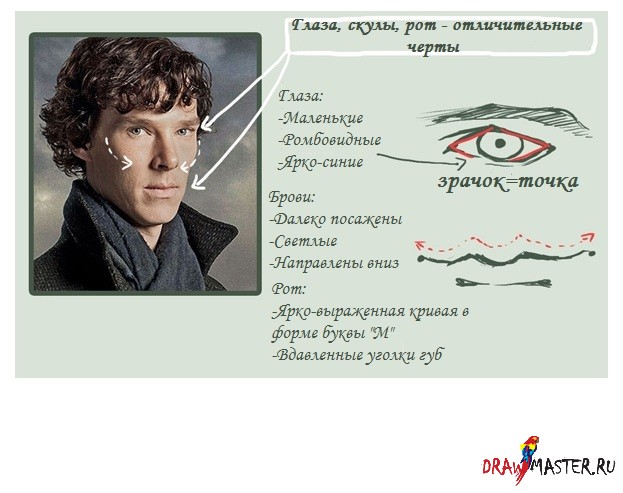
Rest:
Rounded nose
-Hair is quite curly
-The face is significantly lengthened and narrowed
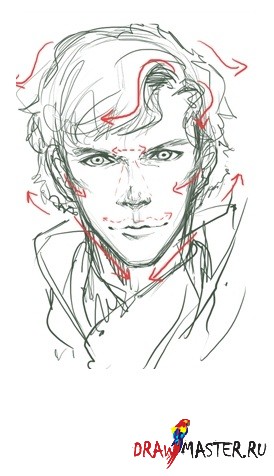
Make a sketch
In this particular case, Benedict as Sherlock looks confident, anxious (mostly due to his intense gaze) and perhaps a little cynical. And so if I draw him with a cheeky grin, it will match his character. Extend your lip line a little to highlight it!
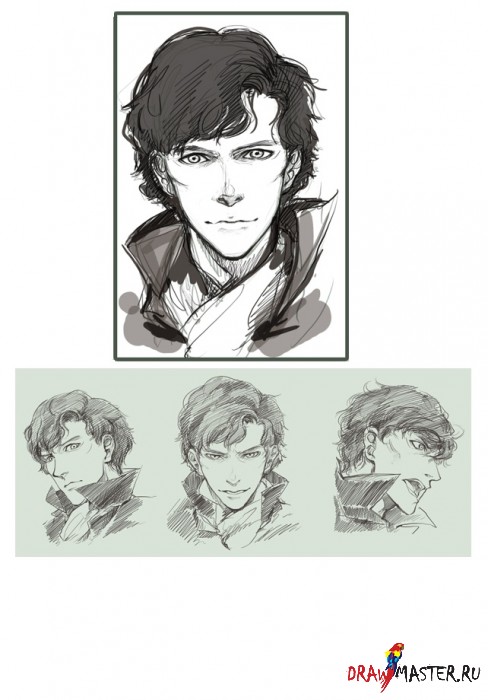
Lineart and shadows
Something is wrong here, maybe I edited his eyes poorly.
Or is it because I went too far with the shadows and that's why he looks a little older than usual xD
When I think about it, it starts to make sense: Benedict is naturally fair-skinned. I'm not even talking about the fact that he's not that old. This means that the number and thickness of lines must be kept to a minimum, otherwise too much shadow will create the appearance of wrinkles.
I was in a bit of a hurry here, so it looks a little rough. Perhaps if I traced it again, the portrait would look better =v=
Click on the picture to view the image in full size and 100% quality.
Simon Baker / Patrick Jane
This place was originally reserved for Hugh Laurie (House) :), but I thought that I was drawing too many men with high cheekbones, not to mention House's character, which is LITERALLY 99% COINCIDENT WITH BENEDICT'S CHARACTER >_>
So here's Simon Baker. I love his smile.
Collect photos.

Identify facial features

Rest:
When she smiles, bags appear under her eyes
- Dyed hair (creates a noticeable contrast)
- The hair on the back of the head always curls
Make a sketch
Baker's Patrick is quite open, friendly, cheerful, and based on the fact that he smirks rather than smiles, he looks ironic and cunning.
And if I make his smile a little lopsided, it will only enhance this effect.
Don't forget that he has a beard (at least draw it on his cheeks), even though it is so light that it is practically invisible. If I don't draw a beard, he will look too young.
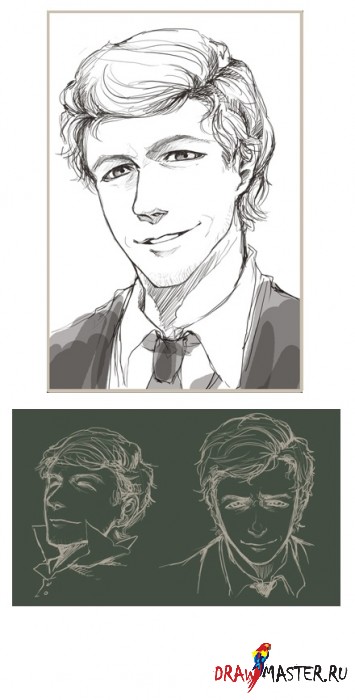
Lineart and shadows
In the end, I didn't draw the stubble above the lip. Everything looks great anyway, so I left the drawing as it is.
Also, since his smile is perhaps his business card, don’t be afraid to add folds on the sides of the lips. This is such an outstanding feature of his face >u
In general, that's all.
Did I mention that I adore his smile?
Click on the picture to view the image in full size and 100% quality.
Of course, if I had more time, I would give more examples xD If you have questions, ask them and I'll see how I can help you!
Oh and I apologize for not including in this lesson female portraits. Perhaps if any of you are interested, I will tell you about them another time.
Thanks for reading! Hope this helps you!
One last note for everyone, especially for those who draw in anime style:
In general, those of you who want to learn how to draw realism, you need to get rid of the fear that you are afraid of “distorting the characters.” And I am sure that many of you understand what we are talking about, especially those who preferably draw in the anime style.
That is, no matter how beautiful a person is, HE WILL NEVER BE PERFECT. What I mean is that if you don't draw folds or wrinkles or anything else, he or she will look like a 10 year old :)
I know this can be very difficult to adapt at times as it MAY look wrong if you add such natural details. But remember that it's all about practice. At first, I was just like any of you, too cautious when it came to drawing real people. But once I realized that Leonardo DiCaprio looked like he'd had botched plastic surgery somewhere in Korea because I neglected the shadow under his bottom lip...well, I finally realized it.
The old saying never goes out of style: the master's work is feared.
So as long as you are able to accept that not everyone looks like Sephiroth or Cloud (approx. game characters Final Fantasy), then you can adequately draw =v=
And guess what? I think I'm on a roll, so I'll expand on my thoughts a bit below:
Make the mistake of looking at human face and ASSUMING that this is the so often drawn standard oval face.
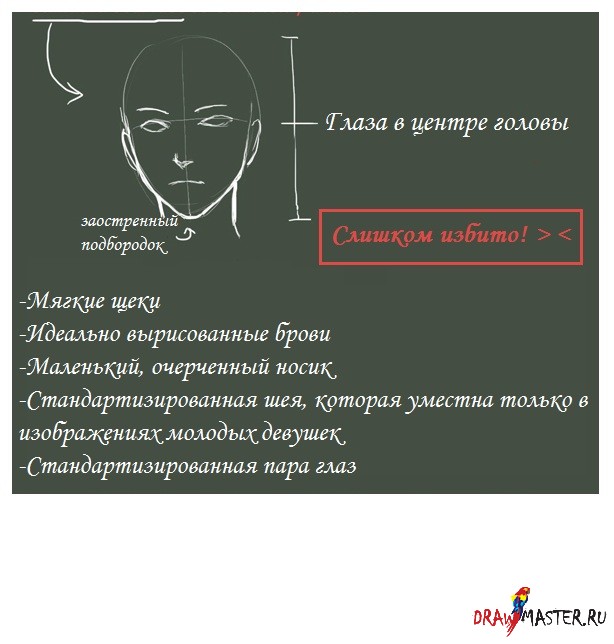
"But but but... it would look pretty weird if I drew him the way he really is. I mean, if I draw a very long face or pronounced cheekbones or..."
Perhaps if you imagine Benedict Cumberbatch with such a standardized face as shown above, you will understand what is REALLY wrong with him. He will look like a teenager!
“I can’t draw a nose the way it is in reality! This prevents me from adding a hump/nostrils and the nose turns out ugly and completely different from the one I copied from.”
Surely most people will agree with me that the nose is the most the hard part V realistic drawing and even I am not good enough at drawing it. If you don't control how much pressure you apply to the handle, especially on the sides of your nose, you'll end up with a very strange nose. Again, the usual thing: practice, practice and more practice!
If you want, you can start by copying my method for drawing noses, in which you shade the dark area under the nose. In this case there is no need to draw wings. This will only work for semi-realistic drawings. Of course, it's always better to find your own way of depicting realism, but never avoid them completely!

The main audience is children when we're talking about about caricature. A good cartoonist is one who can highlight the main details of an object or person and simplify the figure so that a child can recognize and be attracted to what they are viewing.
Your role here is that you understand how to correctly assemble this puzzle and definitely learn how to construct any drawing using this technique. I guarantee you will be shocked how easy it is to create cartoon characters that kids (and adults) will love!
Understanding Human Perception
The human being has a very interesting feature: We can synthesize the parts that make up a structure or object in a very difficult relationships in the most basic and simple. Thus, we can represent any type of thing through several curves and geometric shapes.
Can you tell me if the two images below represent the same object?

Strange as it may seem, you can look at two photographs and say, "that's a car."
It happens that, unlike artists, most people cannot tell from memory all the parts that make up a car, a dog or even a child. Therefore, they begin to associate basic and primitive shapes with specific characteristics of each object. How many 4, 5 or 6 year old children came home from school with two circles and some sticks on a piece of paper and said, “Here are mommy and daddy!”?

1. Let's create our first Character
The basic shape of a caricature is a circle. The circle is everything you need (besides love, of course). This is from a circle that indicates the basic proportions of the character's head.

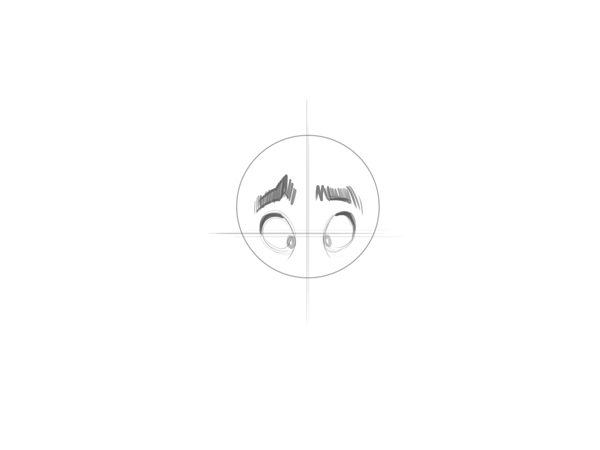
Once the circle is ready, it's time to trace the axis of the face. Draw a vertical and horizontal line intersecting in the center, as in the image below:

Step 1
For the eyes, draw an oval shape with a slight slant to the side at the top. Repeat on the opposite side. It is important to leave a gap between them approximately the same size as the eyes. Since we are in the editorial phase, you can make another eye in the center to serve as a measuring stick.

Step 2
At the top of the circle, slightly thicken the line, which will be the eyelashes of our character. Place your eyebrows slightly above your eyelashes to create a distinctive expression of surprise. The shape of the eyebrows is free and over time you will adapt to your own style.
Draw the eyes pointing towards the center (this is a very effective tactic used by major cartoonists, sole purpose which is to make our characters look prettier).

Tip: To give more life and "realism" in our eyes, you can draw a small line underneath to simulate the look of wrinkles. This is another very interesting tactic that gives a special flavor to our facial expressions.
Step 3
We have arrived at the most creative freedom the whole move. Think of it this way: In cartoon style designs, the main facial structure is the character's skull and eyes. It is at this stage where you will identify with outside world, IE, it is already clear to people that you are drawing character.
Now when we come to the jaw, we will decide what kind of character we want. Maybe an old man, a young man, and so on. My character will be young. So, let's design a proper jaw for it.

Step 4
When designing the nose, we look at it from the front; it is general so as not to use a lot of details. If you only draw its tip, it is likely that it already achieves a convincing effect. It is also a very common method to draw in detail only one side of the nose, away from the idea that it is the opposite side of the world.
Let's draw the right nose for our character.

Step 5
Since our character is a child, we'll make a cartoon mouth: something simple to simply represent an expression of innocence.
Please note that when composing the mouth small child, lips should not be done! In cartoon style, children, regardless of gender, have fairly simple mouths. A good and expressive trace already does its job.

Step 6
The ears are visible from the facial side view (because our hero is standing in front of the camera), so internal cavities will not appear. Then we will only do a simple shape using some basic perspectives (more on this later).

Step 7
The shape of our skull is already determined by the circle we made at the beginning, isn't it? So, we need a very simple and childish haircut to give life to our boy. Let's do it now.

I don't know how to draw hair! Help!
No one needs to be a stylist or fashion designer to get perfect hair. There is no The right way draw hair, so you'll have to try until you create the perfect haircut you want. Just remember that hair is responsible for defining the personality of our heroes. Oddly enough, hair can express age, conservatism... By the way... how's your hairstyle?! Oh never mind
An accurate quick and easy way to draw cartoon hairstyles is to find a photo online! I do this all the time: pick up a fashion magazine or search on Google. After finding the perfect style, place an example image next to your drawing board and start making a cartoon and simplified version.
Well, it seems we have completed our character successfully! Congratulations!
The pleasure of creating a cartoon character is immeasurable. Creating and developing a character involves more than just drawing their figure: each character has its own shape, personality traits and characteristics. It's great if you're already familiar with the basics of head proportions and depicting emotions. But this knowledge is useless if you don't know how to draw a character's torso. The artist must take all of these details into account in order to create a character that will look believable in the eyes of the audience.
There are several in animation various styles for characters such as "chump" and "bully". Want to know more about them? This is what I will teach you in this lesson.
1. How to Get Started
By the way, the steps we will take today are very simple. First, draw the basic shape of the figure and then add features and other body parts. This is a procedure that should be followed regardless of whether you are drawing a person or an animal, or even an object that you decide to animate (for example, make a smiling cup).
Every drawing you make will depend on your work during the sketching stage. At this stage, you should improve your sketch for now final result will not satisfy you.
Once you've decided on the proportions, the next step is to develop expression in your body movements, arms and legs. Just one hand position can tell a whole story.
 Hands are a vast and complex subject (even in animation) that deserve their own lesson.
 In short, there are no secrets in the character creation process. 95% of artists create characters, and they do it by going through certain stages because it makes the process much easier!
2. Proportions
Proportions are one of the most important factors to take into account when creating characters. An artist must remember the relative proportions of body parts because from this we determine the structural features of our characters. For example, a bully has a warlike character, so he will have a small head, but his chest will be very impressive! His arms and legs are strong and well defined, as are his large cheekbones. In contrast, the modest character is based on the proportions of a child, with a larger head compared to the body. And all this in round shapes! Other parts such as forehead and big eyes are responsible for determining the fragility of the individual. And so on...
Animation studios, for the most part, use rounded shapes to estimate a character's height. For example: A child's head, usually more sizes other parts. But an adult character has different proportions, which depend on the gender and physical form of the hero.


Psychedelic cartoon? It looks like it.
When designing (or animating) a character's body, it is recommended to sketch on separate sheets of paper. This makes it possible to have before your eyes a sample of its proportions when sketching other poses and actions.

Rotation example

It is very important to draw a character in various poses, situations and situations. different clothes, until you find it for him perfect proportions.

Examples of drawings of a puppy.
3. The body is a pear!
A common practice among designers is to use a pear shape - or similar objects - to construct the body shape, due to common associations. In fact, this is a common technique in animation studios, as several different artists can work with one character, and at the same time they must maintain the correct proportions.


The example above shows the effectiveness of this technique. Using one template, you can draw several different characters! The reason why pattern-based drawing is used is because it creates an instant association in a person. Especially in the case of children, when everything should be simplified to make it easier to understand. Drawing the body in the shape of a pear allows us to maintain a dynamic look and makes our hero more interesting!

4. Adding a Skeleton
Now that we know how to define the shape, we need to define the structure of the skeleton. If you are drawing any character in a cartoon style, you need to understand the basic differences in muscle and skeletal structure to different categories such as cats, birds and people. This knowledge is important and leading for determining the position of the hero's joints, such as elbows and knees.

Pay attention to the main elements: rounded shapes - pear-shaped body - position of the joints.
When it comes to animation, it's important to remember that we have to tell a story in every scene we create. This doesn't matter as much if we're talking about photographs or a realistic image. For the reason that people are amazingly able to hide their real motives.
In animation everything is different. Physical state and pose, your character should be able to "read" well without any dialogue or surroundings. It is for this reason that it is so fascinating and charming art style!


Learn to tell a story in your sketches and you will become a successful cartoonist.
To sum it up:
- Estimate your character's proportion using round shapes;
- Summarize the body using the famous pear rule;
- Follow the guide lines that show the basic position of the creatures;
- Finish building your character by adding the final elements to the basic structure you've built.
5. Pear Turn
Does the pear rule apply to all the characters we create? Not always. If we flip this shape, we will give a feeling of strength and power to our hero! Look at the examples below:


Fragile little man: pear-shaped body. Strong man: body is an inverted pear. Easy, isn't it?

Can you find the differences in the “pears” in this picture?
Another interesting analogy that characters can be based on is objects that resemble certain physical forms, as in the example below:

In principle, we also use the pear rule. We just use different forms based on the same technique. You, as an artist, can use the method that works best for you!
6. Character Blockhead
A "boob character" is one that walks on two legs (even animals) and looks stupid, clumsy, and generally lazy.
This character is often portrayed as a coward. They usually try to stay out of trouble than everyone else. He can also be presented as a nerd or a frustrated guy.

There is a template that can be followed when creating this type of character, but it is not a defining rule, and can vary depending on the character of the hero.
- The heads are thinner;
- Large noses (or muzzles, if an animal);
- Big teeth;
- Narrow shoulders;
- Virtually no chin;
- Pear rule (never upside down, always up!).
Basically, these are the basic elements needed to create a dummy. Play around with it until you perfect the technique enough to apply it to any character.

What? A lion on two legs? Wait... is that a lion dunce?
Not all animals that walk like humans are "boobs." Many of them have a sarcastic or ironic tone. As an example of such characters, we can recall Woody Woodpecker and Bugs Bunny.
7. Let's Apply Our Knowledge: Creating a Heroic Character
Now we will draw a character together based on what we have learned. Let's get started!
Step 1
I'll start by drawing as a very rough sketch. Don't be afraid to sketch until you find the perfect proportions. It's like a game!
We started by drawing the head and body using round shapes:

Notice that we defined the proportions of our character without special effort.

Note that we used the inverted pear rule here because... our hero is strong!
Step 2
Now let's add lines showing the position of the skeleton joints. Notice that we are giving our hero a common pose where the body weight is transferred to one leg.

It is very important to mark the pelvic area in a bowl shape because this will make it easier to see the movement. This movement in the hips will add dynamics to the pose.
Step 3
Great! Now let's add facial features and muscles for our hero.

My mouth is watering... And this is just a sketch!
To build muscle, you need to have a basic knowledge of anatomy. Otherwise, it will be difficult for you to properly add volume in the places where it is needed.
Step 4
After general structure determined, we can add clothes.

Great! Our hero is finished! By adding a costume and some great accessories, we achieved a great result. Can you tell a story with this picture?
Great Job, You Done It!
Well, that's all! We went over the process of drawing a character's body in a cartoon style. Moreover, we learned to use round and oval shapes to shape the character's body. We also learned the differences that make up the heroic/strong/bully type and the helpless/fragile type, and how to apply the punching bag technique to achieve these results. And finally, we discovered how to apply the boob technique to people and animals. And to top it all off, we created a heroic character from scratch!

Are you already convinced that you can draw cartoon character from head to toe? I'm looking forward to meeting him! Share your drawings below, and if you still have any questions, I will be glad to answer them in the comments.


- Desk audit: developments
- Conditions for performing the stern experiment
- System status and processes
- Alexey Sergeevich Obukhov development of student research activities
- Mars 4th planet of the solar system
- Human organ systems
- Experimental methods for recording elementary particles
- What is the Swedish match famous for?
- The best self-propelled howitzers Russian artillery
- Fedor Petrovich Litke: second circumnavigation of the world
- The first pharmacy was opened
- Creative competition: we enter the Faculty of Journalism of St. Petersburg State University Bachelor's training programs
- Management of a modern school using the example of creating an educational cluster
- What does individuality mean?
- What does a person’s individuality depend on?
- Issues of formation of a cluster education system in the Russian Federation
- Unified State Exam tests in literature What is included in the Unified State Examination in literature
- How to pay transport tax for legal entities
- Card for individual accounting of the amounts of accrued payments and other remunerations and the amounts of accrued insurance premiums Card for insurance premiums per year
- Error when filling in Contour