With a brush and color in Paint. Painting entire areas. Paint Bucket Tool Point Fill
To watch the video tutorial, click on the miniature screen.
You will learn:
- That you can fill it not only with color, but also with texture.
- How to use Define Pattern to create a pattern fill.
- How Content Aware fill works in CS5.
- How to add clouds to a photo with a broken sky.
- How to use the Gradient Editor window.
- How to add sunset colors to the sky and create your own gradients.
- How to create patterns using a gradient.
- How to add a rainbow to an image using a gradient.
The Paint Bucket tool fills an image or selection with color foreground or texture. Shortcut key – G. 
Fill(Fill)- There are two types: Foreground(Foreground Color/Main Color) - the main color and Pattern(Sample/pattern/regular)- pattern, texture. For some reason, in Russian CS4 and CS5 were translated as regular.When selecting this  parameter, the image will be filled with a pattern, which you can select from the list or load new sets by clicking on the arrow in the upper right corner.
Mode(Blend Mode)- pixels change depending on the selected mode. The textbook has five lessons that talk about each mode in great detail. Opacity(Opacity)- fill opacity;
Tolerance– from 0 to 255. At 0, only pixels that exactly match in color will be painted over, at 255 - the entire image.
Anti- aliased(Smoothing)- softening the unevenness and roughness of the edges of the fill;
Contiguous(Adjacent)– If you check this box, only pixels adjacent in color will be filled. If you uncheck the box, the pixels in the entire image will be filled in. 
If you don't want to fill the transparent areas of the layer, click on it in the Layers palette.
Create your own pattern.
To create your own pattern, select a rectangular area in the image, select the Edit command - Define Pattern, enter a name and click OK. Deselect the area. The created pattern can be found at the very end of the list in the pattern selection panel.
Fill Content Aware.
This tool can be considered one of the main achievements of the version developers C.S.5 . It replaces in one motion several steps that previously had to be performed to remove unnecessary areas in the image. In most cases, the background is restored as if nothing was blocking it.
Draw a lasso tool around the object you want to remove from the image. For best results, the selection should cover the background area slightly.
Menu Edit(Editing) – Fill(Perform Fill). In the appeared  window, select . Replacement occurs using the method random selection. Therefore, if you are not satisfied with the result, cancel the fill Ctrl +
Z and repeat it again. Or after filling according to the content, deselect Ctrl +
D and circle the new area that the program filled in incorrectly.
window, select . Replacement occurs using the method random selection. Therefore, if you are not satisfied with the result, cancel the fill Ctrl +
Z and repeat it again. Or after filling according to the content, deselect Ctrl +
D and circle the new area that the program filled in incorrectly.
Compare, in the middle picture the person was removed using the tool Patch(Patch), and in the picture on the right using a content-based fill: 
It often happens that when panoramas are stitched together, white and black edges remain. Select them with the Magic wand tool ( Magic wand). Then fill based on the content. The program itself will fill in the missing pieces.

The possibilities for a new fill are not limitless. For example, you won't be able to remove a radiator from a photo if you just select it and use the Content Aware fill tool.
You will have to additionally protect the person with a mask. You can learn in detail how to work with masks in the lessons on masks. In my textbook, three lessons are devoted to this topic. Now I'll just briefly tell you how to do this: Create a copy of the background layer. For convenience, turn off the visibility of the background by clicking on the eye icon. Click on the mask thumbnail in the Layers palette. Select the black Brush tool. Paint the lower body and arms. Switch to the layer thumbnail. Go to the menu Edit – Fill. In the window that opens, select Content Aware and click OK. Turn on the visibility of the bottom layer and flatten the layers.

The scope of application of this tool is very wide. This is both the creation of shadow and ![]() adding sunset colors to the sky, and creating a smooth transition from one design to another using a gradient mask, etc. etc. A smooth transition of colors is created automatically; you need to set the extreme colors. These colors are set as Foreground (Front color plan) And Backround(Background color). You can find this tool in conjunction with Paint Bucket.
adding sunset colors to the sky, and creating a smooth transition from one design to another using a gradient mask, etc. etc. A smooth transition of colors is created automatically; you need to set the extreme colors. These colors are set as Foreground (Front color plan) And Backround(Background color). You can find this tool in conjunction with Paint Bucket.
Let's look at the options panel:
Gradient- creates a fill with a smooth transition between several colors.
There are five types of gradients:

Mode - pixels change depending on the selected mode. Lessons 16 through 20 cover each in great detail.
Opacity - gradient opacity;
Dither (Color dilution) - imitate more colors;
Reverse - geometrically flip the gradient;
Transparency - use transparency.
Many good and different gradients
Click the arrow in the upper right corner. A list will open in which  additional sets of gradients are located. Choose any of them.
  A window will appear in which you need to click Add(Add), if you want to load new gradients, leaving the old ones in place, or click OK and then the new ones will load instead of the old ones.
Also in this list there is an opportunity to download additional gradients (for example, downloaded from the Internet to the Program Files\Adobe\Adobe Photoshop CS….\Presets\ Gradient folder).
Gradient Editor Window
To open this window, double-click on the gradient sample in the tool options menu.
 In this window you can configure a gradient fill or select from the list Presets. Clicking the button Load… (Load…), you can load gradient sets (file extension .grd) or use the Save.. button to save your own gradient set. In order for the gradient you created to appear in the Presets window, give it a name in the Name field and click the New button.
Name– this field indicates the name of the selected gradient. If you change the settings, the name will change to Custom and can be changed for later saving;
Gradient Type – You can choose from two options: Solid and Noise.
Solid – creates a smooth transition between colors;
Noise – the gradient will appear as a random combination of lines of any colors. Clicking the other option button will load the next random variation of colored noise. Transitions between colors are noisy and the lower part of the window changes:
You can adjust the Smoothness. At zero, the gradient becomes smooth. At 50% you get blurriness and at 100% you are guaranteed stripes of all the colors of the rainbow. There are other settings as well. You can adjust colors by channel in different  color models (RGB, HSB and LAB). You can limit colors and enable transparency.
– sets the degree of smoothness of the gradient.  The lower this value, the sharper the transitions between colors;
Color– sets the color of the selected color limiter;
Location – To numerically set the position of the slider. Color limiter location (0 to 100%). You can set the exact middle by setting the slider to 50
At the top of the color bar are the gradient transparency sliders. To add a new marker, move the mouse cursor to the top of the strip and click the mouse in the desired place. You can change the opacity of the gradient at this point by decreasing the corresponding item in the Stops section. To delete a marker, you need to mark it with the cursor and click on the Delete button. How to determine whether the desired marker is selected for editing? Very simple! The tip of the selected marker turns black.
In the same way, we add sliders at the bottom of the color bar, where the transition sliders between colors are located. Once you add a slider to a color bar, it becomes active and you can assign a different color to it by clicking the Color box. Midpoint indicators (small diamonds) are also located here. They indicate the place where adjacent colors are mixed in equal proportions. Both sliders and pointers can be moved. You can use any number of sliders. Depending on the color choice, the slider will look different. If the gradient color is fixed/custom, then the slider is painted in this color.
When dragging while holding down Alt key The slider is duplicated, and a new color transition appears on the strip.
To create a horizontal, 90-degree, or 45-degree gradient, hold down the key as you move the cursor Shift pressed. Release the mouse button at the point where you want to end the gradient transition.
Let's draw a rainbow
Create a new layer. Choose a rainbow-like gradient.  Move the sliders to the right. Click OK.
Draw a small segment with the linear gradient tool at a 45 degree angle.
Select Edit – Transform – Warp from the menu. Or press the keyboard shortcut Ctrl + T and in the tool options menu, click on the icon. A mesh will appear that can be transformed by moving the corner points and tangents of the vector.
 To exit transformation mode, press Enter or click the icon in the tool options menu.
Reduce the opacity of the rainbow layer and change the blending mode to SoftLight(Soft light).

Questions:
(you can find out the correct answer from the quiz at the end of the video lesson):
- What option should be checked for the Paint Bucket tool so that the selected area is painted over with a pattern?
– Mode (Overlay mode) – Overlay (Overlap).
– In the Fill window, select Pattern.
– Set Tolerance to zero.
– Edit – Define Pattern.
– Layers – New fill layer – Pattern.
3. How to protect transparent areas of a layer from being filled with color or pattern?
– Mode (Overlay mode) – Exclusion (Exception).
– Check the Contiguous checkbox.
– Reduce the Opacity item in the Tool Options menu to zero.
– Click Lock transparent pixels in the layers palette.
– Opacity (Opacity) in the layers palette is reduced to zero.
4. How to open the Gradient Editor Window?
– Menu Edit – Fill – Gradient.
– Right-click context menu – Define Pattern.
– Click on the gradient swatch in the tool options menu.
– Double-click on any of the five types of gradient.
5. How to make a black-red-white gradient from a black-and-white gradient?
– In the Gradient Editor, add a red slider on top of the color bar.
– In the Gradient Editor, add a red slider at the bottom of the color bar.
– In the Gradient Editor, look for a ready-made gradient.
– In the Gradient Editor, select Noise, and 50% Smoothness.
You must or to see hidden text.
Paint.NET is simple in every way. Its tools, although limited, allow you to solve a number of problems when working with images.
The Paint.NET window, in addition to the main work area, has a panel that includes:
- tabs with the main functions of the graphic editor;
- frequently used actions (create, save, cut, copy, etc.);
- parameters of the selected tool.

You can also enable the display of auxiliary panels:
- tools;
- magazine;
- layers;
- palette.
To do this, you need to make the corresponding icons active.

Now let's look at the basic actions that you can perform in Paint.NET.
Creating and opening images
Open the tab "File" and click on the desired option.

Similar buttons are located on the working panel:

When opening, you need to select an image on your hard drive, and when creating it, a window will appear where you need to set the parameters of the new image and click "OK".

Please note that the image size can be changed at any time.
Basic image manipulation
During the editing process, the picture can be visually enlarged, reduced, aligned to the window size, or returned to its real size. This is done through the tab "View".

Or use the slider at the bottom of the window.

In the tab "Image" there is everything you need to change the size of the picture and canvas, as well as flip or rotate it.

Any actions can be canceled and returned via "Edit".

Or using the buttons on the panel:

Selecting and cropping
To select a specific area of the picture, there are 4 tools:
- "Selecting a rectangular area";
- “Selecting an oval (round) shaped area”;
- "Lasso"– allows you to capture an arbitrary area by tracing it along the contour;
- "Magic wand"– automatically selects individual objects in the image.
Each selection option works in different modes, such as adding or subtracting from the selection.

To select the entire image, click CTRL+A.
Further actions will be performed directly in relation to the selected area. Via tab "Edit" you can cut, copy and paste the selection. Here you can completely delete this area, fill it, invert the selection, or cancel it.
Some of these tools are displayed on the working panel. This includes a button "Crop by Selection", after clicking on it, only the selected area will remain on the image.

In order to move the selected area, Paint.NET has a special tool.

By using the selection and cropping tools wisely, you can make transparent background in the pictures.
Drawing and Filling
Tools for drawing "Brush", "Pencil" And "Cloning brush".
Working with "Brush", You can change its width, hardness and fill type. Use the panel to select a color "Palette". To draw a picture, hold down the left mouse button and move "Brush" on the canvas.

By holding the right button, you will draw additional color "Palettes".

By the way, the main color "Palettes" can be similar to the color of any point in the current drawing. To do this, simply select a tool "Pipette" and click on the place where you want to copy the color.

"Pencil" has a fixed size in 1px and customization options "Blend Mode". Otherwise its use is similar "Brushes".

"Cloning brush" allows you to select a point in the image ( Ctrl+LMB) and use it as a source for drawing in another area.

By using "Fills" You can quickly paint individual elements of the image with the specified color. Except type "Fills", it is important to correctly adjust its sensitivity so that unnecessary areas are not captured.

For convenience, the necessary objects are usually selected and then filled.
Text and Shapes
To apply an inscription to an image, select the appropriate tool, specify the font parameters and color in "Palette". After that, click on the desired place and start typing.
When drawing a straight line, you can determine its width, style (arrow, dotted line, dash, etc.), as well as the fill type. Color, as usual, is selected in "Palette".

If you pull the blinking dots on the line, it will bend.

Shapes are inserted in Paint.NET in a similar way. The type is selected from the toolbar. Using markers along the edges of the figure, its size and proportions change.

Notice the cross next to the figure. With it, you can drag inserted objects throughout the drawing. The same goes for text and lines.
Correction and effects
In the tab "Correction" There are all the necessary tools for changing color tone, brightness, contrast, etc.

Accordingly, in the tab "Effects" You can select and apply to your image one of the filters that are found in most other graphic editors.

Saving an image
When you have finished working in Paint.NET, you must remember to save the edited picture. To do this, open the tab "File" and press "Save".

Or use the icon on the work panel.

The image will be saved in the location from which it was opened. Moreover, the old option will be deleted.
To set file parameters yourself and not replace the source, use "Save as".

You can choose the save location, specify the image format and its name.

The principle of work in Paint.NET is similar to more advanced graphic editors, but there is not such an abundance of tools and it is much easier to understand everything. Therefore Paint.NET is good option for newbies.
With a brush
and color in Paint
Brush and color, when working in Paint, are interconnected.
And that's why I combined the job description
with these tools on one page.
how to work with a brush in Paint
How to work with a brush in Paint
Brush tool in Paint,
allows you to draw lines various types and textures.
It is possible to use different artistic brushes.
Using different brushes, can be depicted
arbitrary and curved lines of various types.
The Brush tool is indicated in the screenshot
toolbar in Paint with the number 17.
To open the entire set of brushes, click the arrow at the bottom of the Brush tool. And the entire set of brushes available in the Paint program will open.

To select, simply click on the desired art brush.
And then click the arrow under the "Thickness" section and select
size that determines the thickness of the brush stroke.

Then in the “Colors” group, click “Color 1” (foreground color), select a color and use your mouse pointer to paint the desired area.
To paint an area with Color 2 (the background color), right-click
mouse button and hold it down while moving the pointer.
How to work with color in Paint
Working with color in Paint
The “Colors” section is responsible for color in Paint.

On the left in this block:
"Color 1" is the foreground color.
"Color 2" is the background color.
In the central block there is a color palette.
The top two rows in the palette with cells filled with color.
Bottom row with empty cells.
You can get acquainted with the color choice.
On the right side of the block is the “Changing colors” section.
How to change color in the Paint palette
How to change color in the Paint palette
If you have not selected the color you need in the available one in Paint
color palette - you can choose the color you need yourself.
To do this, click on the “Change Palette” tool,
which is located above the inscription “Change colors”.
A new tab will open to change the palette.

In this tab, you first select a color in the palette, using the arrow located to the right of the vertical scale to help you adjust the color.

For clarity, the color you select will be reflected below the palette
in the “Color|Fill” cell. When the color you need is selected, click
At the bottom right is the “Add to Set” button. And the color you selected will appear
in a free cell, under the inscription “Additional colors”.

Now you can click “OK” at the bottom left of the tab and select your
the color will occupy one of the empty cells in the palette on the Paint toolbar.
Regarding Edward's question elementary lessons by Paint Net. I’ll start by telling you here only about the simple functionality that I use to process and mark up screenshots.
What is Paint.Net
I also use Paint Net to reduce the weight of images so that site pages load faster. This is what we'll talk about.
About the program: Paint.net is distributed free of charge and for this sincerity, huge respect to the developers! Based on its capabilities, the program can easily replace some of the functions of the famous Photoshop. The most interesting lessons paint net you will find the Russian-language version of the program on the official website. And you can download it there.
Lessons Paint.net
For those who have never used graphic editors, I think there are many such users on the rapidly developing Internet. Installed, selected a screenshot, right-click open with, select our program.
First, let's decide on the choice of color with which we will work. The color changes with one click of the left mouse button. If the provided colors are not enough, click the More button
Color selection in paint net
Here we can select the color both in hexadecimal and RGB, or simply by moving the corresponding sliders
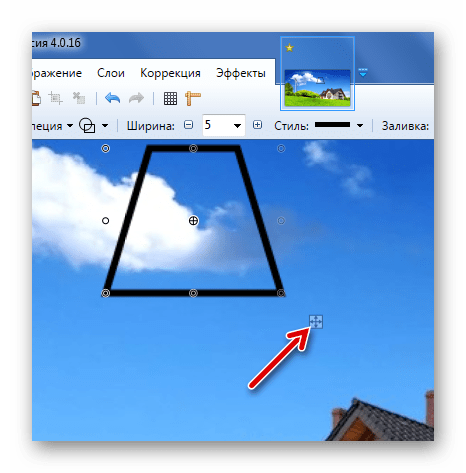
Shape tool in paint net
How to make perfectly even ovals: everything is simple, click on the corresponding icon in the right menu (when you hover the cursor over the icons, a hint pops up) and draw an oval with a predetermined color in the right place.
Eraser tool in paint net
If you want to hide some inscription in the picture, then select the eraser on the right and carefully erase the desired area.
Lasso tool in paint net
Lasso will be a convenient tool for you; it can be used to highlight a wide variety of places with different shapes
Eyedropper tool in paint net
For example: we need to fill some place with the color that is already in the picture. We take the eyedropper and click it on the desired area, all the color is copied
Fill tool in paint net
Now select a fill from the menu and click it on the selected area.
Sometimes the fill covers a little more space than you would like. This happens in cases where the boundaries of the area being poured are not so clearly defined. In this case, simply reduce the sensitivity with the slider at the top.
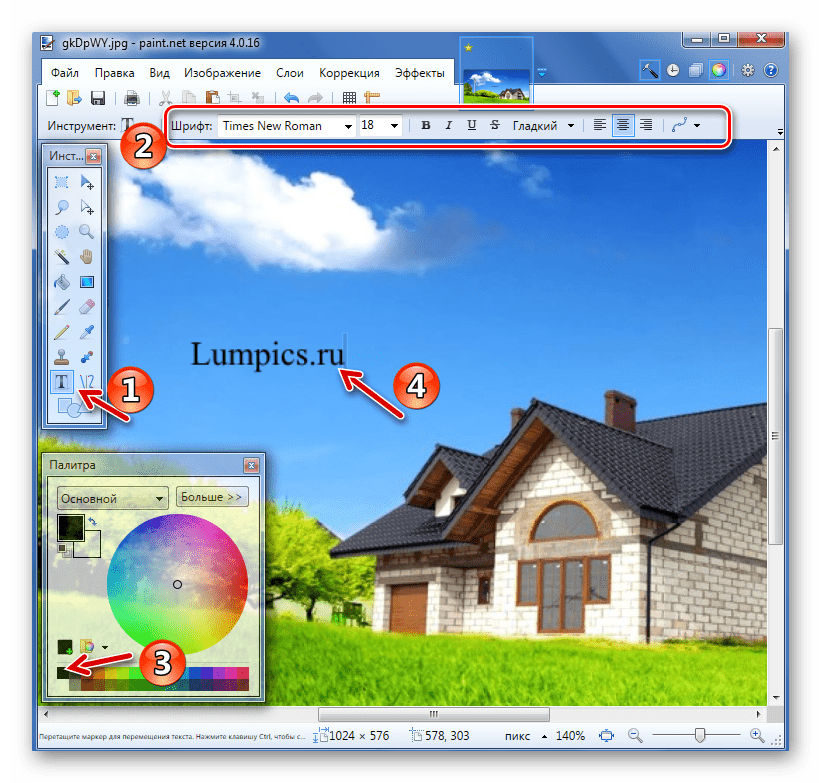
How to Write Texts on Screenshots in Paint Net
Click on the T icon on the right, point the cursor at the right place and write what you want. If you missed the mark a little, it doesn’t matter, grab the cross (just below the written text) and move the entire inscription wherever we want. The size, font, etc. can be adjusted at the top, a standard editor like in Word.
What is shown above is a little thing that anyone can learn on their own, the real lessons are on the off site, link at the top.
How to reduce the weight of a picture
But webmasters will certainly be interested in another necessary tool for reducing the weight of images for inserting images into the site. Even if you are not going to edit anything in the picture, just put a dot somewhere in the corner with the same color as the image itself.
Now in the main menu, select the file - save as . We write a name for the image to be saved, now a window with image quality settings opens. This example uses a PNG file and what would reduce the weight of the picture set the minimum color depth and everything else, to reduce weight jpg pictures use the slider. We click ok and are surprised: instead of 100 kb, the image now weighs only 12 kb and the difference in quality is almost unnoticeable.
For JPEG files, there will be only one slider in the settings, here we are already looking at the optimal ratio of weight and quality. For screenshots with similar and different texts square designs Of course, the best option would be png, since the weight can be reduced by more than 10 times. For designs with gradients, big amount handwritten text and all round png format will be heavy, in this case it is better to use Jpeg
Target lesson:
- consolidation of acquired knowledge about the graphic editor “Paint”;
- get acquainted with the “Fill” tool of the Paint program;
- learn how to use the Fill tool.
Tasks lesson:
Educational: formation, systematization and generalization of knowledge on the topic “Graphic paint editor”, master the operation of the mouse using the graphic editor Paint, familiarization with the “Fill” tool.
Developmental: development of mental activity techniques (generalization, analysis, synthesis, evaluation), attention, memory, creative activity.
Educational: development of students’ cognitive interest, the basics of communicative communication, self-confidence, accuracy.
Basic concepts and terms: graphic editor, file, open file, create file, file name, toolbar, drawing tools, workspace, menu bar.
Lesson plan:
1. Organizing time– 1-2 minutes
2. Update background knowledge- 10 minutes.
3. Studying new material – 10 minutes.
- The Fill tool of the Paint graphic editor,
- Methods of using the tool.
4. Physical education session – 2 minutes.
5. Consolidation and generalization of knowledge. – 12 minutes.
- Practical work on a PC.
- Exercise for the eyes.
- Discussion of the results obtained.
6. Control of theoretical knowledge – 5 minutes.
7. Homework. Summing up the lesson - 3 minutes.
1. Organizational moment
Today we will get acquainted with the Fill tool in the Paint graphic editor. Let's do a number of jobs using this tool. Then, having accumulated enough drawings, we will collect them in our album, the name of which you will come up with yourself. Come up with original name and design is your homework.
2. Updating basic knowledge
In the previous lesson we got acquainted with the Paint graphic editor. Students are asked to repeat the material learned in the last lesson: what a graphic editor is, which graphic editor they became familiar with, how they can save, open and create a new file.
Question: Let's try to restore the graphic editor interface in memory<Picture 1>. Who wants to do this at the board? Schematically depicts the editor interface on the board and labels the main elements.
Picture 1
Students are asked to color the drawing<Figure 2> using pencils and markers in 5 minutes. The teacher communicates the assessment criteria for this task: accuracy, whether the colors are chosen correctly, completeness of the completed task. Students exchange work with their neighbors and evaluate each other's work according to the criteria. After the assessment, a discussion of the grades assigned is held.

Figure 2
3. Learning new material
Before starting coloring in the Paint graphic editor, students listen to the teacher's explanation about choosing and changing the fill color. Write down the name and purpose of the new tool in workbooks.
Fill – paints a closed area of the drawing with the selected color.
Choice of colors – allows you to specify one or another color in the drawing.
4. Physical education minute
You can conduct physical education based on repetition of safety rules. The teacher calls the rules “wrong”, students, if they agree, stretch their arms up, if they do not agree, they stretch their arms in front of them or to the sides.
5. Consolidation and generalization of knowledge. Practical work
The next stage is coming: students work at the computer. You must be extremely careful while working at the computer. Review of safety rules.
Safety precautions
To avoid accidents, electric shock, or equipment breakdown, it is recommended to follow these rules:
- Do not turn on equipment without permission.
- In case of an accident or equipment breakdown, call a senior (teacher).
- Do not touch wires and connectors (possible electric shock).
- Avoid damaging equipment.
- Do not work in outerwear.
- Do not jump, do not run (do not create dust).
- Keep quiet.
- The monitor should be positioned at eye level and perpendicular to the viewing angle.
Task 1. Coloring the same picture<Figure 2> using Paint tools.
The teacher needs to first download the same drawing to the computer so that the students open it and decorate it using Paint <Рисунок 2> . Next, they should keep their jobs. The teacher must first create folders for student work on each computer on drive C, for example, under the name 5_class. Students will later remember where the files they created are located and in which folder they should be saved.
Task 2. For strong students, it is suggested to download an additional task <Рисунок 3> .

Figure 3
You need to find all the triangles and fill them with brown, and leave all other shapes unchanged. Students must determine which animal they will get. (If the task is completed correctly, you will get a camel).
Students save their results. Turn off the computer.
After completing the task, you need to do eye exercises with the students.
6. Control of theoretical knowledge
Students are asked to answer the test on cards, the correct answers are marked, the cards are signed, and handed over to the teacher.
| F.I. __________class_________ date_________ | |||||
Choose the correct answer:
1. A graphic editor is a program designed for...
a) Editing the type and style of the font
b) Creating a graphic image of the text
c) Works with graphic images
2. Paint program runs like this
a) Start – Programs – Accessories – Graphic editor Paint
b) Start – Programs – Graphic editor Paint
c) Programs – Start – Accessories – Graphic editor Paint
3. To create a new file in Paint you need to:
a) File – New
b) File – Open
c) Drawing – Clear
4. The main operations possible in the graphic editor include...
a) Select, copy, paste
b) Pencil, brush, eraser
c) Color sets (palette)
5. When pasting from the clipboard or from a file, where is the pasted fragment located by default?
a) In the upper left corner of the screen
b) In the lower left corner of the screen
c) In the lower right corner of the screen
6. When filling the shape, other areas will be filled if
a) When the outline of the figure is continuous
b) When the outline of the figure has a break
c) When the contour of a figure has two consecutive breaks on one straight line
7. Homework
Come up with an original name and design for an album with drawings created in the Paint graphic editor.
8. Summing up the lesson
Note. You can use other drawings to complete practical work.<Рисунок 4>, <Рисунок 5>, <Рисунок 6>, <Рисунок 7>.
Literature: Computer Science and ICT. Textbook. First level. Edited by N.V. Makarova.

Figure 4

Figure 5

Figure 6


- Ancient Slavic calendar Daaryan circle number of the god Kolyada dar Slavic Vedic calendar
- Slavic fabric amulets dolls: their meaning and how to make them with your own hands When you need to say goodbye to a doll
- Festive cutting of dough
- Festive cutting of dough
- Portfolio of professional activities of a trainer-teacher at the BMU DoD "Dyussh" Portfolio - Document Pa
- Oriental and African studies
- Yelets State University named after
- What does it show and how to calculate the internal rate of return?
- Yaroslav Samoilov is a relationship specialist with no professional education. Do you want to save your relationship?
- Perm Pharmaceutical Academy: reviews, faculties
- Trader Dmitry Cheremushkin
- Preparation of canned fish from mackerel
- Mackerel in oil in a slow cooker: a recipe for preparing delicious canned food for the winter
- Red currants pickled for the winter
- Masago caviar: what it is, where it is used, description and nutritional value
- Bonus – a completely new apple pie recipe – French apple pie “Tarte Tatin”
- Minced meat cakes in the oven
- Step-by-step cooking instructions
- Christmas fortune telling for children
- Sergey Yesenin Yesenin's work more information