How to draw a girl with a pencil step by step for beginners. Face, full length, profile, from the back, from behind, with long hair, short. How to draw an anime girl step by step with a pencil
IN last years Anime cartoons have become quite popular not only among children, but adults also like them. Everyone has their favorite heroes, and many try to copy them by portraying them themselves. How to draw anime with a pencil step by step? This is not as difficult as it might seem at first glance.
Anime technique
Anime refers to a special technique of Japanese drawings, which are performed using a pencil. This picture has several differences from other genres. First of all, this applies to the image of the face and eyes. There are several types of anime. For example, manga or comics.
Anime cartoons attract the attention of many viewers not only with the originality of the drawing, but also with the meaning of their plot. Often this is what causes fans to ask: “How to draw anime with a pencil?”
Portraying anime cartoon characters is quite a fascinating thing. Even if you only use a pencil. The image of facial details is an easy task. So, let's look at a simple way to draw anime with a pencil step by step.

Algorithm of actions
To achieve accuracy and the desired quality of the drawing, it is necessary to adhere to a certain order of execution. Now it will become clear to you how to draw anime. Follow the recommendations step by step.
1. We must remember that all the heroes of such cartoons are characterized by some universal details: huge eyes and small mouths. Noses are usually marked schematically. Some characters have disproportionately long legs.
2. Preparing the necessary supplies. You will need a regular album. The paper should be thick and the pencil should be soft. It is recommended to sharpen it with a knife - the sharpener will not be able to properly cut the end of the lead for more convenient drawing, since you will need to sketch thin lines. Hatching is also easier to apply if the pencil is sharpened at an angle.
3. Applying preparatory markings. A line is drawn from top to bottom in the central part of the sheet - this indicates the growth of the future anime hero. We divide the straight line into six identical segments. The first part on top is reserved for the head. Three segments at the bottom remain for the legs. The shoulders and pelvis are indicated. Then you need to outline the remaining contours of the body. We schematically depict the character's hands.
4. In the place where the head should be, draw an oval and divide it into two even parts using a thin horizontal line. We mark two points on it that serve as the centers of the eyes. We make two transverse strokes (lower eyelids).
5. In accordance with the lower eyelids, we complete the upper lines. Then we do the irises and pupils. It is not difficult. Please note that pupils and irises in anime drawings do not have the correct round shape. In most cases they are extended from top to bottom. Then we outline thin eyebrows above the eyes.
6. Draw a nose in the central part of the face. Most often it is depicted as small and not detailed. We outline the ears. Draw a small mouth - draw a small horizontal stroke just below the nose. You can depict lips, but this is optional.
7. The hairline is located high, at a considerable distance from the eyes. It is recommended to draw the strands in separate curls. Depict the character's hairstyle in accordance with his character. It can be a neat or messy haircut, simple or complex. The main thing is to give freedom of imagination.
8. The contours of the character’s figure are drawn. This drawing stage is similar to the image human bodies V classical genres drawing.
9. Use an eraser to erase any extra lines and color the drawing. He's ready! So we have determined how to draw anime with a pencil step by step.

Character image
Quite often, the main characters of anime cartoons are girls. They are amazingly beautiful, and many people want to learn how to portray them. Let's move on to how to draw an anime girl step by step.
Anime girl
Let's sketch the character's face. We start by drawing a circle. Then we divide it in half. If the girl in the picture is depicted half-turned, then the face is divided into two uneven parts. You can make a bias, as if the heroine lowered her eyes. It all depends on imagination and desire. Another circle is drawn, which will serve as the basis for the character’s head. The chin is marked under the first circle, then you need to mark the points of the cheekbones and outline the shape of the girl’s face. We outline the contours of the mouth, nose and eyes. Let's move on to the hair. Pay attention to the girl’s hairstyle: her hair is tied up or loose, perhaps she has a braid, or her curls are styled in an intricate updo. Pay attention to all the necessary details. Don't forget to sketch out the outlines of the ears.
Eyes are a special nuance in anime pictures. They are usually larger in size compared to classic designs. The eyes need to be depicted as large and expressive. Let's move on to the proportions of the nose. It is usually not detailed in anime drawings, so it is not difficult to depict it.
When the base of the character is ready, you can draw contours, add hairstyle details, and draw shadows on the face. We draw the eyes so that the main emphasis is placed on them. You can depict only the face or draw a girl in full height. The choice is yours.

Application of skills
Now you know how to draw an anime girl. Next, you can begin to depict stories with several characters. Now you can draw various moments from anime series. IN in this case You will need to depict not only the character, but also the surrounding environment and background. The good thing is that it will help you learn how to portray different types of emotions. It's no secret that anime drawings very accurately and quite originally convey the feelings and mood of the characters.
Additional benefits of the lesson
Recently, anime drawing competitions have become popular. Some artists even organize exhibitions.

So learning several ways of how to draw anime with a pencil step by step will not be superfluous. This can bring not only pleasure, but also profit.
Japan is a highly developed country whose technology is ahead of its time. Business card In Japan, in addition to reliable cars and advanced technologies, anime stands out. This type of animation is popular in Asia and other regions of the planet. It is not surprising that many are interested in how to learn to draw anime from scratch.
If you want to master this activity, pay attention to my article. In it you will find useful tips And step-by-step recommendations, making it easier to create anime-style drawings. If you haven't visited art school With perseverance and patience, master this technique.
- Choose a tool. We are talking about leads and pencils of varying hardness. You will need three different leads, which are sold either in wood frames or in the form of rods designed for power tools.
- Alternatively, buy a set of graphite sticks coated with a special layer. With their help you can make quick sketches and easily shade large surfaces.
- You can't do without a good eraser. A soft model is better. Otherwise, during operation, the top layers of paper will be damaged and “injured.” To minimize the risk of such an event occurring, it is recommended to draw contours with thin lines.
- They draw anime with sharply sharpened pencils and leads. Be sure to buy a good sharpener. Once you gain experience, learn how to sharpen a tool using a knife.
- Proper execution hatching involves the use of a hollow sharpened tool. This makes the task faster and easier. True, don’t focus too much on this moment. A beginner is allowed to do what is convenient and easier.
- Start mastering art with drawing contour drawings. To begin with, do some work linearly, applying light shadows in certain places. It will turn out to be unique quick sketch. Over time, your hand movements will become confident, and you will be able to pay more attention to the light and shadow elaboration of the drawing.
- Hatching is much more difficult to master. Draw the elements as best you can closer friend to friend. Otherwise, the integrity of the object will be disrupted and the impression of striping will appear. At first, you can rub pencil marks with a soft piece of paper or your finger.
- When shading a drawing, be sure to keep the distance between individual strokes to a minimum. You cannot use crossed under high angle lines.
- Newbies make mistakes. Fortunately, the pencil is easily erased, only with extreme caution. Otherwise, the paper will be severely damaged or a certain area of the work will be smeared. Remember, it is difficult to put a new layer of graphite on a damaged surface.
- If you want to remove a large amount of shading or slightly weaken the tone, use a special mass resembling plasticine. It is characterized by the ability to easily absorb excess graphite. If you don't have it on hand, take a lump of bread.
You've got your first idea of how to learn how to draw anime from scratch. If you really like drawing, it will become a hobby. Experts advise starting training with simple projects, gradually increasing complexity. Varieties of plot play minor role.
Beginners are not recommended to use complex motifs consisting of large quantity elements. To start, train on simple objects and compositions. We are talking about fruits, vegetables and simple shaped objects. Watch the video below to get a visual representation.
Video training and step by step lessons
Over time, switch to more complex plots and learn to draw animals, buildings and technology. Lastly, start drawing people. Draw human face not easy, but depicting human emotions is completely difficult task.
Secrets of drawing anime with a pencil
Japanese cartoons, whose popularity can hardly be overestimated, have always been famous good story, active developments and bright heroes. After watching such an animated film, many people have a desire to master the art of drawing.
In this part of the article I will tell you how to learn how to draw anime with a pencil. Following my algorithm, you will draw beautiful drawings with a piece of paper and a few pencils on hand. As an example, I will give a technique for drawing a boy, which consists of several stages.
Before we look step by step instructions, I note that japanese drawings have certain technical nuances. In particular, anime drawing is characterized by a technique for drawing the face, eyes, nose and mouth that differs from other genres. Because the facial contours are roughly shaped and complemented big eyes, drawing them is not difficult.
- Initial outlines . Correctly place the outlines of the drawing, and only then draw the main outlines little boy. To make this step easier, make the primary contour from rectangular shapes. The main thing is that they match the size of the body parts.
- Head. Draw a rectangle for the head, and below it draw another rectangular shape for the neck. Starting from the neck, draw two arcs to represent the shoulders. Then draw lines for the arms and place circles in their center, which are destined to become elbows. It's easier to draw hands using rectangles and lines.
- Draw an oval face . In the anime genre, it resembles a regular rectangle connected to a triangle. These geometric figures draw together, and then delete the connecting line. The result is a Japanese-style face characterized by a narrow and pointed chin. All that remains is to add a few elements of a fashionable suit.
- Elements. The next step involves adding various elements to the drawing. Using an eraser, remove unnecessary contours and lines and begin detailing the picture. Give the final shape to the face using the starting lines. Over your head, apply an arched visor along with the cap base. Also draw the contours of the hair and ears.
- Start sanitizing your hands . Using initial contours, carefully outline your hands. Then draw the collar and outline the legs. If you can achieve the correct proportions within this stage, then you have successfully completed this difficult process.
- Main details . As part of the final stage, pay special attention to the main details of the drawing. It's about the eyes and face. The eyes should be located large sizes and large resin pupils. Add a small nose and a small mouth that resembles an inverted triangle.
- Cloth. Pay attention to the boy's clothes by providing them with buttons and pockets. Add additional detail to the T-shirt, draw the gloves and finish off the triangular hair.
- Coloring . Finally, color the drawing, making it bright and contrasting. Since we are drawing anime with a pencil, it is enough to shade the drawing by adding bright shadows.
If you want to draw anime comics with a pencil and build a career in this industry, my instructions will help you get started. If you follow the news and learn, mastering various techniques, you will take your skills to a new level.
Drawing anime eyes - step-by-step instructions

People enjoy watching Japanese cartoons. Some people have a desire to draw something similar, plans and ideas appear. They draw their favorite characters, devoting their free time to the activity, but in most cases the quality of the drawings remains low.
The hardest thing to draw are the eyes. Therefore, I will pay special attention to the question of how to learn to draw anime eyes. I hope that with the help of my tips you will draw beautiful and expressive eyes, which will allow you, for example, to prepare for the New Year by creating interesting gifts.

- There are eyes in anime various shapes, size and color. Draw the arches of the eyelids, and then draw two guide lines that must intersect. It is better to make the guide lines slightly curved and as thin as possible.
- In most cases, the iris takes up a huge part of the eye. Instead of a circle, feel free to draw an oval. When designating the pupil, remember that size determines the character’s feelings. If the pupil is small, the hero is scared. During this stage, you should not highlight the pupil too much. We will do this after drawing the highlights.
- Most often, one highlight is depicted. Alternatively, paint several small highlights, placing them on different sides. Only after drawing the highlights make the pupil bright.
- In anime, the number of eyelashes is small and in most cases does not exceed 7 pieces. Most often they are depicted as an arrow, always highlighting the line of the upper eyelid, thanks to which the eyes become voluminous and bulging.
- Do not draw eyebrows in detail. However, they must be present without fail. Otherwise, you won’t make your cartoon character’s eyes expressive.
- Many beginners have questions regarding eye shape. In most cases it is a semicircle. The upper part of the eye is represented by an almost straight line, and the lower part is a perfect semicircle.
- Draw eyelashes with a general arrow, bending down or up. The direction of the bend is determined by the shape of the eye. If you are depicting several eyelashes, place large ones on the upper eyelid, and small ones on the lower eyelid.
You can make anime eyes lively and expressive with the help of oval highlights by placing them along the edges. You can use vertical or horizontal highlights.
Video lesson
To emphasize the main highlight, use a triangular highlight with the corner extended into the center of the eye. Round highlights are often used, which are used as main or auxiliary highlights. It depends on the style and preferences of the author.
Drawing an anime body

Continuing the conversation about Japanese animation, let's figure out how to draw an anime body at home. At first glance, this seems like a difficult task. In reality everything is different.
Japanese animation differs from cartoons created in other countries. It is aimed at both teenagers and adults. For this reason cartoons are quickly gaining popularity, which has long been comparable to the popularity of the best New Year's films.
The depiction of anime characters and the background on which the events unfold is very different from cartoons in other countries. In most cases, anime is a multi-part television film distributed via optical storage devices. IN Lately Japanese cartoons began to appear more often on widescreen screens.
After watching a Japanese cartoon, many people have a desire to learn how to draw anime. We have covered the main points regarding art. It's time to talk about drawing the body.
- To achieve your goal, first study the proportions of the body and become familiar with the process of drawing it in the Japanese style. The Japanese like to distort proportions. A striking proof is the many cartoon characters in which certain parts of the body are disproportionate.
- Anime masters depict the female figure as elongated, complemented by thin legs and a wasp waist. Male figure characterized by broad shoulders. Moreover, the size of the head does not always correspond to the size of the body. Perhaps this is the secret to the attractiveness of the images.
- Draw a human figure with two points connected by a vertical, which marks the center. Draw the bottom and top lines, and vertically divide the central line into eight equal parts. This is easy to do with a ruler.
- Then draw an oval body, a round pelvis, a head and legs with arms. To revive the drawing, place body parts on a slightly curved arc. This will demonstrate that the character you are portraying is moving.
Only with time will you be able to master the drawing technique various parts body, which is used by Japanese animators.
Video instruction
To know how to draw a girl with a pencil, you don’t have to study art and be an artist. Any beginner can try his hand at it. It is enough to be persistent and gradually master some skills. It is important to keep in mind the aspects below.
What materials are needed
Before starting the lesson, novice creators should stock up on materials such as:
You should not skimp on basic drawing materials, even if we're talking about about a novice amateur. Poor quality materials can discourage interest in drawing and complicate the first steps in art. For beginners, the best choice would be mid-priced products.
Female body proportions
Proportions female body differ from men's in some respects. Besides, in different times for the standard of beauty in fine arts were accepted different proportions.
Nowadays, the following parameters of the female body are relevant for drawing:
- To measure height, you need to calculate the height of the woman’s head and multiply this parameter by 7-8.5 times. It is useful to know that a person’s height is divided exactly in half at the point of the symphysis pubis.
- To calculate shoulder width, you will need an average of 1.5 head heights.
- The width of the pelvic bone is directly proportional to the width of her shoulder, and the height of a woman's pelvis is slightly lower than the height of her head.
- The waist is on average equal to 1 head height.
- To calculate the height between the base of the chest and the hip joint, you should divide the height of the head in half.
Axes and proportions of the face
Not everyone knows the tricks on how to draw a girl with a pencil. It is easy to explain this process step by step for beginners.
It is enough just to know about the following proportions of facial features and about the universal axes on which you can rely on in the process of constructing a face:

Face drawing scheme
Scheme:

How to draw a girl in profile
When wondering how to draw a girl with a pencil step by step for beginners, you need to look for the answer in the same measurements and center lines as when drawing from the front. You should start drawing by drawing auxiliary lines in the form of a square. Its height should be 1/8 greater than its width. All the main axes need to be transferred to it, as if a face was inscribed in it from the front. 
Then, you should inscribe an inclined ovoid oval into a rectangle between the axis on which the tip of the nose is located and the top of the entire square. This oval helps build the correct shape of the skull, back of the head and forehead.
The part of the side of the skull that connects to the neck should be angled downward.
- From the top extreme point oval, you should start drawing the line of the forehead, eyebrows, nose, mouth and chin. In this case, it is necessary to focus on the drawn auxiliary lines. The most prominent point of the forehead, closer to the eyebrows, is in contact with the edge of the square.
- The eyes are located on their own axis. On the face in profile, the eyes take the shape of an arrowhead. The iris changes from round to a thin, elongated oval with a pointed top and bottom.
- The tip of the nose will protrude slightly beyond the square. The depression of the bridge of the nose falls on the same axis on which the eyes are located.
- Lips on a profile face will appear prominent, especially the lower lip. The line where the lips meet goes slightly downward from the lips. Even if a person smiles, the line goes straight at first and then smoothly curves upward.
- When viewed in profile, the ears take on a C-shape. An arc of thin cartilage runs along the edge of the ear. Also, be aware of your earlobe. When drawing female face, ears are often covered with hair.
How to draw a girl in full height
When drawing a girl with a pencil step by step, it is extremely important for beginners to maintain the body proportions discussed earlier. Only compliance with proportions will help avoid depicting an awkward, unrealistic body. 
To depict a girl in full height, it is recommended to take into account the following aspects:
- Image central axis. This axis coincides with the girl’s spine. At the initial level of drawing, it is recommended to draw a figure standing straight and level, from the front. Therefore, the central axis will also be straight.
- Torso. It is recommended to depict it schematically as an inverted triangle. You should not make it too large or wide, as female figure, on average, has more graceful shoulders and chest.
- Breast. To determine the correct location of the chest, another smaller one is inserted into the torso triangle, pointing upward. At its corners you need to draw two identical circles, which are the chest.
- Hips. To depict the hips, it is convenient to draw a circle, a small part of which extends to the lower corner of the triangle representing the torso.
Using the obtained guidelines, you need to connect them with smooth, rounded lines. The figure should acquire the contours of a female body. Next, you need to draw the arms and legs. The length of the arms is just below the groin area.
Important points when drawing hair
Scroll:
- When drawing hair, it is important to pay attention to how the light falls on them. As a rule, the roots of the hair are in the shadow, and at some distance from them a highlight is noticeable on the hair. It should be left unpainted, or only a few strokes should be added around the edges. Next, it is important to pay attention to how the hair lies in the strands. In the drawing, you should combine small strands into larger ones and depict a highlight on them as the light falls. Also, it is necessary to highlight the darker, shadow areas so that the drawing does not look flat.
- The hair lies luxuriantly on the head, covering part of the forehead, cheeks, and ears. Depending on the structure of the hair (curly, straight), it can be more voluminous or, on the contrary, smooth. It is important to notice the direction in which the hair grows to reflect them as realistically as possible.
- There is a lot of hair on a person's head, but you shouldn't depict all of them.. You just need to show their overall texture. Pencils of varying hardness are used for shading hair. For shady areas, take the most soft pencil and hatch with pressure. Hard pencils are needed to define hairs in lighter parts and highlights. It is important that the strokes are confident and long. To do this, it is recommended to rest your hand with a pencil on your elbow, and not on your wrist, and draw from the elbow.
Step by step drawing of hair
Now we know how to draw a girl with a pencil.
Step by step for beginners it is realistic to master such a complex detail as hair:

How to draw a girl with long flowing hair
However, some distinctive features should be taken into account:

How to draw a girl with short hair
Short hair in the drawing process has several distinctive features:

How to draw a girl from the back
Many people don’t know how to draw a girl with a pencil step by step. For beginners, it will not be difficult to master drawing a girl from the back.
This is a simpler option where you won’t need to depict her face, breasts and other complex details.
 However, drawing a girl from the back has its own nuances:
- The width of the shoulders and back should be indicated. General form will resemble a triangle, however, it should not be too large and wide. Otherwise, the girl will look too strong and masculine.
- The spine runs vertically in the center of the back, which must be reflected in the form of several strokes.
- At the level where the arms are attached to the body, the shoulder blades are visible on the back. They should not be highlighted too clearly. But if the picture shows a slender girl, it is advisable to indicate the shoulder blades with light strokes.
- Often the back and neck are covered with loose hair. Drawing a girl from the back is a good opportunity to depict beautiful curls scattered over her shoulders.
Anime style
Anime style involves a stylized image of the girl's figure and face. Generally, anime characters have exaggeratedly large and round eyes in a small face, and a small mouth and nose (which may be indicated by a dash or a dot). The arms and legs are thin and slender. The girl herself is most often petite and graceful, with a thin waist. The legs are exaggeratedly long. 
First you need to make a sketch, depict the head, facial features and hairstyle. Anime hairstyles suggest some carelessness and volume. Next, you should detail the sketch, adding details and paying attention to the location of shadow and light in the drawing.
In a dress
Pencil drawing girls in dress should start with step by step sketch The girl's figure seems to be without a dress. For beginners, this will help to correctly build her figure in clothes. It is advisable to take into account that clothing helps to hide those details that turn out poorly. Therefore, it is important to choose a dress style that will cover the most complex elements drawing.
In addition, the style of the dress should suit the drawn girl and fit her well.
When drawing a dress, it is important to take into account the material from which it is supposed to be made. Soft and delicate material will flow or hug the figure, dense material will not deform along the lines of the girl’s body. In addition, the direction and distribution of light should be considered to reflect soft lighting on the fabric. This will make the drawing more voluminous and naturalistic.
How to apply chiaroscuro using strokes
Hatching is an important element of drawing a girl with a pencil, and for beginners, first of all, it requires step-by-step training. You need to learn how to apply strokes, changing the saturation from dark to light as softly as possible. The softer and smoother the transition, the better the shading is mastered. 
To draw a girl, you should take into account the rules of construction and proportions of her body and face. In drawing, training and observation are important, which will help you depict what you want with the greatest accuracy.
Video: how to draw a girl with a pencil
How to draw a portrait of a girl with a pencil, watch the video:
How to draw a person's face correctly, watch the video:
Olga Nagornyuk
How to draw anime. Lesson “Girls in pencil”
The animated genre "anime", which appeared in Japan in the 20th century, has today gained millions of fans around the world. Both adults and teenagers play Internet games featuring anime characters, enjoy reading comics made in this genre and decorate the walls with images of their favorite characters. That's why we decided to tell you how to draw anime.
Rules for drawing anime girls
The character drawn in anime style is different from the picture ordinary person and has its own characteristics:
- The emphasis is on the eyes, the pupils and highlights are carefully drawn. The eye size of anime characters is significantly larger than that of people depicted in a realistic manner;
- the mouth, nose and cheekbones do not require careful drawing; they are applied almost schematically, using thin lines. Anime girls' faces are more rounded than boys', and their nose in profile is pointed and slightly upturned;
- There are no strict requirements for body proportions in anime: they can correspond to real ones, or they can differ greatly from them (for example, baby Chibi);
- The drawing of hair is done not by individual strands, but by the entire mass at once. Color can be the most incredible - this is one of the hallmarks of anime. If you want to create a more natural image, then learn how to draw a person.
How to draw an anime girl
Let's start a master class on drawing a fictional anime girl. Prepare Blank sheet paper, a simple pencil and an eraser.
1. We start with the head, for which we draw a circle (see the upper left corner of the picture) and use slightly curved curves to indicate the slope. We will focus on these lines when drawing facial features. Using arcs, draw the upper eyelid, then add a cut oval to serve as the outline of the eye. The horseshoe-shaped arc will become the outline of the iris, and the pupil will be drawn in the shape of a heart. We finish drawing the ear, mouth, outline of the neck and cheekbones.
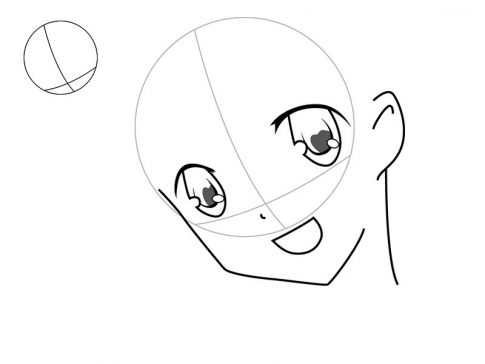
2. Paint over the pupil with light strokes, shading to achieve uniform color. Then we draw the strands of bangs.

3. We complete the outline of the haircut and draw straight lines that will become the basis of the girl’s body, marking the joints with dots and the hands with circles. Please note: the curve that will later become right hand, should be longer than the broken line indicating the left hand.

4. Sketch out the outlines of the body, without detailing yet.
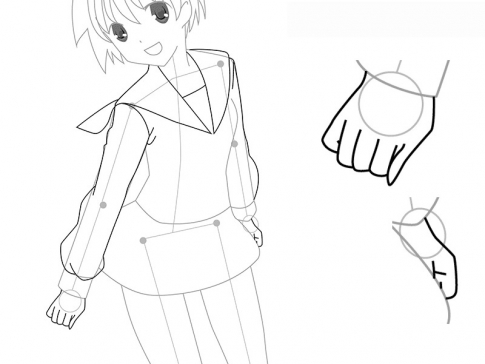
5. Draw the elements of clothing: sleeves and collar. It's time to draw fingers. The picture shows how to do this.

6. We detail the dress, drawing folds, tie and belt. We designate the cervical cavity.
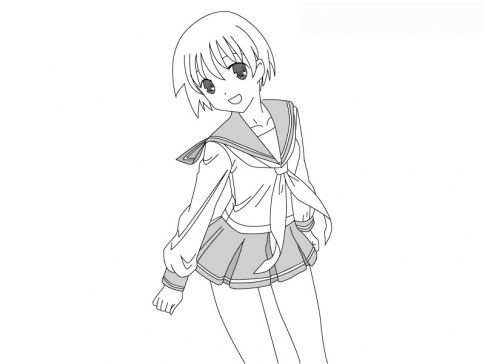
7. Add stripes on the cuffs and collar, as well as pleats on the skirt.

8. Add eyebrows visible through the bangs and a decorative horizontal stripe on the skirt.

9. You can leave the drawing as is, or you can color it with colored pencils or paints.

The drawing is ready.
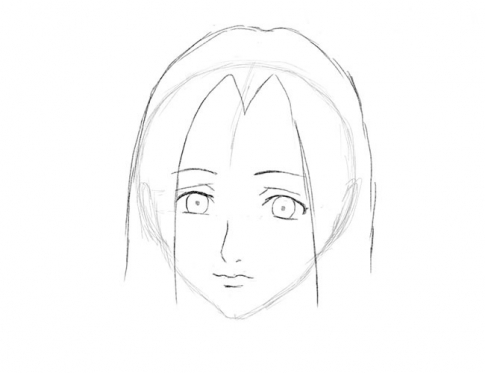
Learning to draw anime: girl Haku from the Naruto series
Next we will depict cartoon character girl Haku.
1. Draw a regular circle and use curved lines to mark the places where the eyes and nose will be. Using smooth lines, draw a slightly pointed chin and outline the contours of the ears.

2. Draw the contours of the eyes, nose and mouth. They are clearly visible in the picture, so try to follow the lines of the drawing as accurately as possible.

3. At this stage, we finish drawing the eyes, indicating the iris with circles, and bold dots- pupils. Create the outline of the hair. Do not press hard on the pencil, otherwise it will leave unsightly marks when erased.
4. Moving on to the shoulders: using smooth lines we draw the neck and “dress” the girl, drawing a collar and the outline of the shoulders. We return to the hair and draw the outlines of the strands lying on the back.

5. Erase the extra lines and color the drawing with light strokes, focusing on our image.

The drawing is complete.
Learning to draw anime: Anna from the series “Shaman King”
1. We start drawing by drawing the contours of the head. To do this, draw a circle of the correct shape and two straight lines that will help us correctly depict facial features on a tilted head. Almost straight lines denote the contour of the face. Please note: the corners at the junctions of these lines are rounded. We draw the outline of the eyes (the boundaries of the upper and lower eyelids), nose and lips.

2. Using cut ovals we depict the pupils, and for highlights on them we use ordinary small ovals. Having finished with the eyes, we draw the contours of the hair.

3. Using zigzag lines we mark the boundary of the color transition in the hair. We finish drawing the eyebrows and scarf, not forgetting to mark the folds on it for naturalness.

4. Using smooth lines, draw the chest and shoulder, and also add the fluttering part of the scarf.

We color the dress with a pencil with a soft lead, giving it dark tone, the scarf goes to grey colour, and the lower parts of the strands are light gray (you can use either light strokes or rubbing of grated graphite).
Once you've learned how to draw anime, take the time to show younger family members how to draw ponies from their favorite cartoon, My Little Pony.
Take it for yourself and tell your friends!
Read also on our website:
show more
Here we will teach you how to correctly draw one of the anime girl options step by step. It will be a beautiful young girl, depicted from the waist up in the style of a Japanese anime cartoon. Anime are drawings made in the style of Japanese animation. Usually their characters are not as funny as in cartoons for children younger age. They have the features of older children - teenagers. Anime characters are expressive, with well-developed figures, usually with large eyes. Cartoons made in anime style are intended for teenagers and older young adults. Many cartoons have been created in the style of Japanese animation. Their entire series are on different topics. But the main rules for character design remain unchanged.
Stage 1. At the top of the sheet we will draw the girl’s face. To do this, we build an elongated oval, inside which we draw three horizontal and two vertical lines. Using an oval, let's begin to outline the contours of the anime girl's face. We draw a gentle chin, a large forehead, and a neat ear. From the face below there are two lines - the neck.

Stage 2. Draw eyes on the line. First, the contours of the eyes with the designation of the upper eyelids. Then we clarify the upper eyelids and draw eyelashes. Then the lower eyelids and the eyeballs themselves in the form of circles.

Stage 3. Draw the pupils. Along the upper horizontal line we draw thin eyebrows in the form of raised wavy lines. Between the two vertical lines we will add a nose, and a little lower we will designate a pleasant mouth.

Stage 4. Show the lines of the ears; there are freckles in the form of dots on the girl’s face. In the ears we draw long earrings: chains with a cross at the end. Add hair to the girl's head. These are beautiful curls, developing in different directions.

Stage 5. Add lines of curls, make beautiful curls and draw another thick braid almost to the waist.

Stage 6. Darken the hair, highlighting the strands with paler and darker colors.

Stage 7. On the head of the girl - the heroine of the cartoon based on Japanese animation, we depict a cowboy hat with a high bottom and wide brim. There is a kind of cutout on the front brim of the hat. We draw the lines of the shoulders and the collar of the shirt.

Stage 8. Now along the additional lines we draw the lines of the body and arms.

Stage 9. Add lines to the clothes. We draw dots on the hat and, as it were, repeat the outline of the hat along the brim and bottom. We make an inscription on the T-shirt. Draw a chain with a pendant. We decorate the skirt with patterns.

Stage 10. We will gradually erase all the lines that are unnecessary to us during all stages. We leave only the drawing itself, for now in black and white.

Stage 11. Look how we colored our anime girl. We advise you to do the same to get beautiful view. The girl is painted in very soft, soft colors. Her eyes are sky blue with bright highlights, her hair is coffee-colored, her hat and T-shirt are snow-white (don’t forget about the play of light and shadows), and her skirt has yellow patterns at the bottom. The result is an anime girl in the style of American cowboys.


- What does individuality mean?
- What does a person’s individuality depend on?
- Issues of formation of a cluster education system in the Russian Federation
- Unified State Exam tests in literature What is included in the Unified State Examination in literature
- How to pay transport tax for legal entities
- Card for individual accounting of the amounts of accrued payments and other remunerations and the amounts of accrued insurance premiums Card for insurance premiums per year
- Error when filling in Contour
- Desk audit: developments
- Conditions for performing the stern experiment
- System status and processes
- Alexey Sergeevich Obukhov development of student research activities
- Oriental and African studies
- Yelets State University named after
- What does it show and how to calculate the internal rate of return?
- Yaroslav Samoilov is a relationship specialist with no professional education. Do you want to save your relationship?
- Perm Pharmaceutical Academy: reviews, faculties
- Trader Dmitry Cheremushkin
- Main economic issues
- Creative competition: we enter the Faculty of Journalism of St. Petersburg State University Bachelor's training programs
- Management of a modern school using the example of creating an educational cluster