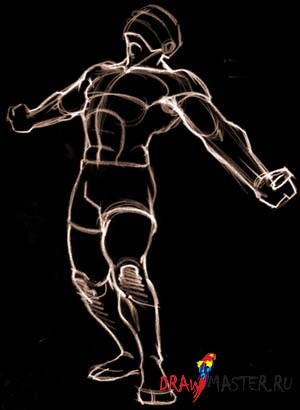
Pencil drawing of a person's right hand. Human Anatomy Fundamentals: How to Draw Hands
Hands: the basics
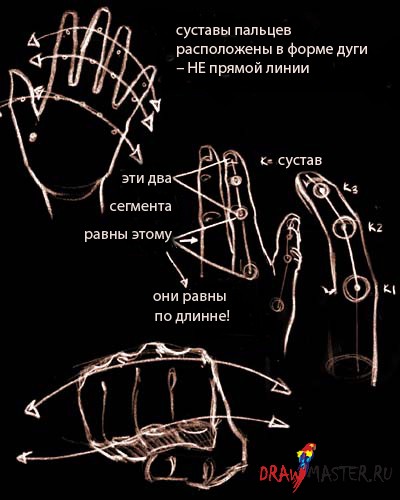
Finding joints

Essentially, there is an invisible line that runs through middle finger and through the center of the wrist. It should be perpendicular to the horizontal line across the wrist.
At the intersection of the lines, a circle is drawn around which the hand rotates freely.

Depending on the person's hand, the position of the joints on the fingers also varies. However, to visualize where the joints should be located, two curved lines can be drawn extending from the nail. thumb... If you add wrinkles in these places, your hands will look very natural.
Moving parts
We will now look at how the hand moves. By understanding these basics, you will be able to draw realistic hands.
Each area of the hand will be marked with a color that will correspond to the text of the same color.
Inner side

This area moves towards itself, along with four fingers.
Outer side

This area is not moving - this is very important to remember.
This area moves with thumb inside the palm.
This area moves with the little finger, however, there is little movement.
Hand drawing

Let's draw the outline of an egg-shaped hand. The tip of the egg will be the end of your middle finger. Next, we will draw the continuation of the hand, the wrist and the circle inside.

Now let's outline where the thumb, palm and four fingers will be. For convenience, you can draw a vertical line through the center of the palm.
Notice how the fingers are connected and how they move.
We make the contour smooth and erase the auxiliary lines.
The size and shape of the hand differs from person to person: wide palm, narrow palm, long fingers, short fingers. The list goes on - that's why there are rules in proportions when drawing a hand.
Basically, the length of the arms is approximately equal to the length of the doubled middle finger.
The middle toe is usually the longest. The index and ring fingers are approximately equal, but sometimes the ring finger is longer. The little finger reaches the upper joint of the ring finger.


In order to understand how muscles and skin move, consider a diagram of the bones of an arm.
Note that the bones of the index, middle, ring, and pinky fingers are mostly tied together, which prevents them from moving far apart. The thumb has much more wide circle movement.

Between the male and female hand there is a big difference... A person's hand looks more masculine if you give it a more angular shape, and more feminine if you give it a soft roundness.

On average, the nail is about half the length from the tip of the toe to the first joint.
Women's nails are drawn more elongated and rounded, while men's nails are more square and angular.

Let's draw a circle to match the basic shape of the fist. Then add the thumb and wrist lines.
If you find it difficult to imagine where your thumb will be, just clench your hand into a fist and take a closer look at the position.

The back and upper part of the hand does not move, so you just need to pay attention to how the fingers are connected. We mark out the upper part of the hand and four fingers, as a rule, of the same width.

As for the shadow, you can add it to create more realistic depth.

However, how much detail you draw the hand is up to you. Find your style that works best for you!
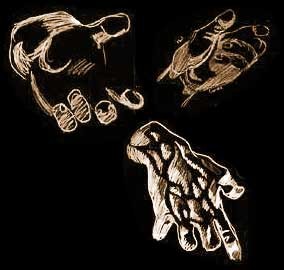
Different drawing options fist

This illustration shows a hand clenched into a fist from the outside. The index finger is much higher than the rest.
In this illustration, three fingers are pressed against the palm of the hand, the thumb is pulled back, and the index is pointing to a point.
Please note that with the help of shadows and wrinkles, the index finger looks voluminous. The same applies to the fist, despite the fact that only some phalanges are drawn on three fingers, the effect of volume is created.

This illustration shows a hand clenched into a fist from the inside. The index finger is also higher than the rest.
There are various ways of placing wrinkles and shadows in order to create the effect of the volume of the fist.

Movement from open hand to squeeze it into a fist.

If you still find it difficult to draw fingers, imagine them as cylindrical elements that connect together to form fingers.

However, sometimes it is necessary to distort the fingers a little to give more depth.
For example, in the image, you see the index finger curved unnaturally, but it looks much more realistic than direct reference.
How to draw a hand with a pencil step by step
Step one.

Step two.

Step three.

Step four.

Step five.

1. Marking the contour of the hand

Indeed, if you need to draw a hand on the whole sheet of paper, then it is easier to outline the outline of your hand, and then, using some of the tips from this lesson, just add details.
If you need to draw a hand on a smaller scale, then put first two points for the wrist and five points for the fingers.
Please note that not the index, but the middle finger on the hand is the longest.
2. Straight contour lines of the fingers

The length of the fingers is different. They say that musicians have very long fingers. The nobles had long and refined fingers emphasizing aristocratic origins. Maybe, but we will draw an ordinary hand, so divide the segment where the little finger will be in half, and draw a line from it, parallel to the points outlined earlier.
For the thumb, draw a rectangular outline.
3. Draw the real outlines of the fingers of the hand

At this stage, you only need to trace the straight outlines of the fingers with a pencil and give them real shapes. Perhaps these preliminary contours will turn out to be inaccurate, then, the shape of each finger can be specified separately.
4. General contour line of the hand

In this step, you can correct the contours of the fingers. Make the "corner" for the thumb deeper, but you can leave the original outline as you like.
Make a marking of the phalanges and remove unnecessary contour lines from the drawing.
5. The hand drawing is almost complete.

First of all, draw your fingernails on your hand. Select with a few strokes the joints of the fingers and we can say that the drawing of the hand is finished. All that remains is to draw a few details in the next step.
6. How to draw a hand. Shadows

Human hands have "wrinkles" or folds in the joints that stretch as the fingers are clenched, make these areas darker. There is an area between the fingers that you also want to highlight. To make the hand look three-dimensional in the figure, you can make part of the contour lines darker and thicker. In this case, choose which side you will have your light source on.
It may seem that drawing a hand is not difficult at all. Try to draw, and then compare your hand with the resulting drawing.
Anatomy
Most important fact- the fact that the hands are concave from the side of the palm and convex from the back. The bulges are so located around the circumference of the palm that it can even hold liquid in it. Hand served primitive man cup, and with two palms folded in the shape of a bowl, he was able to eat food that he could not hold with his fingers alone. The large muscle of the thumb is one of the most important in the hand. This muscle, in interaction with the muscles of the other fingers, provides a grip so strong that it allows you to keep your own weight in suspension. This powerful muscle can hold a club, a bow, or a spear. It can be said that the existence of animals depends on their muscles of the jaws, and the existence of man depends on his hands. 
It is worth noting the powerful tendon attached to the base of the hand and how the tendons of the fingers are grouped on the back of the hand. These tendons can control all the fingers together or each one separately. The muscles that pull these tendons are located on the forearm. Luckily for the artist, tendons are mostly hidden from view. In children and young people, the tendons on the back of the hand are not visible, but with age they become more noticeable. 
The bones and tendons on the back of the hand are close to the surface, but those around the palm and inside fingers are hidden from view. There is a pad at the base of each toe. It protects the underlying bones and creates a grip on the held object.
Hand proportions
The next important thing is the crooked position of the fingertips and joints. Two fingers rest on either side of the line drawn through the middle of the palm. The middle finger tendon bisects the back of the hand. Also important is the fact that the thumb moves at right angles to the movement of the other fingers. The knuckles are located just in front of the folds below them on the inside of the palm. Notice the curves along which the knuckles are located and that the curve gets steeper the closer the knuckles are to the fingertips. 
The middle finger is the key finger that determines the length of the palm. The length of this finger to the joint is slightly more than half the length of the palm. The width of the palm is slightly more than half of its length on the inner side. The index finger is almost flush with the base of the middle finger nail. The ring finger is almost the same length as the index finger. The tip of the little finger is almost flush with the last joint of the ring finger. 
The figure shows how to correctly determine the position of the palm depression. Also notice the curve of the back of the hand. Hands will not look natural and grippy until the artist has mastered these details. The hands in the figure are depicted as if they were holding an object. A loud sound of applause is produced by a sharp squeezing of air between the hollows of two palms. Poorly drawn hands will appear unable to applaud. 


Female hands
The hands of women differ from men mainly in that they have smaller bones, muscles are not so strongly expressed and a large roundness of planes. If the middle finger is made at least half the length of the palm, the hand will be more graceful and feminine. Long fingers, oval in shape, add charm. 


Man's hands


The hands of babies

Children's hands are on their own good exercise in drawing. The main difference from the hands of adults is that the palm is significantly thicker compared to the small fingers. The muscles of the thumb and base of the palm are very voluminous, even small children can support their own weight. The knuckles on the back of the hand are hidden by flesh and are visible in the dimples. The base of the palm is completely surrounded by folds; it is much thicker than the pads under the fingers. 
Hands of children and adolescents
The proportions remain largely the same. Aged primary school the difference between the hand of a boy and a girl is small, but in adolescence there are big changes. The boy's hand is bigger and stronger, showing the development of bones and muscles. Girls' bones remain smaller, so they never develop knuckles as big as boys. The base of the palms also develops more in boys; in girls, it is much softer and smoother. Boys' nails, like fingers, are slightly wider. 
Children's hands are a cross between the hands of an infant and the hands of a teenager. This means that the muscles of the thumb and base of the hand are proportionally thicker than that of an adult, but thinner than that of an infant's fingers. The fingers in relation to the palm are the same as in adults. The arm as a whole is smaller, slightly fuller, dimpled, and the joints are of course more rounded.
Elderly hands
Having mastered the construction of hands, you will enjoy drawing the hands of the elderly. In fact, they are easier to draw than the hands of young people, because the anatomy and construction of the hand is more visible. The basic construction is the same, but the fingers get thicker, the joints are larger, the knuckles are protruding more. The skin becomes wrinkled, but it is only necessary to accentuate this wrinkling in a close-up view. 
Let's start ! Start drawing basic shapes and lines. This is helpful so that you can keep the shape of your hand and the proportions of the joints.

First, draw along the baseline of the upper and visible end of the forearm at the level of the wrist!

Now draw the basic shape of the index finger!

And now along the base of the thumb of the line and the shape of himself. The hand took shape pretty quickly.

And now draw the shape of the middle finger!

The next step is unnamed. The fingers become less and less visible. But the joints line up and the proportion and beauty of the lines is noticeable.

And now your last finger on basic form- drawing for a little finger - little finger! And you did everything quickly in the basic hand shape from the first step!

Now draw your fingernails as you can see them in yourself or in photographs.

Draw small details of the folds in the joints and folds of the skin. They are on both sides. The hand in a relaxed state tends to clench.

Here are some small parts, which you also need to draw to make the drawing realistic /

You did it! Now you have to apply shadows and lights yourself.

First, start drawing your hand with anatomical tips! We will try to refresh or replenish our knowledge about the structure of the human body. This is very helpful because most aspiring artists can have a hard time getting their hands on. Well, let's start with anatomy and you will better understand the drawing of a human hand!

Here is a slightly enlarged anatomy of your fingers so you can get a better look at the bones and remember their main parts. We will always use them for the base of the hand drawing.

It may not seem important, but when you are drawing larger hands you will need help choosing the type of nails. You can choose the best ones for your character in the picture!

And here is some extra help in the drawing so that you can clearly notice and compare the difference for your character's age and gender!

Here are some hand sketches to give an idea of the realistic hand drawing style! You should start in any style based on their actual appearance.

And now the options for the hands from the comics or fairytale characters... These are just a few examples. You won't notice too big difference between realistic and comic or fantasy style.

In the cartoon style, there are more noticeable differences from the realism. It's always helpful if you look closely at this particular detail in the cartoons you're watching, and then you can pick a style you like and start creating your own for that part of the drawing.

If you have animal characters, then these examples will come in handy! Basically, when your animal character is walking on two legs, his / her front arms or paws are more like real hands and arms, so you should draw them like human hands, only with some specificity and style of animals.

And now, the last part of preparing to draw the hand. This possible options, angles and positions of hands and fingers. First, let's look at the simpler options and grasp the basic principle for the joints and proportions of the fingers and palms. For a woman's hand, you can increase flexibility, and for a man's, increase angularity.

Step 10.
Now the drawings are a little more difficult, from a different point of view and angle! This is the expression of emotions, gestures, accompanying words and actions.

This part of the preparation will already be really difficult, but not impossible! When you start drawing hands harder than these, you will remember with a smile. We're just looking at the tip of the iceberg in terms of base and shapes, and we'll start to grow towards hatching, shading, and color grading and editing. And now we are still just warming up!

1. You can fit several options for hand reversals at once. Mark them using an oval base and a guide line.
2. How to draw hands. Start drawing individual fingers.
3. The next step is to draw in more detail the outlines.
4. Erase unnecessary lines, mark the small folds of the skin and nails.
5. How to draw hands. With a TM pencil, shade the shadow on the brush, just try not to darken immediately.
6. The next brush is expanded a little differently. This angle can be used quite often in drawings. Outline the overall shape.
7. Refine the drawing of the fingertips. How to draw a cat.
8. Draw marigolds with a sharpened pencil.
9. Use a soft eraser to remove all unnecessary construction lines. How to draw a dragon.
10. Feel free to start the black-and-white study.
11. Now you can try to draw horizontal arms. Just like in the previous sketches, start by laying out the overall shape.
12. Work out in detail the contours of the hands.
13.Using soft pencil you can add accents to the drawing to make it look natural.
14. Hard pencil draw a shadow on the lower arm.
15. Do the same with the top.
STEP 3. Anime hands
Here is a typical anime / manga hand as it looks painted with open fingers, when painted it should be finished with something like this.
STEP 4.anime hands
Begin this first drawing step by drawing an inverted bell shape for the middle of the arm. Once this is drawn, add five lines for the fingers. I've added some arrows to show you how far apart each finger should look.
STEP 5.
Now that you have drawn the skeleton of the hand, you can add three circles on each finger. These circles will help you draw anime / manga finger shapes. Draw a line for the wrist before moving on to the next step.
STEP 6.
In this sixth step, we will start drawing the shape of the fingers and hand. Once this is done, add the shape right side wrists.
STEP 7.How to draw hands
In this step, we will simply add lines for the joint and bones of the wrist. Once this is done, start erasing all the instructions and shapes that we drew in the previous steps.
STEP 8.
this is how your hand should look roughly
STEP 10: draw anime hands
Start a clenched fist in the center of the square, this will help you draw individual fingers.
STEP 12.How to draw anime hands
In this next step, you will start adding lines for the fingers and knuckles. Once that's done, add a shaping line for the left side of the wrist.
STEP 14.Learning to draw hands
Once you're done it should look like mine. Hope you enjoyed this tutorial.
To begin with, you should pay attention to our hands. They are made up of three parts: the shoulder, the forearm, and the hand. Each of them can be depicted in the form of ovals, well, or you just need to learn how to draw a hand right away. If you are depicting a lowered hand, then the tips of the fingers will reach the middle of the thigh, and the elbows will be at the level of the waist.

Here we examined a method with a simplified shape of the hand, now we will improve it in order to make it look more natural. When you draw your hands, you don't need to draw them too evenly. We start with the shoulder, it has a smooth bend, near the elbow the arm narrows slightly and expands again in the place where the biceps is.
The elbow will be somewhat difficult to draw, because this is not just a fold, it is a joint, a hinge.

Next is a brush. Let's imagine each of the segments as a cylinder, and now turn your hand upside down and you will see three almost identical segments on each finger. Well, because all fingers are different in length, the pads and folds that are between them do not line up.
Start drawing the hand from the knuckles of the pitted fingers. The first joint is the largest of all three. The second joint is located between the two (in the middle), it is smaller and shorter than the first, but longer than the third joint - the tip of the finger. All fingers cannot be drawn in this way, since each finger has a different length.

From the top of the phalanx of the fingers, you need to draw with straight lines, and from the side of the palm, rounded.

But let's not forget that the male hand is slightly different from the female. Male hand more massive and more sinewy. There are three options for drawing a hand: Muscular, toned and weak. 
Perhaps For sketching or to see some parts, I don’t know .:
No aspect of drawing is as difficult as. There is very little normal material on the topic. The biggest difficulties arise precisely with the search suitable material... Your hands are the finest material available to study. Perhaps you have never looked at them under the light. In most cases, people learn how to draw hands on their own. Any teacher can only point out the facts that are connected with your hands.
The study of hands, excluding the study of anatomy, mainly consists of comparative analysis measurements. The fingers have a certain length in relation to the palm; the space between the joints of the fingers is specifically proportional to the entire toe. The palm is wide enough in relation to the length. The distance between the knuckles on the back of the toe is greater than the same distance between the folds on the back. The length of the longest finger, from its tip to the third knuckle, is equal to half the length of the hand from the pad of the finger to the wrist. The length of the thumb almost reaches the second joint of the first toe. The length of the palm is approximately equal to the length of the face from the chin to the hairline. You, like anyone else, can make such comparative measurements.
The most mobile part of the body, it can adapt to an object of significant shape and weight. Such mobility complicates the work of the artist, because the hand can take on a wide variety of positions. Due to certain technical parameters, the hands work constantly. The palm can form a kind of hollow, clenching and unclenching. When the palm is squeezed, the fingers point inward, towards the middle of the palm. There are rather hard nails on the fingers, which sometimes help a lot if you need to grab something. You take the pin with your fingertips; you take the hammer with your fingers and palm. You cannot fully bend your fingers back due to the stiffness of the back of the hand.
This mechanism was invented by nature for pushing movements. As we know, the hand is the most perfect mechanism for performing an almost unlimited number of actions. Added to this perfect instrument is the fact that this instrument is perhaps the most dependent on the brain for its function. Most of the hand movements are subconscious. For example, typing on a computer or typewriter, or playing the piano.
Culturally, man began to train his arms long before he started to train the brain. A newborn begins to use his hands effectively long before he can think. He can grab a burning match, not yet knowing that he might get burned. The history of human progress, dating back to prehistoric times, can be closely associated with the development of hands.
The fact is that hand movements do not require a lot of skill. This may be the reason why there is very little knowledge of hand drawing. Now look at your hands, you will see them differently. Note that before picking up any object, the hands automatically take the appropriate shape. To draw a hand, you first need to take it, study its silhouette, look at its changes so that the hand fits the silhouette. Try grabbing a ball, a peach, or an apple, see how your fingers take shape before you pick up the object. The mechanical principles of hand work are a very important part of drawing.
Only by knowing how hands work can you learn how to draw hands.
The back of the hand is usually drawn in three planes: one is drawn for the thumb and one for the lower index knuckle. The other two are for the back of the hand, gripping the wrist. In most cases, the back of the hand is wavy, and this phenomenon boils down to these three planes. The palm is usually presented in three blocks that surround inner space palms - the arch, the thin base of the thumb, and the small tubercles that are just below the fingers.
When the fingers are bent, the knuckles should be flush with the thumb; when the fingers are extended, the knuckles should not protrude. Care should be taken to straighten the nails because they are on their own. midline which intersects with the middle line of the finger. In other words, the nail can somehow change its position, we will not even notice it.
Continue to study your hands for general knowledge. The muscles are so deeply located that they are no less important than the external forms.
Of the bones available to the eye, knuckles and wrist bones are presented to us on the back of the hand. If you involve your palm in different kinds her activity, the fingers are quite easily attached. Study the comparative length of the fingers and remember that the thumb almost always works at right angles to the rest of the fingers. Get rid of the thought that hands are hard to draw. It's just difficult when you don't know how they work. Once you understand them, your hands become charming.
Remember the very important fact that the palm is sunken, and back side palms are convex. The bumps on the palm are so perfectly aligned that they can even retain fluid. For ancient man the palm was made into a cup. He put his two palms together so he could eat food that he could not grab with his fingers. The thumb muscle is undoubtedly the most important muscle in the palm. This muscle, together with the muscles of the other fingers, gives the person a very strong grip. Thanks to this, a person can even support his own weight. This muscle gives a person the ability to hold a bat, club, bow, spear, etc. The life of an animal directly depends on the strength of the jaw muscles. Man depends on his own hands.
When you perfectly master the features of the structure and proportions of the hand, you can easily use this knowledge to display specific features characteristic of female, infant, children's hands, as well as the hands of the elderly.

1. The line bounding the palm of the hand resembles a "flattened iron" in its shape. This is the perfect shape to start painting your brush. The outlines of the human brush literally amaze the imagination of beauties and the ideality of forms.

2. Drawing a line from the wrist along the BRUSH, we separate the area of the fingers. The auxiliary organ of the hand, the thumb, is bent in relation to the rest of the fingers; without it, the human hand would be helpless.

3. A horizontal line drawn midway between the base of the hand and the tip of the longest finger helps to determine the position of the fingers in relation to the thumb and the rest of the palm.

4. A curved line drawn above the midpoint of the hand shows the base of the fingers. The little finger is the only finger whose base is below the midline. The rest of the fingers start above this line. Distances 1 - 5 can be considered equal. The middle finger is the longest. Each finger is bounded by an oval drawn at the beginning.

5. We already know the length of the middle finger. Toes 1 and 3 can be the same length, but quite often toe 3 is slightly longer. The little finger (4) is shorter than the aforementioned fingers, and the thumb (5) ends slightly above the curved line of the base of the other four fingers.

6. We already know the length of the middle finger. Toes 1 and 3 can be the same length, but quite often toe 3 is slightly longer. The little finger (4) is shorter than the aforementioned fingers, and the thumb (5) ends slightly above the curved line of the base of the other four fingers.

7. At the base of the fingers, there is one peculiarity: small wrinkles bend away from the line of the fingers and follow the arc line representing the base of the fingers.

8. When the hand is straightened and the thumb is placed together with the rest, the palmar wrinkle, shown in the figure above, passes into the line of the upper joint of the thumb. A fold is clearly visible at the base of the thumb, which merges into a line representing the collected skin, similar to an inverted "T".

9. Having determined the location of the joints of the fingers (Figure b), you can depict them with double lines in the first row of joints, if the hand is massive enough. The upper joints are usually depicted in single lines. If the hand is small, then the first row of joints is depicted in single lines. And on very small hands, the joints may not be visible at all.

10. When looking at the palm from behind, the fingers will appear longer. The lines of the boundaries of the fingers reach the lines shown in the figure.

11. If you turn the straightened hand in reverse, then part of the thumb will become invisible. Areas of loose skin on all finger joints will be visible. They will be in the form of small ROUND areas. On the upper joints, these areas are not as clearly visible as on the others. The protuberances of the lower joints take on the shape of ellipses, so the y areas of free skin above these joints are the same. Bones and tendons of the hand are also visible in these places.
The image of hands, or rather hands, is a rather difficult task. Even many successful artists, with skill and landscapes, avoid compositions involving hands. Therefore, having set a task for yourself - learn how to draw hands correctly, you should understand that this is a long and painstaking work... First of all, you need to study the structure of the palm, the physiological basis - the skeleton. Most The best way for this it is drawing from life.

Many give up learning to draw. Fears that they will not be able to overcome difficulties, that they are not talented enough, even prevent them from trying to master the initial drawing skills. They look for reasons and guilty ones, because it is easier to abandon an undertaking than to sweat hard. And this is actually sad. After all, you should understand that the learning process will not be easy. Some lessons are easier and it is enough to practice for a few hours to get satisfactory results. And some moments "at a snap" can not be studied, you need to work long and hard before the first positive results appear. Both in life and in painting, it is easier to give up obstacles than to strain and move on.

In order to start drawing you will need: plain drawing paper, an HB and 2B pencil, an eraser. The first sketch is better done with a barely noticeable HB pencil, and for further shading and adding details, we use the 2B markings.
Step by step instructions
Flip the paper horizontally and split it in half. Put your hand on one half, and start drawing on the other. Imagine that your fingers - cylinders, hands and wrists - are geometric shapes. Thus, we can represent the volumes of which the human hand consists.

First, let's draw some straight lines repeating the axes of the fingers. Then we will set the upper part of the middle finger, little finger and thumb. Between extreme points the axes of the thumb and little finger draw a connecting line to help calculate the distance and it is easier to estimate the distance between the joints in further calculations.
The sketches made may seem to be nonsense, and you may have a question: "How will the hand come out of these lines and lines?" Remember that even great things begin with small ones, and it is impossible to competently build a palm without referring to the physiological structure.


Draw the thickness of the fingers along the marked ellipses so that thin cylinders form.


Erase the dark construction lines and smooth out the image and add small details such as nails, folds and wrinkles.
Then, using the eraser, select light tones and shades, erase the excess lines that remain from the sketches around the arm.
Remember that the mindset with which you get started determines the success or failure of your venture.
When drawing a person, special attention should be paid to both the face and the hands. First, apart from the head, the arms are the most exposed areas of the body. Secondly, they are also expressive and mobile. Along with this, due to the complexity of the connecting joints, convex and flat parts of the hand, the hands can become, and usually are, the most difficult part when studying the structure of the human body.
The first mistake when drawing is too small hands. And here the ability to draw a head comes to the rescue. If you know how to correctly proportion the head, then you can assume that you already have the correct proportions for drawing a hand. If you put your hand on your face, the tip of your middle finger will be in the hairline, and the brush will end at the level of the chin. Here's your main way to measure brush parameters.
I hope you now understand the importance of being able to draw. human body... If you can draw a human body, you can draw anything for two reasons: 1) now you already know enough about the three-dimensional forms of the human body; and 2) if you put this body in a room with various subjects, you can easily determine the dimensions of these objects in relation to the body. And you will also already know that all these objects have their own volume and shape.
Let's go back to the topic - Building a hand.
The hand has two volumetric bulges: one - at the base of the thumb (B), the second - the palm (the rest of the hand) (A). Double rows of finger bones, or wrist bones, are joined to the arm to form one whole. The wrist does not exist in isolation, and it is not attached to the hand by a ball-shaped joint, like wooden dolls. Hand movement begins at the wrist. It tapers slightly at the junction with the forearm. The wrist can also be considered a universal connector because it moves in all directions - up and down, side to side, and can rotate.

The center of the palm is slightly lower than the rest of the hand. For example, if you place your straightened hand on a table, palm down, you will notice that your wrist is not touching the table surface. You will notice that the wrist lifts up where it meets the arm.
The area of the thumb is significantly larger than the area at the base of the little finger. The hand is wider at the base of the fingers than at the junction with the wrist; however, it is higher closer to the wrist. Now pay attention to your hand: the palm is longer than its back. The thumb is attached to the palm of the hand by an independent and highly mobile ball joint, which allows it to actively move independently of the rest of the hand. The palm consists of elastic and soft areas - pillows. The surface of the fingers and the entire palm are covered with many pads. The tips of the fingers are pointed, the middle finger - the longest - is the most high point brushes. The cushions at the tips of the toes are pointed so that they go in the middle towards the middle toe. If you measure the length of your thumb from the top side, it will be equal to the length of your middle toe. The thumb is more powerful than the rest. The constituent parts of the fingers are more square than it might seem at first glance, on the last square is the nail, almost triangular in shape, with bulges on both sides, forming the place of growth of the nail. You will better memorize the structure of the hand if you study the structure of the skeleton of the hand, after which problems with drawing the hand will never arise again.
Knowledge of the structure of the joints, their movement and limitation in movement is very important. The first joint of the thumb and the first two joints of the remaining fingers are articulated. They can only move up and down, but not sideways and rotationally. When you spread the fingers apart, the top-most joints of each toe are bent backward. The lower joints of the fingers will bend forward, while the upper joints or the tips of the fingers cannot be bent even at right angles. Note that the top two pivot joints can only flex at 90 degrees. The lower joints of the fingers, like those on the wrist, are ball joints. There are tons of hand positions and structures to learn. Even when drawing, you can use your free hand as a model. Place a mirror in front of you and it will give you more possibilities study the position of your free hand.
1. The first step in drawing a hand in motion is the position of the fingers and hand. Draw a hand in motion and determine the approximate position of the hand.
2. Then select the volumetric areas - divide the brush into parts, this will help you determine where are convex and where are flat areas.
4. Add shadows at the end.

Memorize this lesson, buy an anatomy textbook and study it. You can study the structure of the hand forever, and you may never be able to draw a hand in the same position twice. Every time you practice hand drawing, you learn something new. Remember, your hands are just as important as your face. And they require the same attention and close scrutiny.
Hope you find this tutorial helpful.
Successful work!
 The image of hands is one of the most thorny tasks that a novice artist faces. What are hands? Yes, we see them every day, they are constantly in front of us, because we perform most of our actions with the help of them, but on initial stage hand drawing- these seemingly visual parts of the body, difficulties always arise. On this online lesson in drawing, I will try to teach you how, without much difficulty, to understand the plasticity of the hand and the technique of its execution.
1) To learn how to draw hands, first you just need to try to sketch (at least from the pictures below), from your own hands, from photographs, and after that, when you encounter certain difficulties, you can study this article in detail and here you will already find answers to common mistakes and some subtleties and tricks when drawing hands.

2) Each drawing naturally begins with a sketch or sketch. A drawing that is done correctly and proportionally is obliged primarily to a sketch. A sketch, especially of parts of the human body, can only be performed correctly thanks to knowledge of human proportions or anatomical structure. So, what do we know about the proportions of the human palm. In the picture below, we can see that the human palm can be measured in relation to the head - from the jawline to the hairline.

3) The next thing we need to know about the structure of the hand for drawing is that the bones, or knuckles, are not located in a straight line - this is a common mistake - they are located in an arc (see the example). And in general, as for the hands, there are almost never parallel and straight lines... Everything here moves, the hand is multifunctional, the hands are a separate being, they live their own lives.
4) Fingers on the hand different lengths... The longest finger is the middle one, the next in descending order is the ring finger, then the index finger (the last two slightly differ in length), the little finger (reaches the upper joint of the ring finger) and the thumb, although the thumb is equal in length to the little finger, it turns out to be lower than all the others and from this it seems the shortest. You also need to know that the length of the middle finger is almost half the length of the palm. The thumb just slightly misses the second knuckle of the index finger and, basically, when working and moving the hand, it is 90 degrees in relation to the other fingers. The width of the palm is approximately 75% of the length of the palm, or slightly more than half.

5) Despite the fact that the hand is the most flexible and unpredictable, at first glance, part of the body, there are also laws by which the hand, palm and fingers live. We all know these laws, but when we start drawing hands, for some reason we forget about them. The mechanical principle of the hand is that the palm can only open and close, and the fingers bend or curl down towards the middle of the palm, squeezing the metacarpus like a closing flower bud. The hand is concave on the inside and convex on the outside, the fingers grow tightly, when the fingers are folded, they are a continuous continuation of the palm. An incorrect drawing is one in which the fingers are widely spaced from each other or, when added (mentally), gaps are obtained.
To master this, you need to observe the hand while it is holding something, reaching out, grabbing. Only knowing how the hand works, which phalanges are involved in a particular reflex process, can you convincingly draw a hand in motion or in a static state. Here's another piece of advice that I will give you to learn how to draw hands: always divide the palm into three parts: the first part is the base of the palm, the second is the base of the thumb, which cuts off a significant piece from below, and the third is the upper bases of the other four fingers. The thumb muscle (the second part of the palm) is the most powerful of all located in the palm, it is the most important and most visual, the most convex and voluminous. In the middle of the palm, on the inside, there is a characteristic fossa with the lines of fate. My advice to you: when drawing a hand, first sketch out the lines of the hand, then build blocks or those three parts on the basis of the lines, so it will be easier to depict a natural hand.

 6) The bones in the palm and fingers are visible only in the form of knuckles on the back of the hand, in other cases they only form shapes and when sketching they can be depicted by lines along which the hand will be built. The fingers consist of several bones, thanks to which they have a rhythmic shape - from each knuckle to the other they narrow and expand. At the joints, the fingers look a little thicker, on the inside there are folds that are located just above the joint. You also need to study the hinge ability of the fingers to bend, so that later you do not draw an improperly bent finger. The first two joints can bend at right angles, while the upper ones cannot even bend at a sharp angle. Look at the unconscious dependence of the joints, for example: when the second joint flexes, the upper joint automatically flexes. When the fingers are extended, the upper joint tends to lean back.
The tendons on the arm, visible on the back of the hand, appear as threads or lines that form a straight line with each of the midline of the fingers. They appear when the palm is very tense, or arched. Tendons of the back of the hand will be a mistake to depict in children, adolescents and overweight people, since in these cases they are hidden, not noticeable or underdeveloped.

7) Another important thing that we will look at in the online lesson "how to draw hands" is the location of the lines of the fingers. Notice that the middle finger line divides the palm into two equal halves. This line is also at right angles to everyone else. This finger unclenches and squeezes exactly to the palm, while the rest, when squeezed to the palm, tend to its center, and take an angle.
8) How to draw female hands ... As elsewhere, when depicting a woman and her parts, one must remember that the main thing here is smoothness and roundness. The knuckles on the fingers and the outer side of the palm are smaller in women, the fingers are mostly thin. With clenched fingers, they tend to one point more clearly than that of a man, as if a few more centimeters and they would merge into one point.

The hand is such a drawing object that is always at hand (sorry for the tautology). Even when you draw with one hand, you always have a second one, in order to see how the palm or finger or phalanx behaves in this or that case. Of course, in the technique of drawing a hand, practice is considered the main thing, studying anatomy, behavior and structure is half the battle, and then you need to train and train. The hand is such a part of the body that you do not have to draw twice in the same position, so each time you will learn it in a new way, but thanks to the basic knowledge that you received, these will be little things that you can easily build around the base of the sketch.

Follow the site releases and in the next updates of the Articles section, there will be new tutorials on drawing parts of the human body.
Want to make a good impression on the people around you? In the Duhi Original online store you will find Montale perfumes that you can buy at the most affordable prices. A wide range of products with aromas for every taste.
Perhaps no aspect of the drawing is accompanied by much disorder and is presented with less adequate material for research than the drawing of hands. Much of this trouble is caused by the fact that you rush to look for material anywhere, instead of looking at your own hands. You have best source information is constantly available. Perhaps you have never thought of them in that sense. Hand drawing should be based on to a large extent on myself. After all, any teacher cannot explain to you more than you can learn by carefully studying your own hands.
Examination of the hands, in addition to studying their anatomical construction, consists mainly of considering the size different parts compared. The fingers are of a certain length relative to the palm; the joints of the fingers are in a certain proportion in relation to the whole finger. The palm is wide and long. The distance between the joints on the outside of the fingers is greater than between the folds on the inside. The length of the longest finger, from its base to the third joint at the back, is actually half the length of the back of the hand from the tip of the finger to the wrist. The tip of the thumb reaches almost to the second joint of the index finger. Palm length - equal to the length of the face from the chin to the hairline. You can take these comparison measurements on yourself or someone else.
The arm is the most flexible and adaptable part of the anatomy of the body, it can embrace an object of any shape and size comparable to it. This flexibility is also difficult for the artist, because the whole hand can assume different positions. But still, the mechanical principle of the hands remains constant. The palm opens and closes, and the fingers curl inward towards the middle of the palm. Nails are a very convenient exercise for learning how the fingers work, as they need to be gripped accurately and firmly; you pick up the pin with your fingertips; take the hammer with your fingers and palm. The back of the hand is more or less resistant to the back pressure of the fingers, and is used in pushing (it is rather difficult to bend the fingers back). The hand is the most perfect mechanism we know for achieving a wide variety of purposes. In addition to its perfection, the hand is more closely and precisely coordinated with the brain than any other part of the body. Many of her movements are controlled by subconscious reflexes; for example, typing and playing the piano.
Man began to operate with his hands before his brain and cultural level developed. The infant can use his hands effectively before he can think. The history of human advancement since ancient times is closely related to the adaptability of the human hand.
The fact is that the hands and their movements require such a small conscious impulse that it is surprising to be aware of it from the outside. Look now at your own hands; you will see in the illustration how the hand automatically assumes a shape suitable for grasping the object.
To draw a hand as you draw an object, you must first examine the outline of the object, then observe how the automatic adjustment of the hand matches that outline. Watch your fingers before grabbing and squeezing a peach or apple. The principle of the grasping mechanism is very important in the drawing of the hand. Only by knowing this how it actually works can a hand be drawn convincingly. To draw a hand as you sketch a person, you must first examine the outline of the object, then note how the position of the hand corresponds to that outline. First, before you take and squeeze a peach or apple in your fist, observe your fingers to notice how they behave before grasping. The reflex principle is very important in hand drawing. Only by knowing how the hand actually works can it be drawn convincingly. The back of the palm can be drawn in three planes - the first for the section of the thumb to the joint of the base of the index, and the other two along the palm, tapering towards the wrist. For most actions, the back of the hand bends. Typically, the palm is made up of three blocks surrounding the inside of the palm — the base of the palm, the thick base of the thumb, and the base of the rest of the fingers. The joint between the fingers and the thumb is a connecting joint, adapted to move the thumb towards the palm inward or pull it at an angle of 900 to the palm. We also need to carefully align the nails so that they lie on the same plane with the outer surface of the fingers and are a continuation of the midline of each finger. Otherwise, the nail will be crooked, and you will not understand why.
Continue to study your own hands to learn about hands in general. The internal muscles are so deep that they are not as important as the external shapes. The only bones we see are the knuckles on the outside of the joints and wrists. If you are drawing the palm in action, the fingers can be quite simply attached to the joints and aligned correctly. Examine the comparative length of the fingers; remember that the thumb works mostly at right angles to the rest of the fingers. Get rid of the idea that hands are difficult to draw. It's just very easy to get confused if you don't know how they work. It all becomes much easier when you figure it out.
The most important thing to remember about the hand is that it is concave on the inside and curved on the outside. The fingers grow so tightly that even liquid can be held in the palm of your hand. The hand served as a cup and spoon for primitive man, he picked up in a handful what he could not take with his fingers.
The thumb muscle is perhaps the most important muscle in the hand. This muscle, supporting or opposing the rest of the fingers, gave a person the ability to make a very strong grip, capable of holding even a human body in weight. This muscle helped a person to hold a spear, a club. Just as animals often depend on the strength of their jaws, so humans depend on the strength of their hands.
When you become familiar with the structure and proportions of the hand (Fig. 77 - 85), it will be easier and more convenient for you to display the features of female hands, the hands of babies, children, and the elderly.
Figure 77. Anatomy of the hand. 
Pay attention to the tendons located on the dorsum
the side of the palm that extends towards the fingers. They perform
a huge feature: they can be used to compress and decompress
palm, and also move each finger separately.
The muscles that control these tendons are located
in the forearm. Fortunately for artists, most
tendons are hidden under the skin and muscles, and invisibly.
In children and adolescents, the tendons of the hands are not visible, they
show through in old age.
Figure 78. Blocks that form a hand 
On the back of the hand, bones and tendons are located close to the skin; those on the sides and on the inside of the palm are additional. I have mapped these surfaces in such a way that it will be easier for you to familiarize yourself with them. Pay attention to the thick, fleshy "pads" in
the base of the thumb and the base of the palm. A pad is present at the base of each finger, and together they encircle the top of the palm. The muscles in the fingers protect the bones. Due to their elasticity, they
provide good coordination of movements, as good tires provide traction on the road. There are no muscle pads on the outside of the palm,
but on the other hand, the muscle is well protected by the outer surface of the little finger, so much that it can withstand quite swipe especially when the fist is clenched.
Figure 79. Hand proportions 
The next important thing is the curved lines that can be drawn through the fingertips and joints. If you divide your palm in half along an imaginary line, then there will be two fingers on each side of it. The tendon of the middle finger roughly halves the outside of the palm. Notice also that the thumb grows almost at right angles to the rest of the toes. It can be moved perpendicularly from the palm to it, while the rest of the fingers are clenched and unclenched parallel to the palm. The finger joints are located slightly above the folds on the inside of the fingers. Draw imaginary curved lines: the curve across the base of the fingers will be shallow, the intersecting joints will be steeper, and the steepest will be the line across the fingertips.
The middle finger is the key finger, by which we determine the length of the hand. The ratio of the length of this finger to its joint at the back is slightly more than half the length of the arm.
The width of the palm is slightly more than half the length of the inner side of the palm. The index finger reaches approximately the length of the middle finger nail, the ring finger is approximately equal to the index finger. The little finger reaches only the upper joint of the ring finger.
Figure 80. Constructing an arm 
Figure 81. Inner part palms (fossa) 
In the picture above, note how carefully the turnout is indicated in the middle of the palm. Also note the curve around inner side palms. Hands never appear natural or graspable until artists understand this trait. All of these hands look like they are holding or grasping something. A loud clapping sound comes from the sudden compression of air between these two pits in the palms. A hand that does not appear capable of grasping and clapping is poorly drawn. Examine your own hands to be sure.
Figure 82. Drawing hands in perspective 
Figure 83. Hand in action 
Figure 84. Joints 
Figure 85. Drawing your own hand 
Figure 86. Female hand 
Women's hands, like their faces, differ from men's mainly in smaller bones and more delicate muscles, and generally more rounded surfaces. For more grace in the hand, the middle finger should be about half the length of the palm, oval nails also add grace. Even though women's hands are thin, they can be very squeezed and tenacious.
Figure 87. Toes, tapering towards the ends, in motion. 
Figure 88. Learn a lot different poses hands. 
There is only one the right way to learn how to draw hands is to do a lot, a lot of sketches. When drawing hands, more than anywhere else, their position is significant. Extend your fingers along your palm before examining them in detail. Hands are almost never completely straight and flat. Take a close look at the space between the knuckles. Most of time we see them not in direct projection, but in perspective, as shown in chapters 82-85.
Figure 89. Baby's hand 
The hands of infants are examined separately. Their main difference from the hands of adults is that the palm is thicker in relation to the smaller fingers. The muscles of the base of the thumb and base of the palm are relatively strong in young children. Babies can pinch and grasp something equal to their weight. The joints on the outside of the arm are completely hidden by the muscles and are indicated by dimples. The base of the palm is often surrounded by a thick crease. The base of the palm is much wider than its width at the base of the fingers.
Figure 90. Examining the hands of an infant 
Figure 91. Children's hands 
The hands of a child are intermediate between the hands of an infant and a teenager. This means that the thumb muscle and the base of the palm are thicker in relation to adult hand but not as thick as in a child's hand. The fingers grow in relation to the palm in the same way as in adults. The entire arm is smaller, slightly thicker, and more dimpled, and the joints are certainly not as prominent as in adults.
Figure 92. The proportions remain more or less constant. 
In junior school age the difference between the hand of a boy and a girl is small, but in adolescence there are big changes. The boy's hand is much larger, stronger, bones and muscles are more developed. The base of the palm, the joints of the fingers are more developed in the boy, and in the girl the hand is thinner and more delicate, the bones in it are smaller. On the boy's hand, the nails, as well as the fingers, are slightly wider.
Figure 93. Hand of an elderly person 
If you have mastered the construction of the hand skillfully, drawing the hands of old people is a pleasure for you. In fact, they are easier to draw than the hands of young people, since the structure and anatomy are more clearly visible there. Main features: thicker fingers, protruding joints. The skin becomes wrinkled, but this should only be drawn in close-ups.


")


- How to cook awesomely delicious oven baked cauliflower with sour cream and cheese?
- Three coins will tell about good luck
- Christmas sweets. Tasteful gifts. Original ideas for sweet New Year surprises
- Wanga's predictions for Russia literally
- Salad glamor with herring Salad glamor in layers
- Carrot and nut cakes
- Raspberry compote for the winter
- Wanga predictions by years
- Chikhirtma from chicken in azerbaijani
- Building and drawing a section of a building
- How to plant wormwood in the country
- Blueberries: planting and growing
- Garden lily of the valley (kupena) - we grow on a garden plot
- Arrangement of a well in a well Collapse of a tent in a well
- Astragalus malt (Astragalus glycyphyllos
- What to do if a brownie starts up in the house
- Encyclopedia of pets
- Window openings: device according to GOST
- How to get rid of red ants in an apartment
- Boric acid with egg - a remedy for cockroaches and ants