How to draw an old car with a pencil step by step. We draw a car. How to choose the right model
This is a medium-sized lesson. It can be difficult for adults to repeat this lesson, so I do not recommend drawing a car for this lesson for young children, but if there is a great desire, then you can try. I also want to note the lesson "" - be sure to try to repeat it if you have the time and desire to draw today.
What is needed
In order to draw a car, we may need:
- Paper. It is better to take medium-grained special paper: it will be much more pleasant for novice artists to draw on this one.
- Sharpened pencils. I advise you to take several degrees of hardness, each must be used for different purposes.
- Eraser.
- Shading wand. You can use plain paper curled into a cone. Lego will rub off the shading, turning it into a monotone color.
- A little patience.
- Good mood.
Step by step lesson
Drawing a car is difficult, like any complex vehicle, in order to function it must be designed in a certain way. In order not to violate the design features, it is better to see how it looks live. If this is not possible, look at the available photos on the Internet.
By the way, in addition to this lesson, I advise you to pay attention to the lesson "". It will help you improve your skill or just give you a little pleasure.
Please note that every object, every living creature, every phenomenon on paper can be depicted using simple geometric objects: circles, squares and trigolniks. It is they who create the form, it is them that the artist needs to see in the surrounding objects. There is no house, there are several large rectangles and a triangle. This makes it much easier to build complex objects.
Tip: Sketch in as thin strokes as possible. The thicker the strokes of the sketch, the more difficult it will be to erase them later.
The first step, more precisely zero, you always need to mark out a sheet of paper. This will give you an idea of where the drawing will be located. If you place the drawing on half of the sheet, you can use the other half for another drawing. Here is an example of centering a sheet:
STEP 1. The first step is pretty easy. All you have to do is make an elongated shape for the future car. It should look like an oblong box. It even resembles a guitar or violin in some way. Try to repeat exactly as shown in Figure 1.

STEP 2. Using this shape, we will gradually add details and sketch out the real body of the car. It is best to start with the roof and then move on to drawing the wheels and the rear. Do not use rulers or auxiliary tools, as the car has a rounded shape. And here everything is much easier than drawing a helicopter, for example.
But if you want, you can use the ruler to draw the car windows, and later round them by hand.

STEP 3. Start painting the glass. The first is the windshield, later the passenger side window. There might be some Barbie or famous singer Debbie Ryan sitting there. Next, draw the headlights.

STEP 4. In the drawing of the car with a pencil, we see the car from only one side, therefore we draw only one door and the steps under the door. Add window frames. Don't forget to make a handle and a keyhole.

STEP 5. Moving on to the hood. Draw two lines on the hood and below the grill. Next, outline the spoiler liner and bumper.

STEP 6. We are ready to go. It remains only to draw the wheels of the car. Please note that the wheels are not round! Under the weight of the machine, they become a little flat at the bottom. It will look more realistic. Naturally, the tires are not perfectly round.

STEP 7. Finally, we carefully draw the rims. Try to repeat it as in the picture, or you can draw your own version, so they can be of different types and shapes, for every taste and color.

STEP 8. Delete unnecessary auxiliary lines with the eraser and outline the contours. Here's how we should get it:

STEP 9. Coloring.

I sincerely hope that you enjoyed the tutorial on how to draw a racing car. If you put in the effort, I believe that you will achieve everything you wanted. Now you can pay attention to the lesson "" - it is just as interesting and exciting. Share this lesson with your friends on social media. networks.
This lesson is intended for those who are somewhat familiar with drawing and concepts such as: layout, perspective, shadows, etc. Here we look at the nuances of drawing a car with colored watercolor pencils in a dry way and with a regular pencil.
Before starting our lesson, let's ask ourselves a question - why do we need to draw a car, if, for example, it can be photographed? Well, firstly, photography is a separate form of art, and secondly, the car that you are going to depict is a figment of your imagination, and thirdly, a drawn image allows you to more accurately convey details, lighting features, focus on color, etc. and finally, you just enjoy drawing.
How to draw a car with watercolor pencils
So, having decided, let's get down to business. What materials will we need:
- watercolor pencils;
- collet pencils with colored leads;
- simple (graphite) pencil;
- thick Whatman paper about A3 or larger;
- soft eraser;
- fine-grained sandpaper for sharpening colored leads.
Note. Guidelines for drawing a black and white car are a little later in this article. As a matter of fact, no matter what source of the car image you have - a photo, from nature, according to the idea, the main thing is to get a realistic drawing, the metal should look like metal, glass on glass, etc.
Let's look at some of the features of color overlay with watercolor pencils.
- When two colors are mixed to obtain a third, a dark shade is superimposed on a lighter shade.
- Clarity of objects is achieved by tracing along the edge with a sharply sharpened lead of a collet pencil.
- Falling shadows are better made from several colors than from one black. Such compound shadows are also called "living shadows".
Drawing stage
1. Go directly to the car. To begin with, we make an image of the car in the contours with a simple graphite pencil. The final contour drawing should not contain thick lines, since we are going to overlay the color, and graphite may show through the light color tones.
In general, the thinner and paler the lines, the better. In the course of work, some lines will be removed completely. For contour drawings, an automatic pencil with a lead thickness of 0.5 mm and a softness "B" is used.
2. Let's start coloring. If you are right-handed, start painting from the left edge, if you are left-handed - from the right. This is in order not to smudge the drawing. You can also put A5 sheets of paper under your arms so as not to leave prints on whatman paper.
Some artists, applying color, paint over the entire drawing at once, layer by layer refining the image. I do it differently: I select some part of the image or an element and bring it to mind, then move on to the next one. But you can do as you like.

1. Draw clear boundaries of color and outlines of elements with a collet pencil with a sharpened lead of the same shade as the color of this element. This is so that the different colors are clearly separated from each other, i.e. there should be no loose borders.
2. Whiten smooth color transitions with a white pencil, in some cases, to create a transition, adjacent colors can be rubbed with cotton wool. In general, I recommend that you blend the drawing with a white pencil for a smoother color. Try not to blemish when working with dark shades, as they do not erase very well with an eraser. Some points can be corrected with a white pencil. Multi-layer areas can be scraped off with a blunt cutter.
3. When drawing, often evaluate your work a little from a distance in order to detect and correct possible mistakes in time. I draw your attention to the fact that in order to get a good result, working with watercolor pencils, you need to show some diligence and patience. Over time, you will develop your own drawing techniques. At the end of the work, use the eraser to remove any dirt, if any, around the design.
4. And of course, sign your autograph!

How to draw a car with a pencil step by step
1. So, for the phased drawing of the car, we need to start with the wheels. Draw a line for yourself, which will be the main one. Draw two circles and discs for them. You can use a curly ruler or compasses if you find it difficult to draw circles. You need to draw with an ordinary soft pencil, make the lines thin so that you can erase them easier.


3. Now, in order not to get confused, first draw the headlights, then the number, the entire bumper, car doors and other small details.

4. At the last stage, you need to draw in more detail everything that should be on our machine. Headlights, license plate, door lines, etc.

In this lesson, you will learn how to quickly draw a crossover car, step by step with a pencil. The car in this class is slightly larger and heavier than other types of passenger cars, so the wheels of this car are taller and wider than those of conventional cars. For better off-road cross-country ability, this car has a high suspension, that is, there will be more clearance for the body and the earth. The modern streamlined design of the car body is not very easy to reflect in the drawing, so we will draw the car without additional design elements, only the base of the car body.
If you can do it right draw a car step by step with a pencil, you can then add additional design elements, such as an air intake and a spoiler, etc. A picture drawn with a pencil can be colored with crayons in the penultimate step of this lesson.
1. Draw a simple general outline of the machine

Draw car it is not easy, therefore it is necessary to make the correct preliminary marking of the general contour of the machine. To make this easier, draw two parallel lines 2.5 cm apart. Divide these lines with two segments 6 and 8 cm. If you draw a car larger, on the whole sheet of paper, then increase these numbers proportionally. At the same stage of the drawing, next to the straight lines, draw lines at an angle, and delete the first contour lines.
2. Draw the outlines of the roof and wheels

Try to make exactly the same markings for the wheels as in my picture. Note that the right front wheel is farther from the vertical edge of the outline than the left wheel. And the contours of the wheels themselves are not square, but rectangular. The outline of the roof of the car is easier to draw, however, try to make it as accurate as possible.
3. We begin to draw the shape of the car body

At first, it is better to draw the streamlined lines of the body shape together with the hood, and then start drawing the outlines of the wheel arch liners. Between the outlines of the wheels, draw the lower part of the car body. Do not rush to draw everything at once, look carefully at drawing machine again before moving on to the next step.
4. Shape of body and wheels

Start this step by removing any extra contour lines from the drawing. After that start drawing the car wheels. You may not be able to draw perfect circles right away, so do not press hard on the pencil. Now start drawing body parts, glass, headlights. Detailed instructions on how draw a car it is impossible to give, just be careful.
5. Finishing touches on the car drawing

Wheels for a car are tricky to draw because they have to be perfectly round and the same. But drawing discs is not difficult. Any symmetrical shape, such as a star, is suitable for drawing a disk. When you draw the side windows for the car, do not forget to draw the side mirror as well. Draw the rest of the body parts at your discretion, the main thing is that you can correctly and symmetrically draw the shape of the body and wheels.
6. How to draw a car. The final step

If your drawing of the car will be made using the technique of a simple pencil, then it is imperative to shade the drawing. This will give the car picture a three-dimensional look, volume. But, probably, any car will look prettier if you paint it with colored pencils. It is imperative to draw the road and the landscape surrounding the car, then your drawing of the car will be a real picture.
Sports cars have a more streamlined dynamic design and a low stance. In addition, they have low and wide car tires. This is necessary for greater stability on bends and better grip of the car with the road. The rest of the drawing of a sports car does not differ from that of an ordinary passenger car.
The tank is one of the most complex military vehicles in design. The most important thing in drawing a tank, as well as in drawing a car, is to draw its frame correctly.
Nowadays it is rare to find wooden sailing ships. But even now they are the subject of many drawings. On our site there are many lessons in drawing techniques, including machines. In this lesson we will learn how to draw a ship in stages.
Drawing an airplane is not so difficult, much easier than, for example, drawing a car. In order to draw an airplane, you just need to know some of the features of its structure. For example, military aircraft, unlike passenger ones, do not have a passenger compartment, but only a cockpit.
Let's try to draw a hockey player in motion in stages, with a stick and a puck. You may even be able to draw your favorite hockey player or goalkeeper.
It is better to draw a tram against the background of a cityscape. Draw a road, cars, and if you wish, you can draw people entering the tram.
It seems to me that you can draw a car using diagrams and tips, and it's even easier to sketch from a finished coloring book, for example. I think it’s best to draw with diagrams to convey the accuracy of our drawing.
For example, you can draw a car in profile, then only part of the car will be visible - side, two wheels, windows. You can draw a car from above. Then we depict the roof, the hood, but we do not see the wheels, windows and doors.
Take your pick.
It is best to draw starting with the wheels - see below the drawing diagram in stages. Draw a couple of circles at once on a piece of paper. Next, draw the shape of the car as you want. It can be a sports car, a passenger car, such as "Zhiguli", or a small truck.
In a sports car, make the body a little more elongated, let the fit be low. Only the doors and glass in them are visible from the side. But you can turn car from different angles.
These options are complex. For a child, you can offer a typewriter based on a rectangle that needs to be divided into parts. In them, it is easier to draw a car in parts - wheels, doors and windows.
The easiest option is to draw a simple car in profile. There is nothing difficult here and a child is not gifted with a talent for drawing to cope with it. See for yourself with a few examples:


But draw volumetric the car is more complicated - you need to observe proportions, evenness of lines, details. Here are some step-by-step tutorials.


I offer a variant of the coolest car, which cannot be compared with anything else. Boys love everything beautiful, especially cool cars. Therefore, you should not choose the simplest option, but focus on complex, beautiful models.


Erase the extra lines and voila!

Cars, they are different. Let's draw something like that. Let's start with a basic rectangular wireframe. Remember the perspective.

We begin to enter our super car there.

Don't forget about the wheels.

You can add volume.

I will try to give examples of not complicated schemes for the phased drawing of a car. Let's prepare paper, eraser, pencil. In the end, at your discretion, of course, you can make a drawing in color, or you can leave it completely in pencil and shade with a simple pencil. So, let's start drawing. For example, here's a car: first draw a rectangle, roughly marking the places where the wheels will be. Then we cut off the corners - where the windshield will be, and a little behind. We begin to draw the kols. And so on, as shown in the diagram, we move in steps.

Next - one more scheme, this time we draw an SUV. The scheme is the same, we start drawing with a rectangle, then an integral part of any car - a wheel. And then, as shown in the stages, we simply repeat all the actions. Good luck with your drawing!

Who should draw the car? After all, a 4-year-old child can simply draw a rectangle and two circles and say that this is a car. And an older child will already be able to portray something like this:

First, an arbitrarily elongated rectangle is drawn and since the car is with an open top, there is no need to depict the side and rear windows - the front glass is enough. A place for the wheels is selected. The front and rear bumpers are shown. Front and rear lights are shown, it is important to divide them into two parts, one of which will be the side signal.
In addition, there are still a lot of interesting schemes and lessons. Here are just a few of them:
How to draw a Niva car? she is VAZ 2121 🙂
How to draw a fire engine with a pencil step by step?
How to draw a police car with a pencil step by step?
How to draw a car Audiquot ;?
The simplest car can be drawn in four simple steps:

It turned out to be quite a nice machine.
And this is how you can draw a truck (eight steps are required for this):

Enjoy the drawing process, everyone.
I propose for drawing one with light options for drawing a car.
Prepare a sheet of paper, an eraser, a pencil ruler and colored pencils.

Good luck with your creativity and inspiration!
To draw a car in stages, we need a pencil, an eraser and a ruler for more complicated models. First you need to learn the technique of drawing on simple car models and gradually move on to more complex ones.
Here is the model simpler:

And here more difficult:

More models can be found on this site. Here you can enlarge the image, print it and use it as a coloring.
Draw a rectangle. Then a trapezoid above it. It turns out the body of the future car. Next, you need to draw tires, headlights. A simple drawing can be suggested for a child. Here's what I found.

Immediately draw windows, as in the picture, glass.
Erase the excess with an eraser, then you can draw with paints or felt-tip pens.
You can draw a sports car. For example, this.

Gold paint can be replaced with yellow paint.
Here you are laughing, and the appearance of this car is actually a work of art. Now it seems to us that the coolest appearance can only be with Lamborghini or. It used to be different. At the beginning of the 20th century, it was believed that the most advanced art form was cubism, or rather the desire to see regular geometric shapes in objects. It was fashionable in France, and then it got to the Soviet Union. Well, it's true, the French still believed that the car should be comfortable, reliable and durable, but this is the technical side of the issue. The soul of a Russian person requires external beauty. And so this work of art happened:
How to draw a Zhiguli with a pencil step by step
Step one. I draw rectangular shapes of the car's cabin.  Step two. I'll add wheels.
  Step three. Now headlights and work on the appearance.
 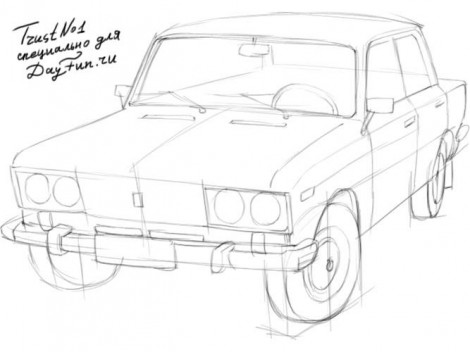 Step four. I will add shadows on the wheels.
  Step five. Here's what I got a Zhiguli drawing: If you drove a Zhiguli, like it. And draw more other cars:
- Domestic cult car -


- Characteristics of the hero Pechorin, Hero of our time, Lermontov
- Short biography of Leo Tolstoy: the most important events
- The ninth wave analysis of the picture
- Essays for all classes
- Vasily Stalin's children their fate
- How many peoples live on the territory of Russia
- The most numerous peoples in the world
- Biography Where did Tolstoy Lev Nikolaevich serve?
- Theater "baikal" is the best dance group in russia!
- Mussorgsky short biography and interesting facts
- The image of Tatyana Larina in the novel “Eugene Onegin The character of the main character
- The play "Thunderstorm" and its heroes
- The history of the creation of the novel crime and punishment of dostoevsky
- The main characters of Ostrovsky's "The Thunderstorms"
- A short image of Khlestakov in the comedy "The Inspector General": a man without moral principles
- Characteristics of Tatyana Larina Portrait of Tatyana Larina in the novel Eugene Onegin
- The image of Tatiana Larina in the novel "Eugene Onegin Tatiana in the story of Eugene Onegin
- The play "The Thunderstorm" and its heroes Speech characteristics of the heroes of the thunderstorm quotes
- The image of the Box in the poem 'Dead Souls' N
- Analysis "The Cherry Orchard" Chekhov Questions for the analysis of the play Cherry Orchard